
Overview
In warehouse management and order fulfillment operations, picklists refer to a list of items or products that need to be picked, packed, and shipped to customers.
Picking, on the other hand, is the process of scanning the items listed on the picklist from their respective storage locations (i.e. bins) in a warehouse. Picking can be a time-consuming process that requires attention to detail to ensure accuracy and minimize errors. Efficient picking is essential for meeting customer demands and maintaining inventory accuracy. Working on picklists is possible through the Skustack app, while generating new ones, monitoring their progress, and exporting data can be done through the Skustack Admin.
Picking Modules
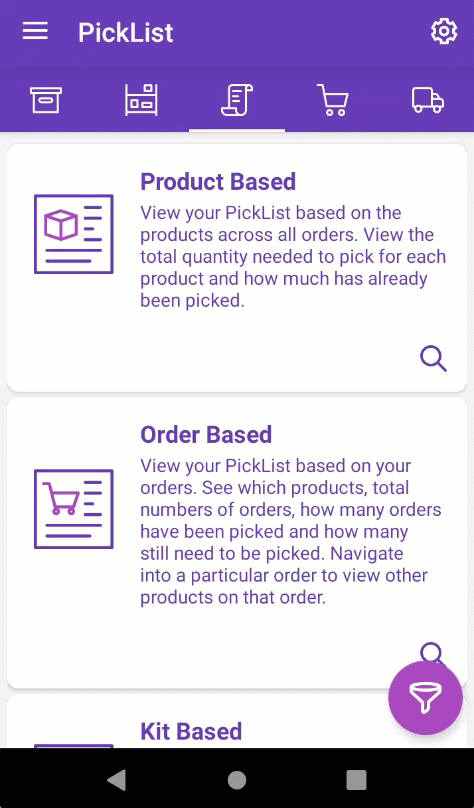
The PickList tab is where you can access all the modules designed to assist you in managing the process of picking items for orders. Learn more about the PickList tab here.
When an item is picked from a bin, it is automatically transferred to the warehouse’s Picking Bin. The picking bin is created by the system, with a unique picking bin for every warehouse. For example, Default Warehouse with ID “86” will have a picking bin named PickingBin Warehouse-86.
There are three ways you can pick products:
- Product Based – Recommended for picking single-item orders.
- Order Based – Recommended for picking multi-item orders.
- Kit Based – Recommended for picking kit-only orders.
Ideally, orders should be sorted with filtered Saved searches based on their item status (i.e. single-item, multi-item, kit) before your Picklists are generated. This means you should filter single-item orders and non-kits first and generate a PickList for these products. After that, do the same for multi-item and kits-only orders. The Picklists will then be able to be picked in full based on the selected options. Keep in mind that products will only be available for picking only if the order is paid and in process.
Kit-based picking
Kit-based picking streamlines the often complicated process of picking non-packaged kits. This module will provide the warehouse staff with all the components to pick. Learn more here.
Order-based picking
Order-based picking allows you to pick items on a picklist, order by order. This is an effective workflow for handling large orders with multiple items, as the order items can be picked and grouped together by the warehouse picker for packing. Learn more here.
Product-based picking
Product-based picking enables you to easily pick all units on a picklist. This option gives you an effective workflow for single-item orders. Learn more here.
Pick Order Items
Skustack offers three efficient picking modules to cater to various order types. Learn more about each module here and select the one that best suits your needs. The example below illustrates Product-based picking.
- Navigate to PickList > Product Based and open a picklist.
- All products and pick quantities in that picklist will load. Swipe down to see the number of picked units and the number of total units in the picklist.
- Swipe left on an item to reveal shortcuts to other actions:
- Bins – Displays all bins in which this item’s units are stored.
- Info – Directs you to the Product info module.
- To filter products by different parameters, tap the Filter icon at the top right. From there, you can filter by inventory availability, single or multi-item orders, rush or picked status, region, and more.
- Scan a Product ID/UPC barcode, or select a product manually. The product pick dialog will open. To display the product’s full alias, press and hold its ID.
- Enter the bin from which you are picking or select the suggested bin. The suggested bin may appear next to the Bin field. This suggestion is based on the following factors:
- The bin is sellable. Although unsellable bins are excluded from the suggestions list, you can still manually enter an unsellable bin name if needed.
- The bin type is Normal or Temp.
- Primary bins will always be suggested first.
- The bin with the most or least quantity will be suggested based on the client setting PickList Bin suggestion sort qty by ASC Order.
- Scan units to add to the picked qty or adjust the number manually. To auto-populate the total quantity available for the scanned product in that bin, enable Skustack’s Warehouse Management setting Auto populate progress quantity when bin is selected.
- If the Lot Number workflow is enabled for your company and the product is set as expirable you must select a Lot Number before being able to pick it. When an item is picked from a bin containing only one Lot Number, Skustack will automatically populate that Lot ID.
- Tap Pick to update the picked quantity.
- The quantity picked will be transferred to the Picking Bin, and the picklist will be updated.
- Once an item is picked, tap the Printer icon to print a label or configure your Skustack settings to auto-print labels for every unit picked.
Unpick Order Items
There are several reasons why you might need to unpick items from a picklist, including incorrect quantities, damaged products, and more. To do that:
- Select the item that has been picked incorrectly.
- Select the bin that you are unpicking the items to and enter a negative value of how much you want to unpick. For example, if you want to unpick 10 units, enter -10 and tap Unpick.
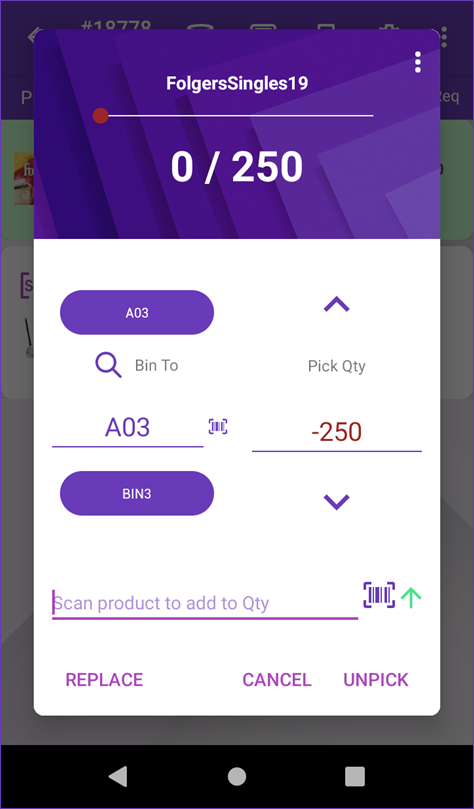 To switch between positive and negative movements for serialized products, tap on the green Arrow icon. Note that the arrow indicator must be red in order to unpick products with serial numbers.
 - A confirmation message at the top will indicate that the product has been successfully unpicked.

Picklists
The Skustack Admin portal lets you easily search for existing picklists, generate new ones, monitor their progress, and export them to Excel.
When an item is picked from a bin, it is automatically transferred to the warehouse’s Picking Bin. The picking bin is created by the system, with a unique picking bin for every warehouse. For example, Default Warehouse with ID “86” will have a picking bin named PickingBin Warehouse-86.
There are 3 ways you can pick products:
- Product Based – Recommended for picking single-item orders.
- Order Based – Recommended for picking multi-item orders.
- Kit Based – Recommended for picking kit-only orders.
Ideally, orders should be sorted with filtered Saved searches based on their item status (i.e. single-item, multi-item, kit) before your Picklists are generated. This means you should filter single-item orders and non-kits first, and then generate a Picklist for these products. After that, do the same for multi-item and kits-only orders. The Picklists will then be able to be picked in full based on the selected options. Keep in mind that products will only be available for picking only if the order is paid and in process.
Generate a Picklist
- Navigate to the Skustack Admin portal at https://xx.skustack.com (replace “xx” with your server ID or team name).
- Enter your login credentials.
- On the left, select Orders > Manage Orders.
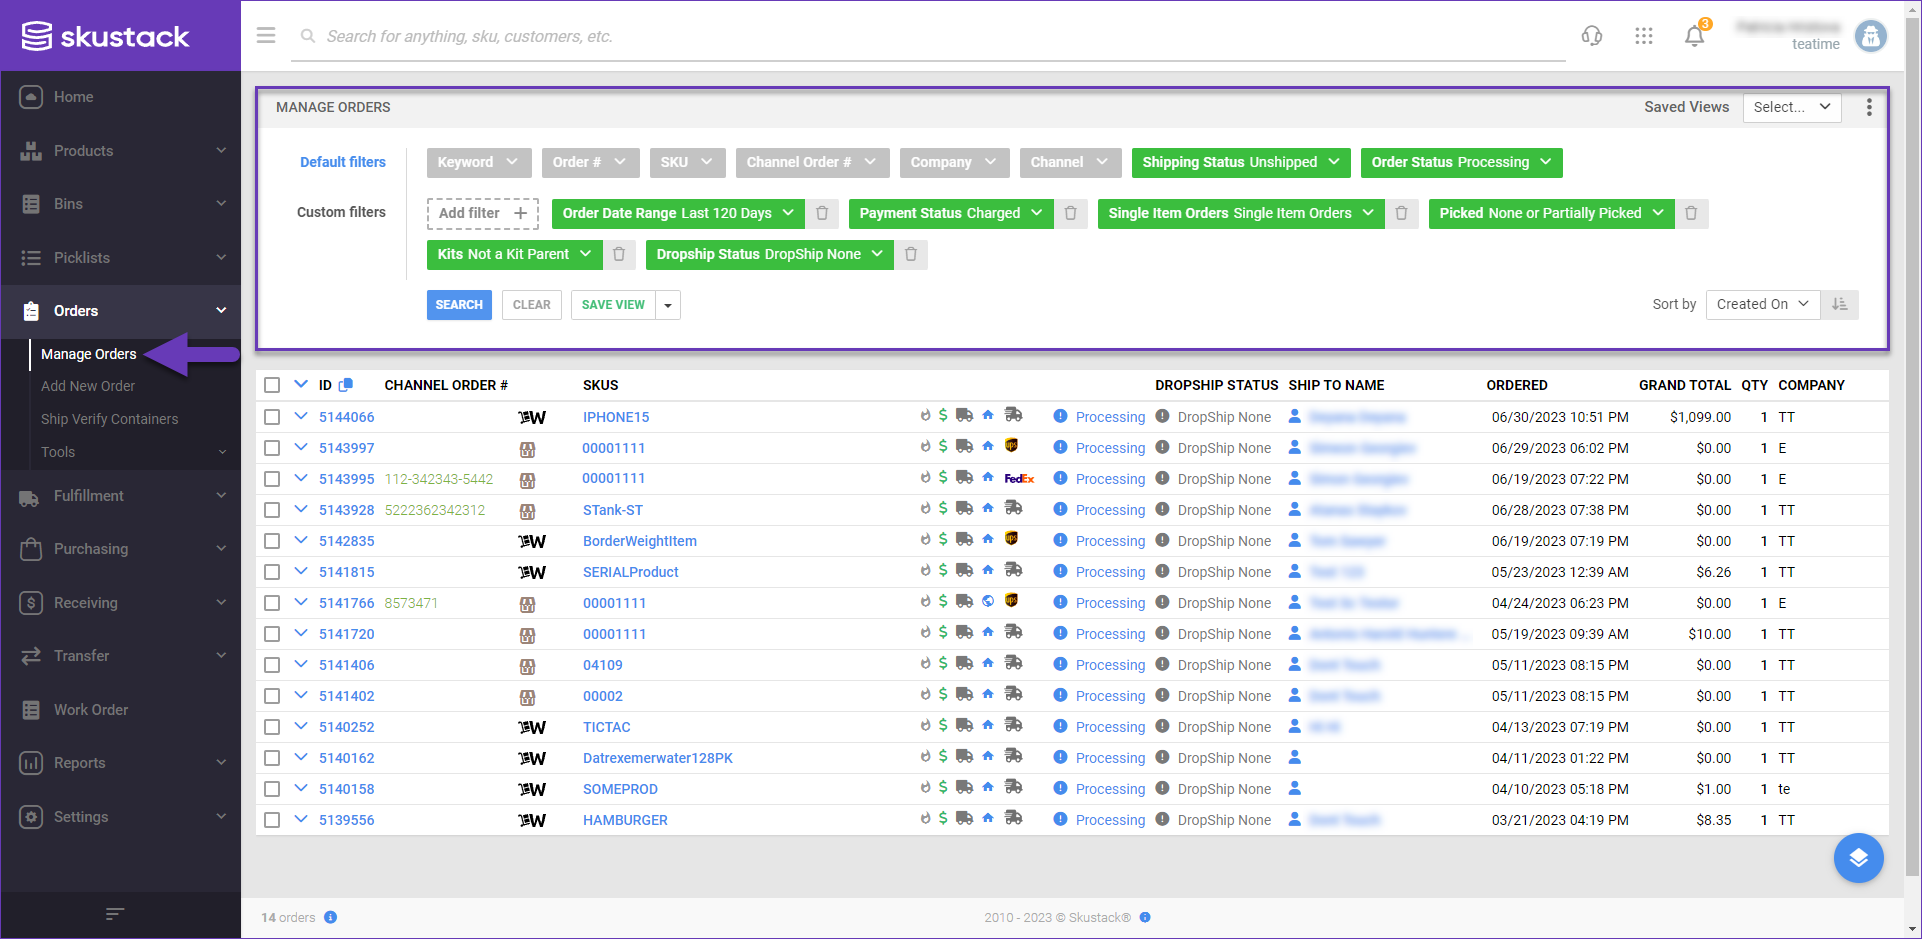
- Select your desired orders from the grid. Recommended filters are:
- Order Date Range — Preferred date range, the default value is set to Last 120 days.
- Shipping Status — Unshipped.
- Order Status — Processing.
- Dropship Status — Dropship None.
- Payment Status — Charged.
- Ship From Warehouse — Specific warehouse location.
- (Optional) Is On Picklist — Not In Open Picklist (typically used in combination with Client Setting Close all picklists at midnight).
- Picked — None or Partially Picked.
- Single Item Orders — Include Single or Multi-Item Orders.
- Kits — Include or exclude Kit Orders.
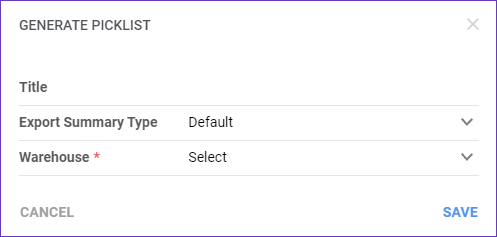
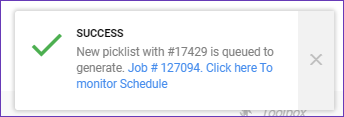
- Access the Actions menu > Generate Pick List.
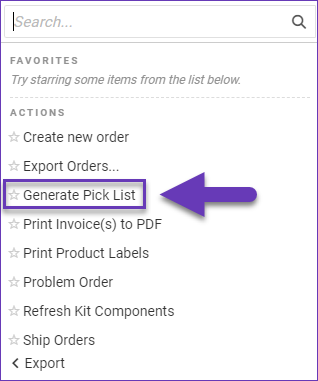
- Title your Picklist and select the Warehouse you are generating it for.
Manage Picklists
To manage picklists:
- Navigate to Picklists > Manage Picklists.
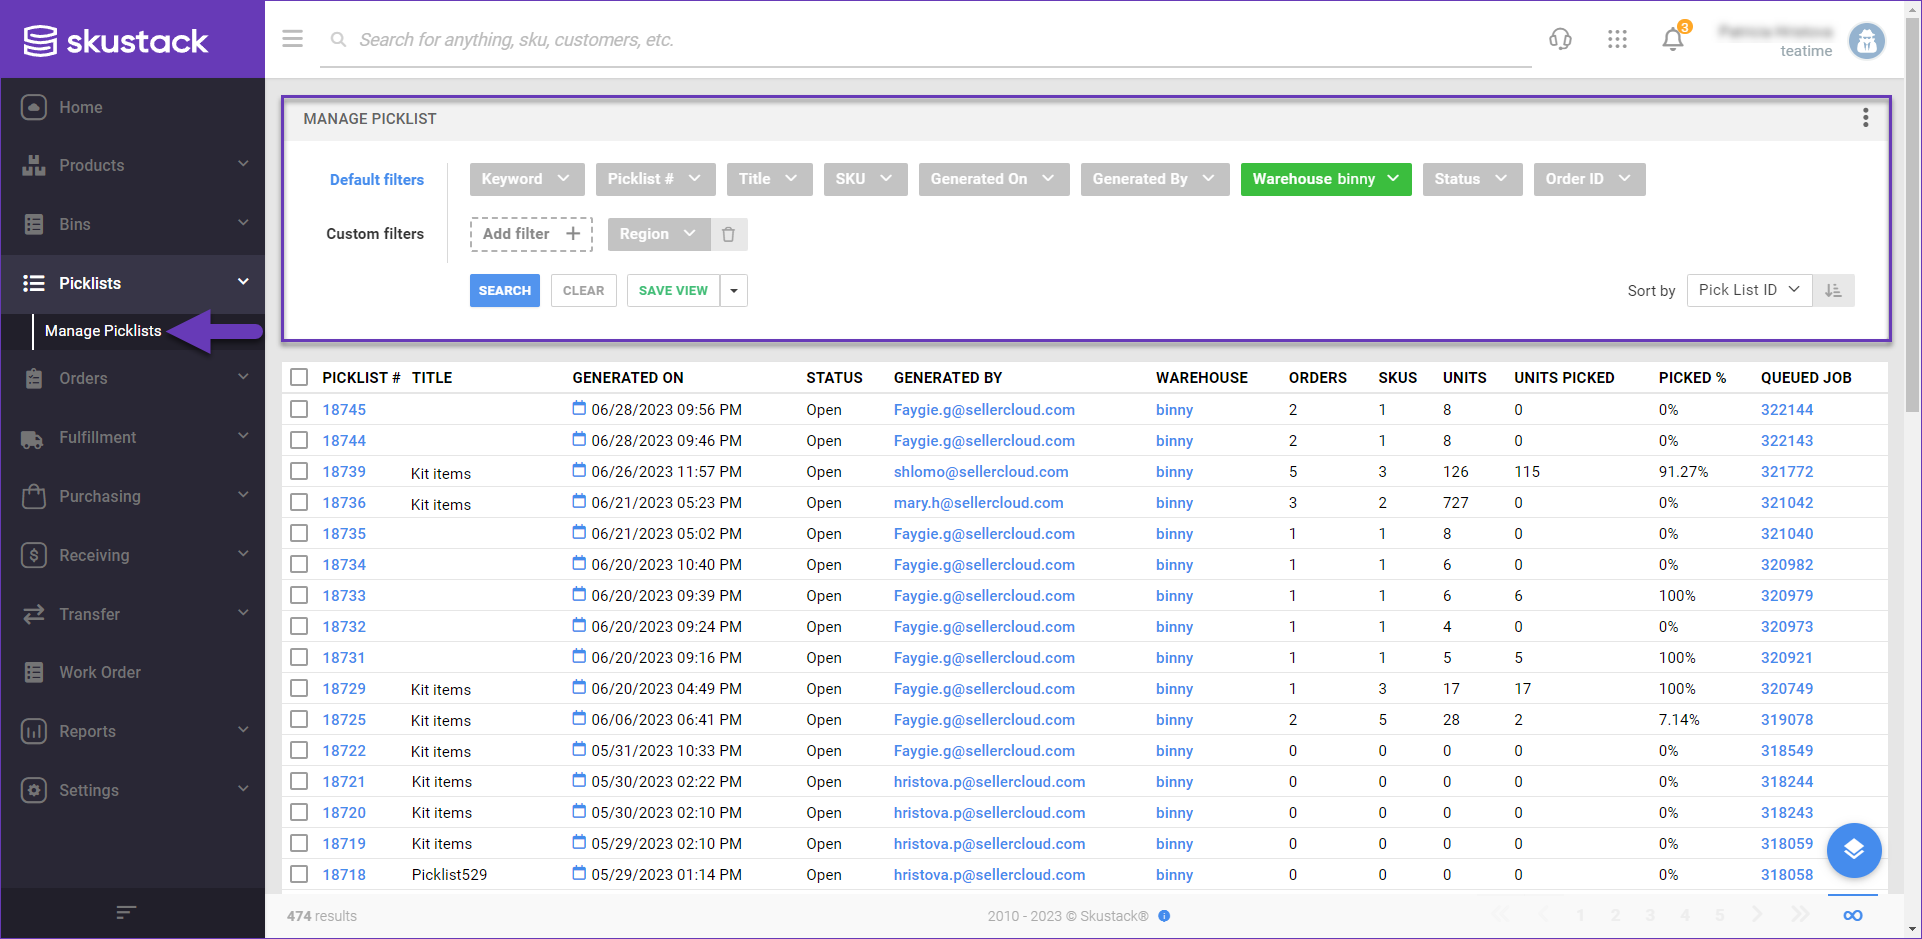
- Configure your Default filters to make sure that the results display exactly what you need.
- Click Search. Each filter you apply gets highlighted. If a filter is gray or not displayed at all, it’s not active.
- To manage the columns in the grid, click the three dots icon on the top right and select Customize Columns. You can:
- Reorder columns by dragging them up or down in the list;
- Hide columns by clicking the Trash icons;
- Add columns by clicking Add column.
- To arrange the data in a different order, use the Sort by menu.
- To save your filtering and sorting options, click Save view, enter a Name, and click Save.
- Select a picklist from the grid and access the Actions menu at the lower right-hand corner to either
- Close Picklists
- Export to Excel
- View Orders In Manage Orders
- Export Via Plugin
or click on a Picklist # to be directed to the Picklist Details page.
Split Picklists
When dealing with a high volume of orders, trying to load all the orders across every shipping station risks a system overload. To mitigate this risk, you can split your picklists by a number of orders per shipper.
- Open your picklist > Products panel > Select items.
- Click the arrow icon in the upper-right corner to split the selected items into a new picklist.

- Click the link in the notification to view your queued job.
Filter and Column Definitions
Picklists will generate with the following default columns:
- SKU — An item’s unique identification number.
- Item — Name of the product.
- Qty — Quantity of units to pick to fill selected orders.
- Location — Location of the item in the warehouse (if set on the product’s Home page).
- Package — Shipping package type (if set on the product’s Shipping Preference page).
- Inventory — The available quantity you have on hand to pick: Aggregate + Unshipped = Inventory. This is not necessarily the total physical quantity.
- UPC — The item’s barcode.
Additional columns can be enabled from Client Settings:
- Replacement SKU
- Replacement SKU LOC
- Weight
The following filters can be used to filter SKUs and quantities on the picklist:
| Filter | Description |
| Has Available Inventory |
|
| SKU Exists |
|
| Single Item Order |
|
| Rush Order |
|
| Is Kit |
|
| Is Picked |
|
Instead of generating a picklist of all orders and then using the picklist filters, it may be more efficient to filter the orders first. For example, you may want to use the Back Order filter to filter out orders with items that are out of stock. To include orders like this in your picklist, go to Client Settings and check the Consider ReplacementSKU Qty in BackOrder Calculation box.
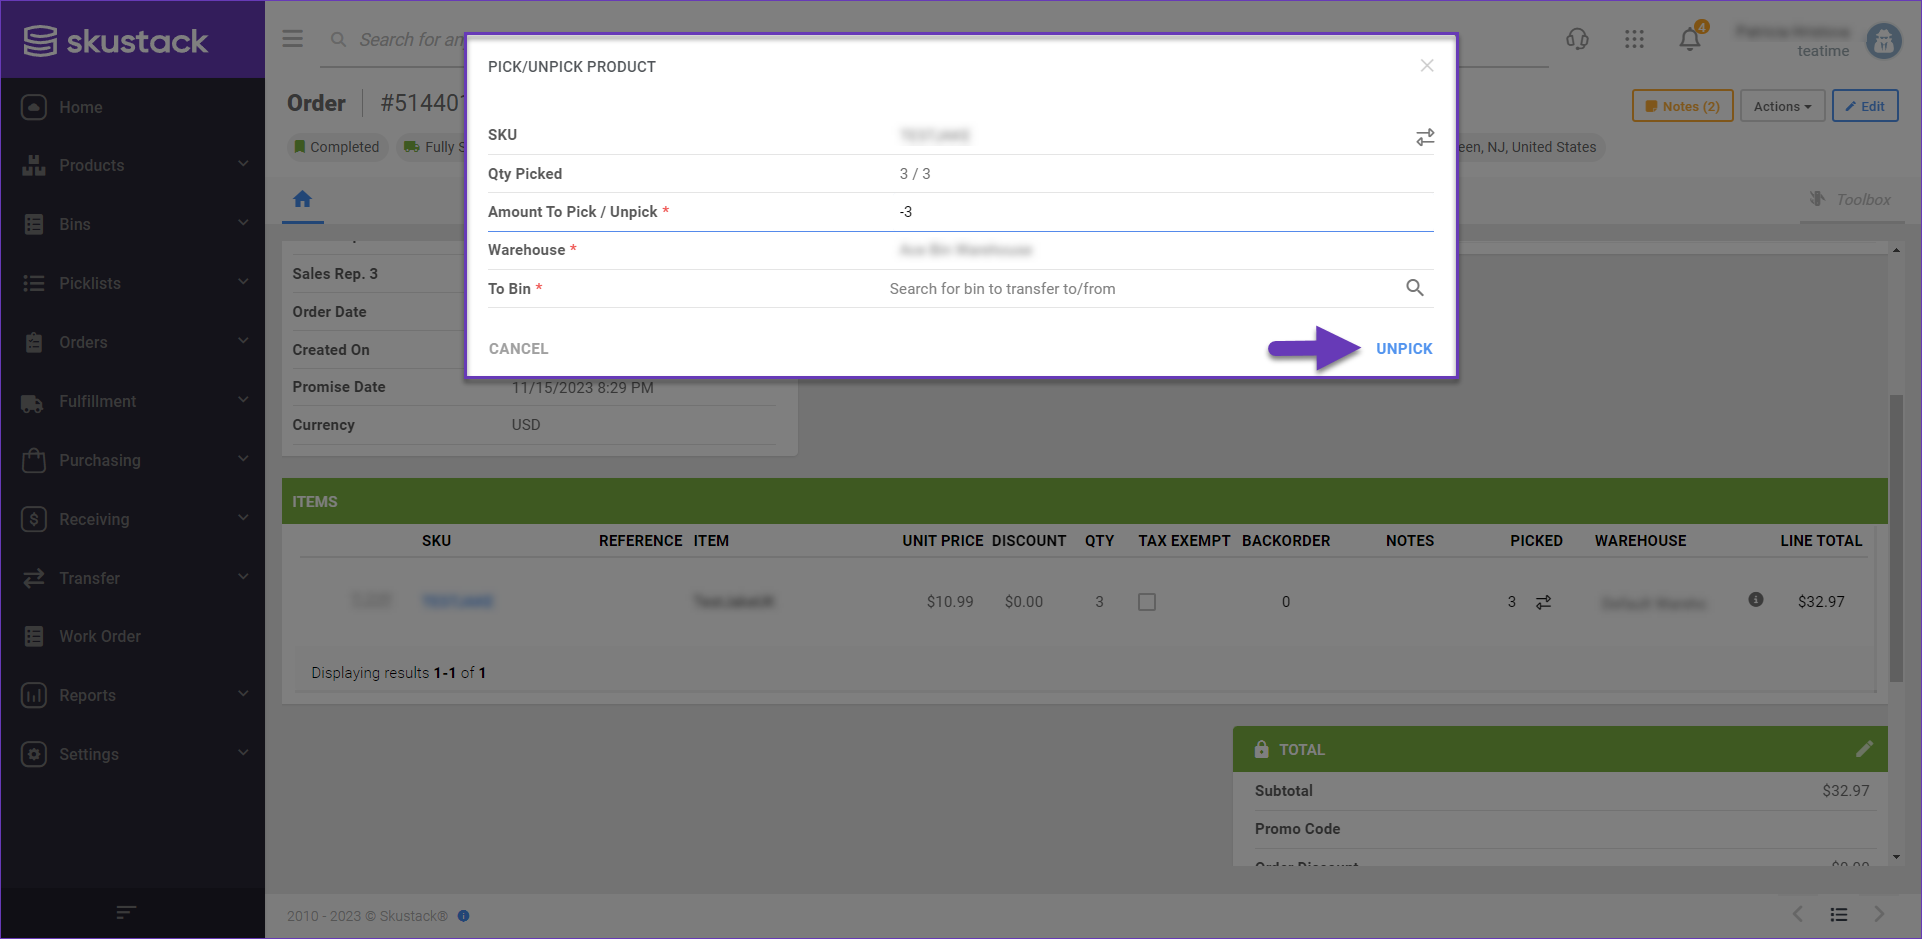
Unpick Order Items
- Open your desired order.
- In the Items panel, click on the arrows icon.
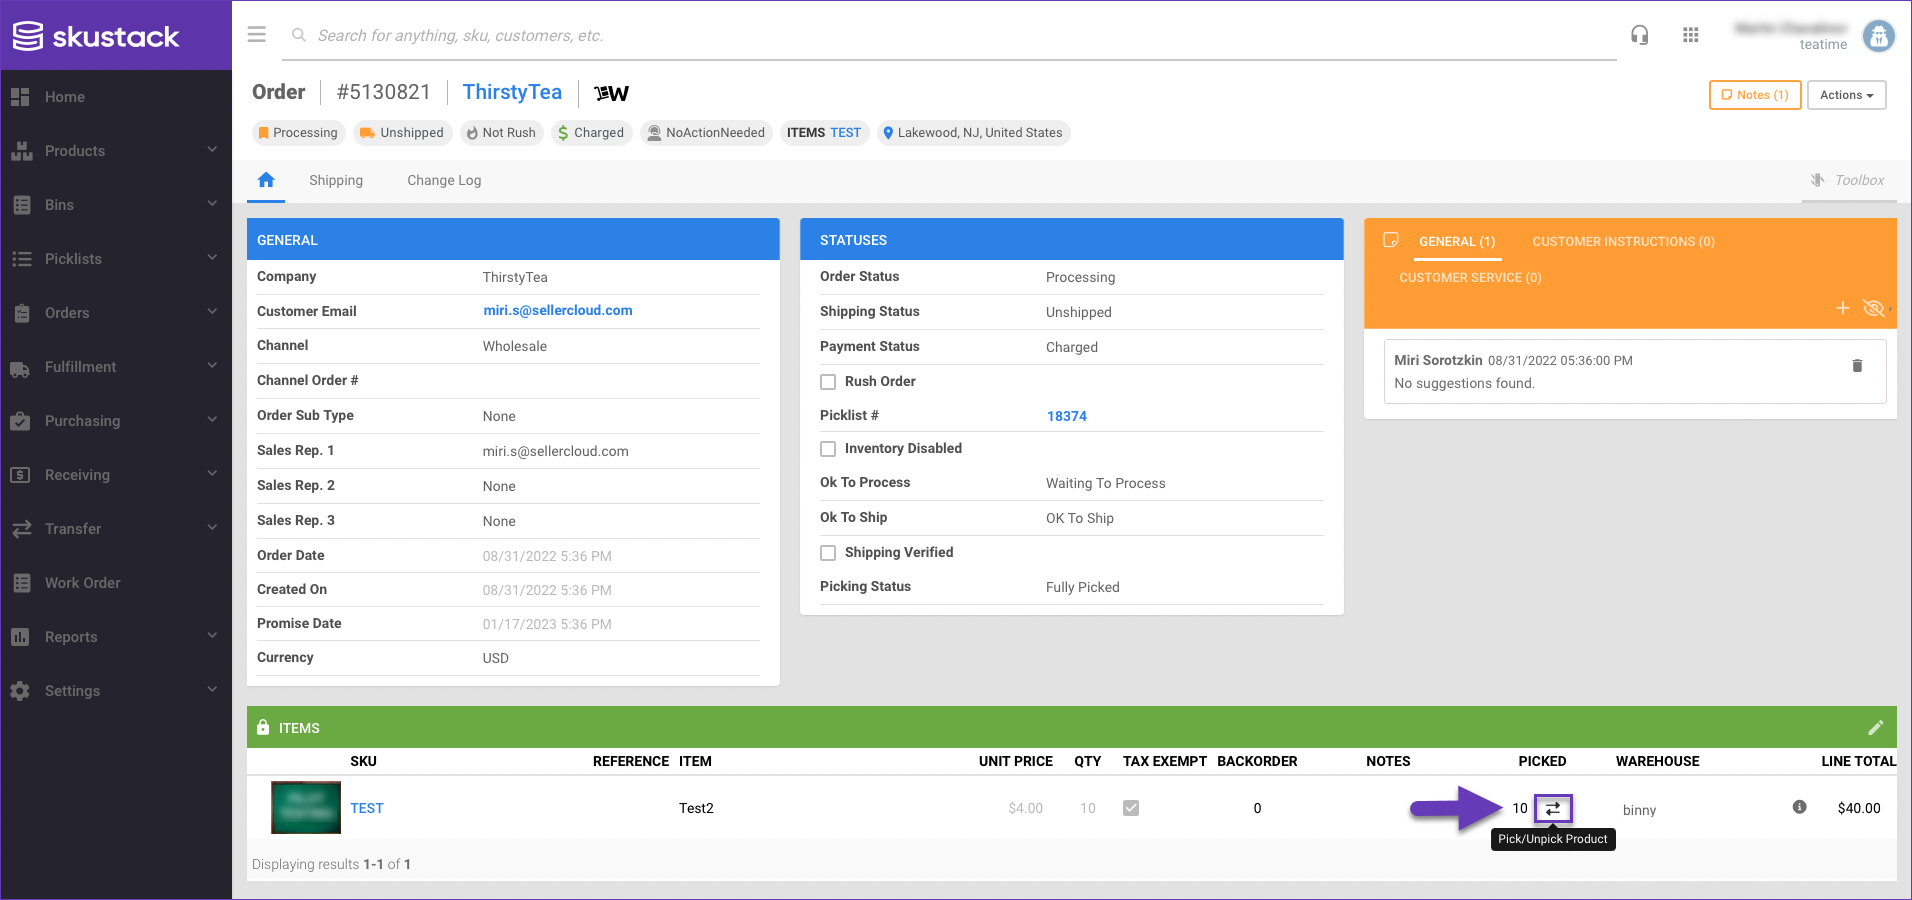
- Select an amount that you are unpicking and put in a negative value of how much you want to unpick (for example, if you want to unpick 10 units, put in -10)
- Select a bin and click Unpick.
Close PickLists at Midnight
Skustack allows you to automatically close all your open Picklists at midnight. To trigger this option, enable the Client Setting to Close all picklists at midnight.
Related Settings
| SETTING | DESCRIPTION |
| Find Ideal Region When Picking | Client Setting. The system will find the ideal region that has enough inventory from which the product can be fully picked and only show the product in that one region, even if it is available in other regions.
|
| Picklist Bin Suggestion Sort Qty By ASC Order | Client Setting. Once enabled, the suggested picking bin will be the one with the lowest product quantity. |
| Sort Picklists By Warehouse Bin Location Notes | Client Setting. When enabled, this setting sorts picklists alphanumerically based on the Bin Location Notes value. If disabled, sorting is based on the alphanumeric bin names associated with each product’s inventory. |
| Sort Picklists By Oldest Date First | Client Setting. This setting determines the order in which picklists are sorted in your Skustack app. When enabled, the oldest picklists will be displayed first. |
| Minimum Expiration Date by Month | Client Setting. This setting lets you set a minimum expiration date by adding a specific number of months to the current date. Only bins with lot numbers on or after this calculated date will be shown during picking, and a warning will appear if a product with an earlier expiration date is selected. |
| Allow Picking For Shipped Orders | Client Setting. Enable this setting to allow the picking of orders that are already marked as shipped. |
| Enable Picklist Generation By Warehouse | Client Setting. Once enabled, a warehouse dropdown becomes available when generating picklists, allowing you to define the warehouse to which your picklist applies. |
| Picklist Generation Only Allow Valid Orders | Client Setting. If enabled, a list of restrictions will be applied when you try to add orders to a picklist using the Generate Picklist action. The limitations are as follows:
|
| Close All Picklists At Midnight | Client Setting. Enable to automatically close all open Picklists at midnight. |
| Auto print PickList Order Confirmation Labels | Skustack’s Warehouse Management setting. When enabled, confirmation labels will be printed automatically for fully picked orders, as per the selected Auto print PickList Order Confirmation Labels Mode. |
| Auto print PickList Order Confirmation Labels Mode | Skustack’s Warehouse Management setting. Sub-setting of Auto print PickList Order Confirmation Labels, which defines the mode to print automatic confirmation labels:
|
| Include user name on PickList Order Confirmation Label | Skustack’s Warehouse Management setting. Enable this setting to include the email of the user who picked the order to the confirmation label. |
| Print kit parent SKU on PickList Order Confirmation Label instead of component SKU | Skustack’s Warehouse Management setting. Activate to include the kit parent SKU instead of the component SKU when printing order confirmation labels for kit products. |
| Print UPC on PickList Product Order Confirmation Label | Skustack’s Warehouse Management setting. Enable this setting to substitute SKU for UPC on picklist product order confirmation labels. |
| Allow partial picked label print | Skustack’s Warehouse Management setting. Allows printing of confirmation labels even when not fully picked. |
| Auto close after fully picked | Skustack’s Warehouse Management setting. Automatically closes the dialog window when fully picked. |
| Auto Pick when QtyToPick is full | Skustack’s Warehouse Management setting. When the Qty Picked equals the Qty Required, the product will be picked automatically without tapping the Pick button. |
| Display Product Name when picking | Skustack’s Warehouse Management setting. Shows the product name in the pick dialog. |
| Slide to pick | Skustack’s Warehouse Management setting. When enabled, you can slide the progress bar in the pick window to increase the quantity. |
| Require serial scan when picking | Skustack’s Warehouse Management setting. When enabled, it will force the user to scan serials for products that are set to require serial scan. |
| Allow Unpick | Skustack’s Warehouse Management setting. Enable this setting to allow the unpicking of products from the pick dialog. |
| Auto print FBA box label when picking | Skustack’s Warehouse Management setting. If enabled, FBA box labels will be printed automatically when the items in the box are fully picked. |
| Auto print FNSKU label when picking an item for an FBA shipment | Skustack’s Warehouse Management setting. When enabled, FNSKU labels will be printed automatically when an item is picked for FBA shipments. |
| Enable pick and ship | Skustack’s Warehouse Management setting. This setting enables the pick and ship workflow. |
| Enable ship from warehouse warning | Skustack’s Warehouse Management setting. For Order Based picking, you will see a warning message if you try to pick an order that is set to Ship From a different warehouse than the one you are currently logged into. |
| Restrict picking an order not on a picklist | Skustack’s Warehouse Management setting. Once enabled, you cannot initiate picking via an order ID in the Order Based module. A picklist ID must be used instead. |