
Overview
The Order Based picking module is located within Skustack’s Picking tab.
Order-based picking enables you to pick items on a picklist, order by order. This is an effective workflow for orders with multiple items, as the items can be picked and grouped together by the warehouse picker for packing. Learn more about the different picking methods here.
There are five modes for searching orders:
- Search By ID – Search for a specific PickList.
- Search By Name – Search for a specific Picklist Title.
- Search All – Search for all PickLists and filter by a specific product.
- Search By Order – Search for a specific order on a PickList.
- Search By Channel Order # – Search for a specific order by its channel order ID.
Search By PickList ID
Searching by PickList ID allows you to see all products on a specific picklist. You can then go into each item and see all open orders for picking.
- Select Search By ID from the search mode dropdown.
- Enter the PickList ID and tap Search.
- Products on that PickList will load. Tap on a product to view the respective order IDs. If you tap on an order, the number of items picked out of the total number will display. Swipe down to see the Channel Order ID, the number of picked units, and the total units in this order.
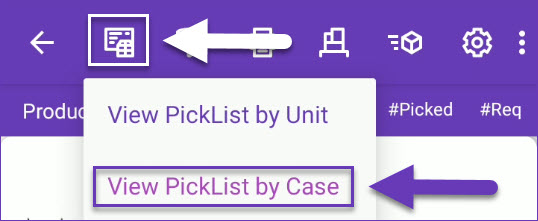
- To manage your picklist by the case, tap on the top left picklist icon and select View PickList by Case. Case Qty mode must be enabled for the order to see this option.
- To pick the entire order from a specific bin, tap on the Bin icon, enter the desired bin and tap Pick. The quantity picked will be transferred to the Picking Bin and the picklist will be updated.
If there are products with insufficient quantities in the chosen bin, an error message will appear and no products will be picked.
- To pick products from different bins, swipe left on an item to reveal shortcuts to other actions:
- Bins – Displays all bins in which this item’s units are stored.
- Info – Directs you to the Product info module.
- To filter products by different parameters, tap the Filter icon at the top right. From there, you can filter by inventory availability, single or multi-item orders, rush or picked status, region, and more. To reveal the product’s full alias, press and hold its ID.
- Scan a Product ID/UPC barcode, or select a product manually. The product pick dialog will open.
- Enter the bin from which you are picking or select the suggested bin. The suggested bin may appear next to the Bin field. This suggestion is based on the following factors:
- The bin is sellable. Although unsellable bins are excluded from the suggestions list, you can still manually enter an unsellable bin name if needed.
- The bin type is Normal or Temp.
- Primary bins will always be suggested first.
- The bin with the most or least quantity will be suggested based on the Client Setting PickList Bin suggestion sort qty by ASC Order.
- Scan units to add to the picked qty or adjust the number manually. To auto-populate the total quantity available for the scanned product in that bin, enable Skustack’s Warehouse Management setting Auto populate progress quantity when bin is selected.
To switch between positive and negative movements for serialized products, tap on the green Arrow icon. Note that the arrow indicator must be red in order to unpick products with serial numbers.
- Tap on the three dots menu in the upper right-hand corner to:
- Flag – Use this option to Flag the item and indicate specific concerns.
- Reset Dialog – Use this option to remove selected data from the picking dialog.
- If the Lot Number workflow is enabled for your company and the product is set as expirable you must select a Lot Number before being able to pick it. When an item is picked from a bin containing only one Lot Number, Skustack will automatically populate that Lot ID.
- Tap Pick to update the picked quantity.
- The quantity picked will be transferred to the Picking Bin and the picklist will be updated.
- Tap the Printer icon to print an order label or configure your Skustack settings to auto-print the order label after it’s fully picked.
Search By Name
The Search By Name option allows you to find a specific Picklist by its Title.
- Select Search By Name from the search Mode dropdown.
- Enter the desired Picklist Name and tap Go.
- Tap on the Picklist to open it.
- Products on that picklist will load. Tap on a product to view the respective order ID. Tap on an order ID and the number of items picked out of the total number will display. Swipe down to see the Channel Order ID, the number of picked units and the number of total units in this order.
- Follow steps 4-15 from the Search by PickList ID section.
Search All
The Search All option allows you to see all picklists for the product. You can then pick each picklist separately.
- Select Search All from the search mode dropdown.
- Scan/enter a product or tap Go to load all open picklists. Rush Order picklists can be easily identified by a Rush icon next to the picklist ID.
- To filter the Picklists, tap the Filter icon at the top right.
- Tap a Picklist to open it.
- Tap on a product to view the respective order ID. Tap on an order ID and the number of items picked out of the total number will display. Swipe down to see the Channel Order ID, the number of picked units and the number of total units in this order.
- Follow steps 4-15 from the Search by PickList ID section.
Search By Order
This method allows you to enter a specific order number and pick the items on that order.
- Select Search by Order from the search mode dropdown.
- Enter an Order ID and tap Go.
- The order’s products will load, and the picked‑versus‑total item count will be displayed. Swipe down to see the Order ID, Channel Order ID, the number of picked units and the number of total units in this order.
- Follow steps 4-15 from the Search by PickList ID section.
Search By Channel Order
This option allows you to find and pick an order using its Channel Order ID.
- Select Search By Channel Order # from the search mode dropdown.
- Enter a Channel Order ID and tap Go.
- The order’s products will load, and the picked‑versus‑total item count will be displayed. Swipe down to see the Order ID, Channel Order ID, the number of picked units , and the total number of ordered units.
- Follow steps 4-15 from the Search by PickList ID section.
Related Settings
| SETTING | DESCRIPTION |
| Validate serial globally | Client Setting. Enables serial number validation in Skustack. Learn more about serial number validation and relevant client settings here. |
| PickList Bin suggestion sort qty by ASC Order | Client Setting. Once enabled, the suggested bin to pick from will be the one with the lowest product quantity. |
| Minimum Expiration Date by Month | Client Setting. This setting lets you set a minimum expiration date by adding a specific number of months to the current date. Only bins with lot numbers on or after this calculated date will be shown during picking, and a warning will appear if a product with an earlier expiration date is selected. |
| Require serial scan when picking | Skustack’s Warehouse Management setting. When enabled, will force the user to scan serials for products that are set to require serial scan. |
| Auto print fully picked orders | Skustack’s Warehouse Management setting. Prints a single confirmation label when an order is fully picked. This setting should be used if your normal method of picking is order-based. Configure the printer setting to use Picklist Label One. |
| Auto print for every unit picked | Skustack’s Warehouse Management setting. Prints a separate confirmation label for every unit picked. This setting should be used if your normal method of picking is product-based. Configure the printer setting to use Picklist Label Two. |
| Allow partial picked label print | Skustack’s Warehouse Management setting. Allows printing of confirmation labels even when not fully picked. |
| Auto close after fully picked | Skustack’s Warehouse Management setting. Closes the dialog window when fully picked. |
| Auto Pick when QtyToPick is full | Skustack’s Warehouse Management setting. When Qty Picked = Qty Required the product will be picked automatically without having to press the Pick button. |
| Display Product Name when picking | Skustack’s Warehouse Management setting. Shows the product name in the pick dialog. |
| Slide to pick | Skustack’s Warehouse Management setting. When enabled, you can slide the progress bar in the pick window to increase the quantity. |
| Allow unpick | Skustack’s Warehouse Management setting. When enabled, the unpicking option within the Order picking dialog will be available. |
| Auto populate progress quantity when bin is selected | Skustack’s Warehouse Management setting. When a bin is selected, the Pick Qty field will automatically be set to the total quantity available in that bin, up to the quantity required. |
| Enable ship from warehouse warning | Skustack’s Warehouse Management setting. When enabled, a warning message will alert you if you’re picking an order from the incorrect warehouse. Only applicable to Order-based picking. |
| Restrict picking an order not on a picklist | Skustack’s Warehouse Management setting. Once enabled, you cannot initiate picking via an order ID in the Order Based module. A picklist ID must be used instead. |
| Bypass serial number validation while picking | Skustack’s Warehouse Management setting. Enable to skip serial number validation during product picking, even if scanning is mandatory. |