
Overview
When purchased products are returned to their vendor, a Credit Memo should be generated to document the process and log the corresponding credited amount. This procedure ensures that your inventory levels and accounting records remain accurate and up to date. Within the Skustack Admin portal, you can easily create, manage, and export Credit Memos. The Skustack application, on the other hand, allows you to effectively pick all products associated with a Credit Memo.
Credit Memo Module
The Credit Memo module is located within Skustack’s PickList tab. Within this module, you can view and manage Credit Memo picklists with products that should be sent back to their Vendor.
Search Credit Memos
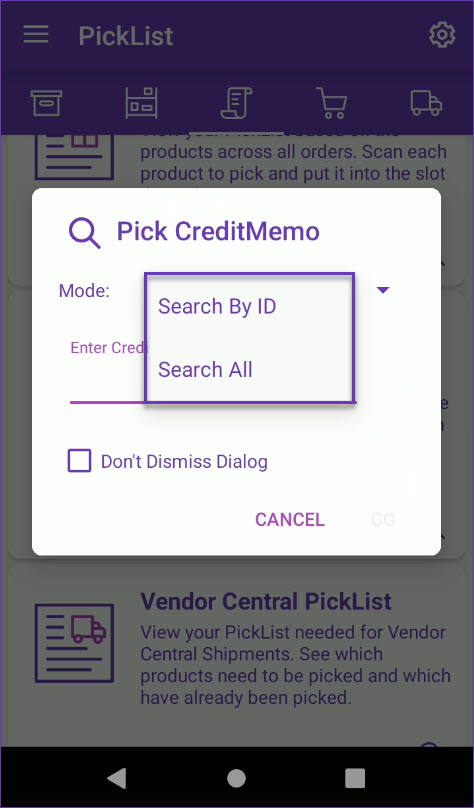
You can search for Credit Memos in one of two modes:
- Search By ID – Search for a specific Credit Memo #.
- Search All – Search for all Credit Memos and/or filter by a specific product.
Pick Credit Memos
To pick Credit Memo products:
- Navigate to the Picklist tab and select the Credit Memo module.
- Tap the Search icon and scan/enter the desired Credit Memo.
- The picklist with product quantities will load. You can also filter items by their Picked status or Warehouse Region. Simply tap the filter icon at the top right and apply your preferences.
- Tap the Notes icon to view or add custom Notes to the Credit Memo.
- Swipe down to see the number of picked units and the number of total units in this memo.
- Swipe the items to the left to reveal shortcuts to other actions:
- Bins – Tap to see all bins where the product is stored (bins will show if you’re logged into a bin-enabled warehouse).
- Info – This shortcut reveals the product info module.
- Dimens – Allows you to set product dimensions or get a 4D scale reading.
- Labels – Tap to print product labels for each item.
- Tap the three dots menu in the upper right-hand corner to Select Product Identifiers:
- UPC
- Aliases
- Product Name
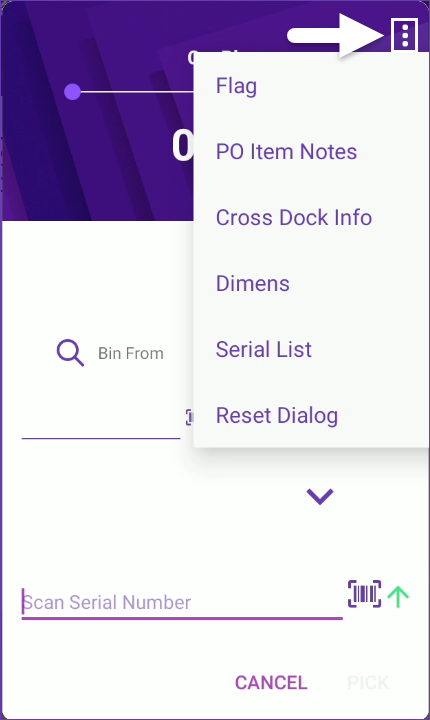
- Scan a Product ID/UPC barcode, or tap it on the screen. The product window will open. The action menu within the dialog provides options to Flag items, view PO Item Notes, Cross-Dock details, Dimensions, Serial List, and to Reset the picking progress.
- Enter the bin from which you are picking. A suggested bin may appear next to the Bin field. This suggestion is based on the following factors:
- The bin is sellable. Although unsellable bins are excluded from the suggestions list, you can still manually enter an unsellable bin name if needed.
- The bin type is Normal or Temp.
- Primary bins will always be suggested first.
- The bin with the most or least quantity will be suggested based on the client setting PickList Bin suggestion sort qty by ASC Order.
- Scan units to add to the picked qty or adjust the number manually. To auto-populate the total quantity available for the scanned product in that bin, enable Skustack’s Warehouse Management setting Auto populate progress quantity when bin is selected.
- If the Lot Number workflow is enabled for your company and the product is set as expirable you must select a Lot Number before being able to pick it.
- Tap Pick to update the picked quantity.
To switch between positive and negative movements for serialized products, tap on the green arrow. Note that the arrow indicator must be red in order to unpick products with serial numbers.
- The quantity picked will be transferred to the Picking Bin and recorded on the Credit Memo.
- When all items in the credit memo are picked, a success message will display at the top.
Related Settings
| SETTING | DESCRIPTION |
| Validate serial globally | Client Setting. Enables serial number validation in Skustack. Learn more about serial number validation and relevant client settings here. |
| Require serial scan when picking | Skustack’s Warehouse Management setting. When enabled, will force the user to scan serials for products that are set to require serial scan. |
| Auto populate progress quantity when bin is selected | Skustack’s Warehouse Management setting. When a bin is selected, the Pick Qty field will automatically be set to the total quantity available in that bin, up to the quantity required. |
Manage Credit Memos
Skustack enables you to efficiently search and manage existing Credit Memos, monitor their progress, create new memos, and more.
Search Credit Memos
To search for existing Credit Memos:
- Navigate to the Skustack Admin portal at https://xx.skustack.com (replace “xx” with your server ID or team name).
- Enter your login credentials.
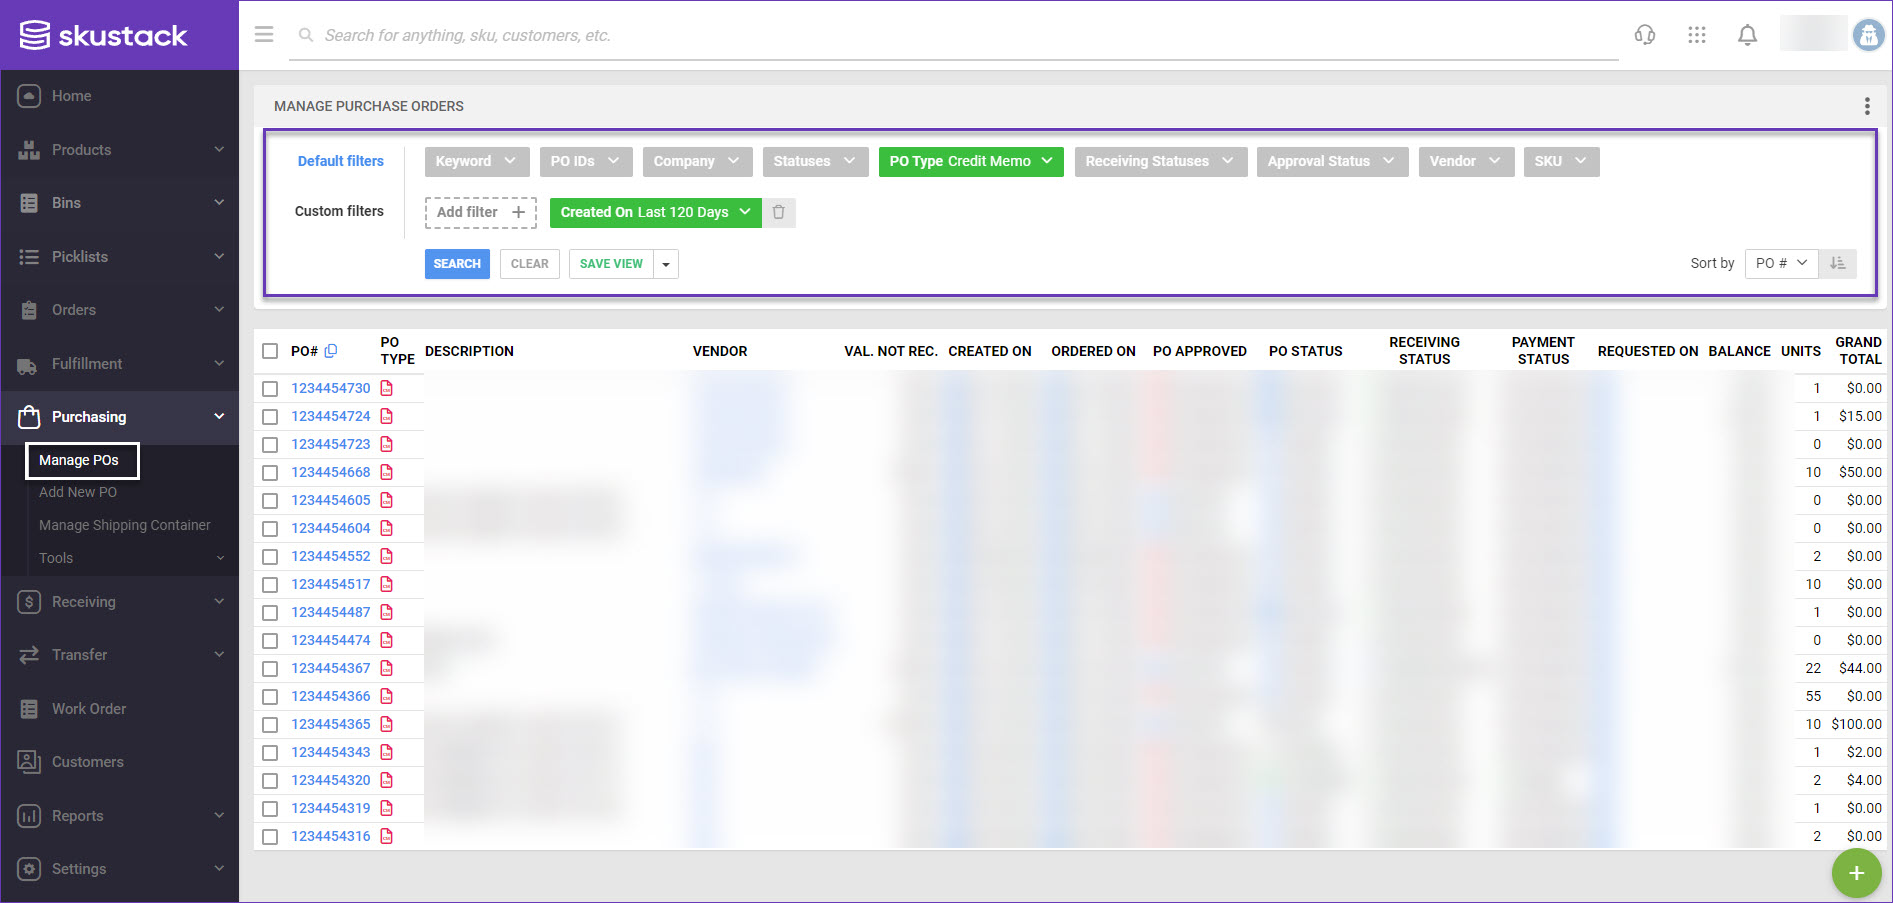
- Go to Purchasing > Manage POs.
- Click the PO Type filter and select Credit Memo. Configure the rest of the Default filters to make sure that the results display exactly what you need. The available filters are:
- Keyword
- PO IDs
- Company
- Statuses
- PO Type
- Receiving Statuses
- Approval Status
- Vendor
- SKU
- Click Search. Each filter you apply gets highlighted. If a filter is gray or not displayed at all, it’s not active.
- To manage the columns in the grid, click the three dots icon on the top right and select Customize Columns. You can:
- Reorder columns by dragging them up or down in the list;
- Hide columns by clicking the Trash icons;
- Add columns by clicking Add column.
- To arrange the data in a different order, use the Sort by menu.
- To save your filtering and sorting options, click Save View, enter a Name, and click Save.
Create Credit Memos
You can create a Credit Memo in a few simple steps:
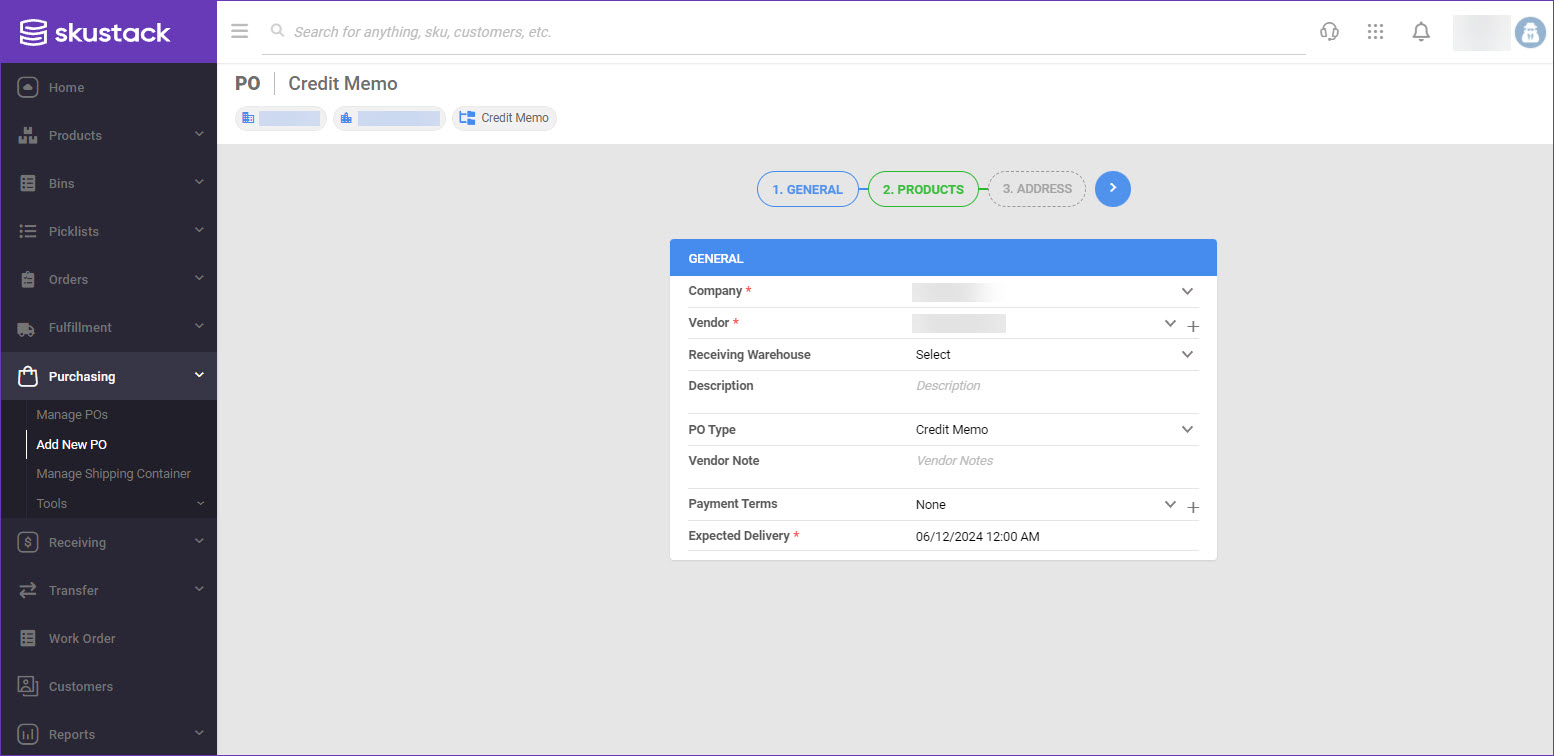
- Navigate to Purchasing > Add New PO.
- Select the associated Company.
- Choose the Vendor to whom you will be returning the products.
- If necessary, add:
- Items Receiving Warehouse.
- Description of the memo.
- Custom Vendor Note.
- Add custom Payment terms, or select an existing one from the dropdown menu.
- In the PO Type field, select Credit Memo.
- Choose an Expected Delivery date and time.
- Click the blue arrow to proceed.
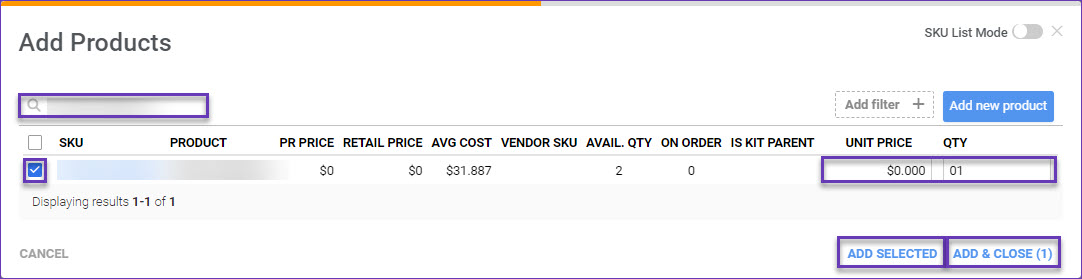
- Click the Add Products + button or the plus icon.

- In the following pop-up, click the SKU List Mode toggle to display a search textbox, in which you can enter a list of SKUs. You can also Add a filter to limit your search or Add a new product, if necessary.
- Search and check the desired products to select them.
- Define return items Qty and Unit Price.
- Click Add Selected, or Add & Close.
- Alternatively, you can also upload products in bulk with an import file. Simply download a template in the chosen format (Tab Delimited, Excel, or CSV), populate the required products information and upload the file in Skustack.

- You also have the option to Enable Case Qty mode and define Total Cases, Qty/Case and Case Price.

- Select a Warehouse from which the products will be subtracted.
- Once done with the products details, click the blue arrow to proceed.
- Provide a Billing Address and Ship To information and click the green flag to save the Credit Memo.

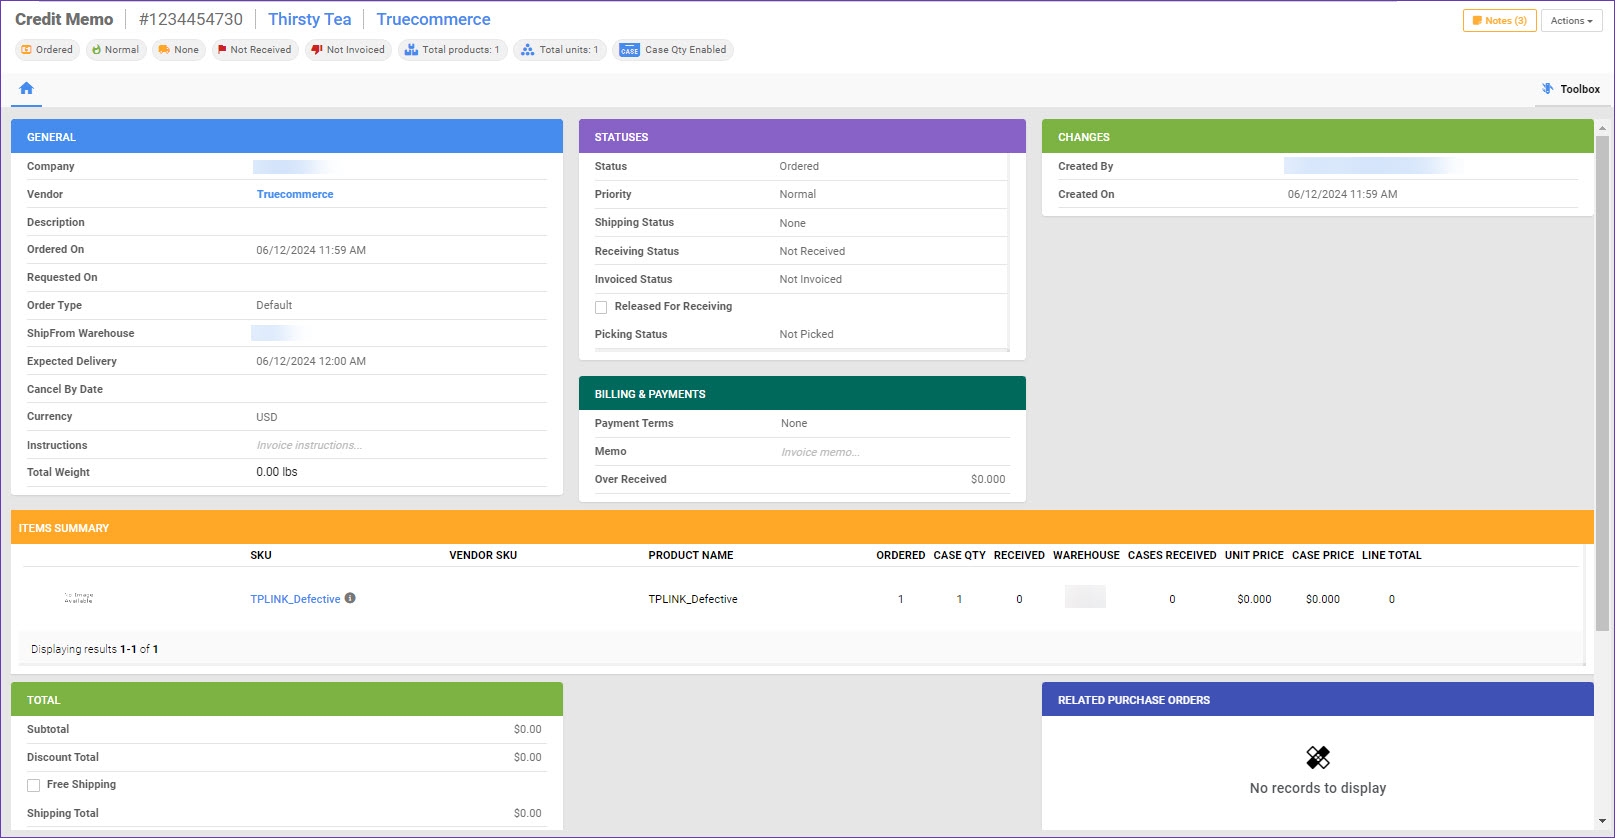
- A message with the Credit Memo ID appears on your screen. Click View Credit Memo to display its details.
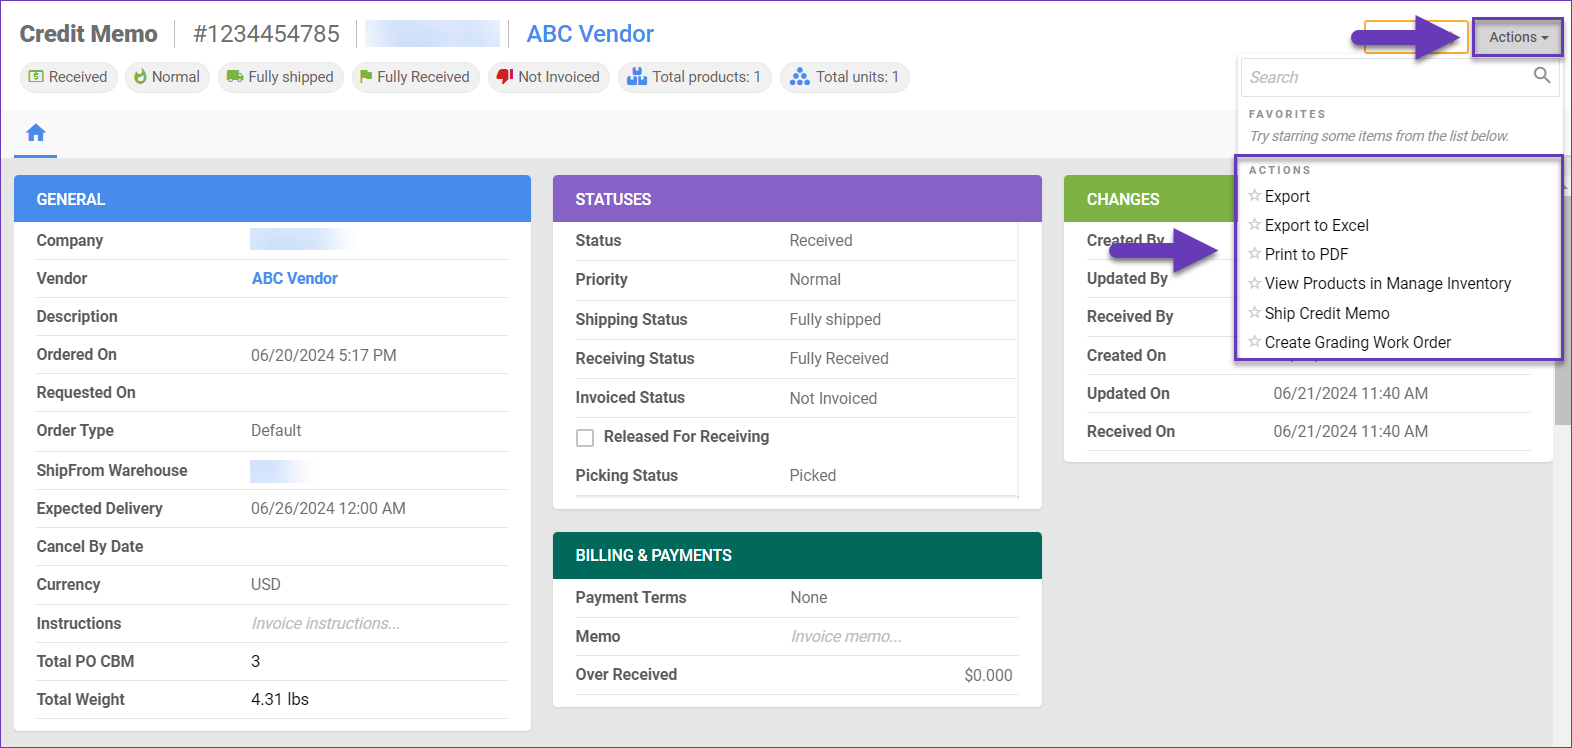
Actions
The Credit Memo’s Actions menu leads to convenient functionalities, such as exporting and printing files with the memo’s details, viewing the related products in Manage Inventory, shipping a Credit Memo and creating Grading Work Orders.
Toolbox
The Toolbox grants you access to tabs with other modules related to your Credit Memo. Here you can find the Memo’s Change Log, Receiving Sessions, Shipping Containers, related items and their serial numbers.

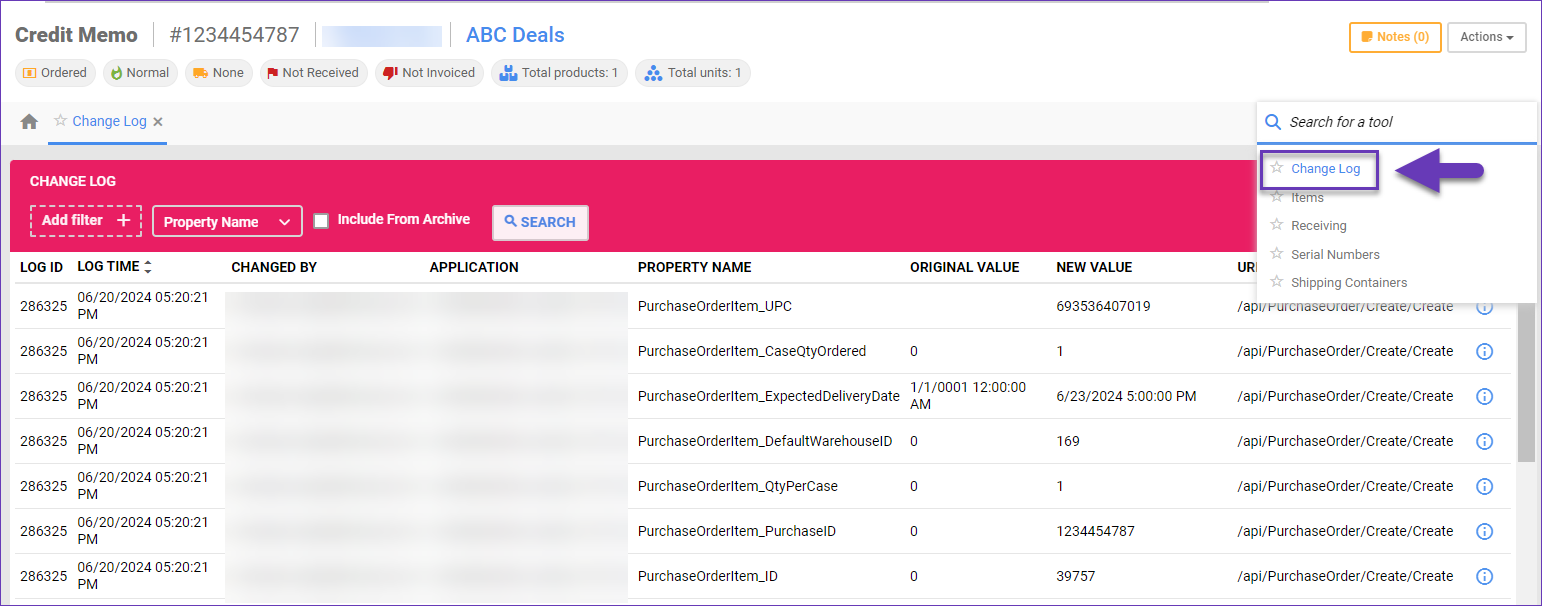
Change Log
The Change Log tab provides comprehensive records of all the changes made to the Credit Memo, including the date, time, and the user who made the change.
To see the Credit Memo’s change records, navigate to its Toolbox and select Change Log.
Ship Credit Memos
The Ship Credit Memo Action allows you to update the status of a Credit Memo to Fully Received by its Vendor. It also updates the product’s Inventory and PO’s Average Cost calculations based on the returned quantity.
To ship a Credit Memo:
- Navigate to Purchasing > Manage POs.
- Use the available filters to find the appropriate Credit Memo.
- Click the Actions menu in the upper right and select Ship Credit Memo.
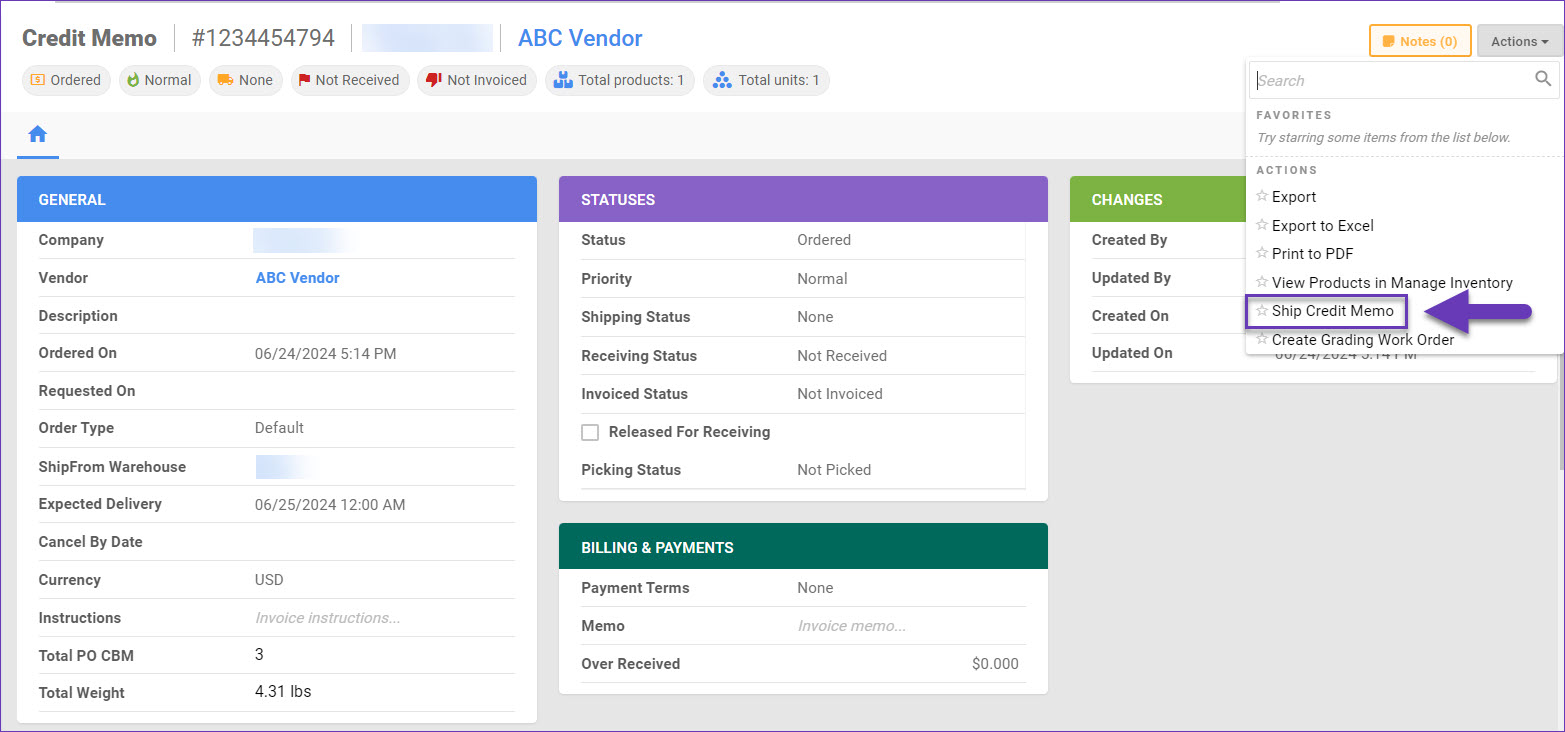
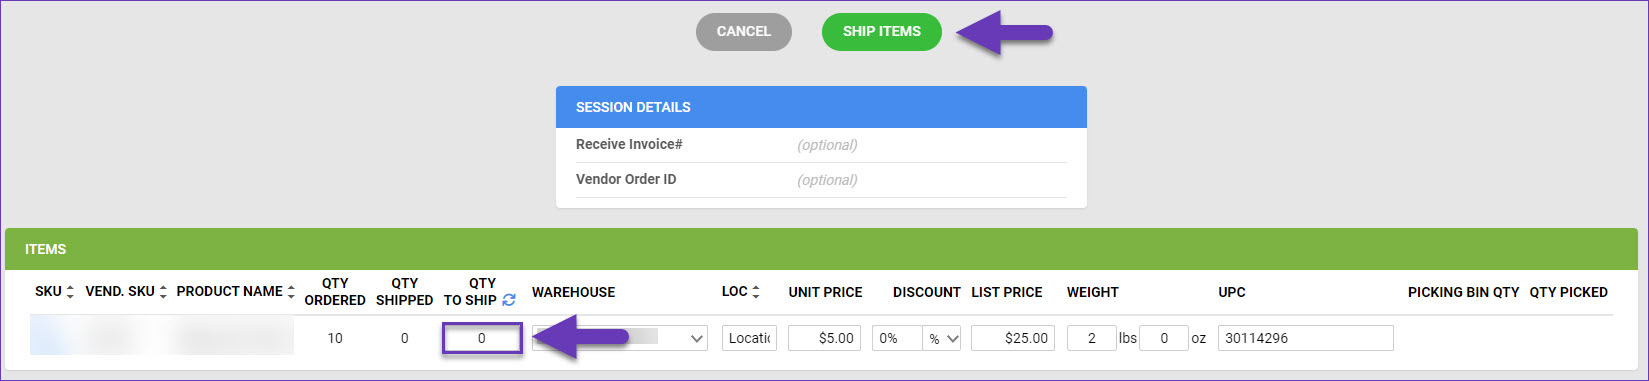
- Fill in Qty to Ship to determine the number of products to return, populate all necessary fields, and click Ship Items.
- A Queued job will be generated, from which you can monitor the status of the task. Once its status is Completed, the product’s Inventory and PO’s Average Cost calculations will be updated.
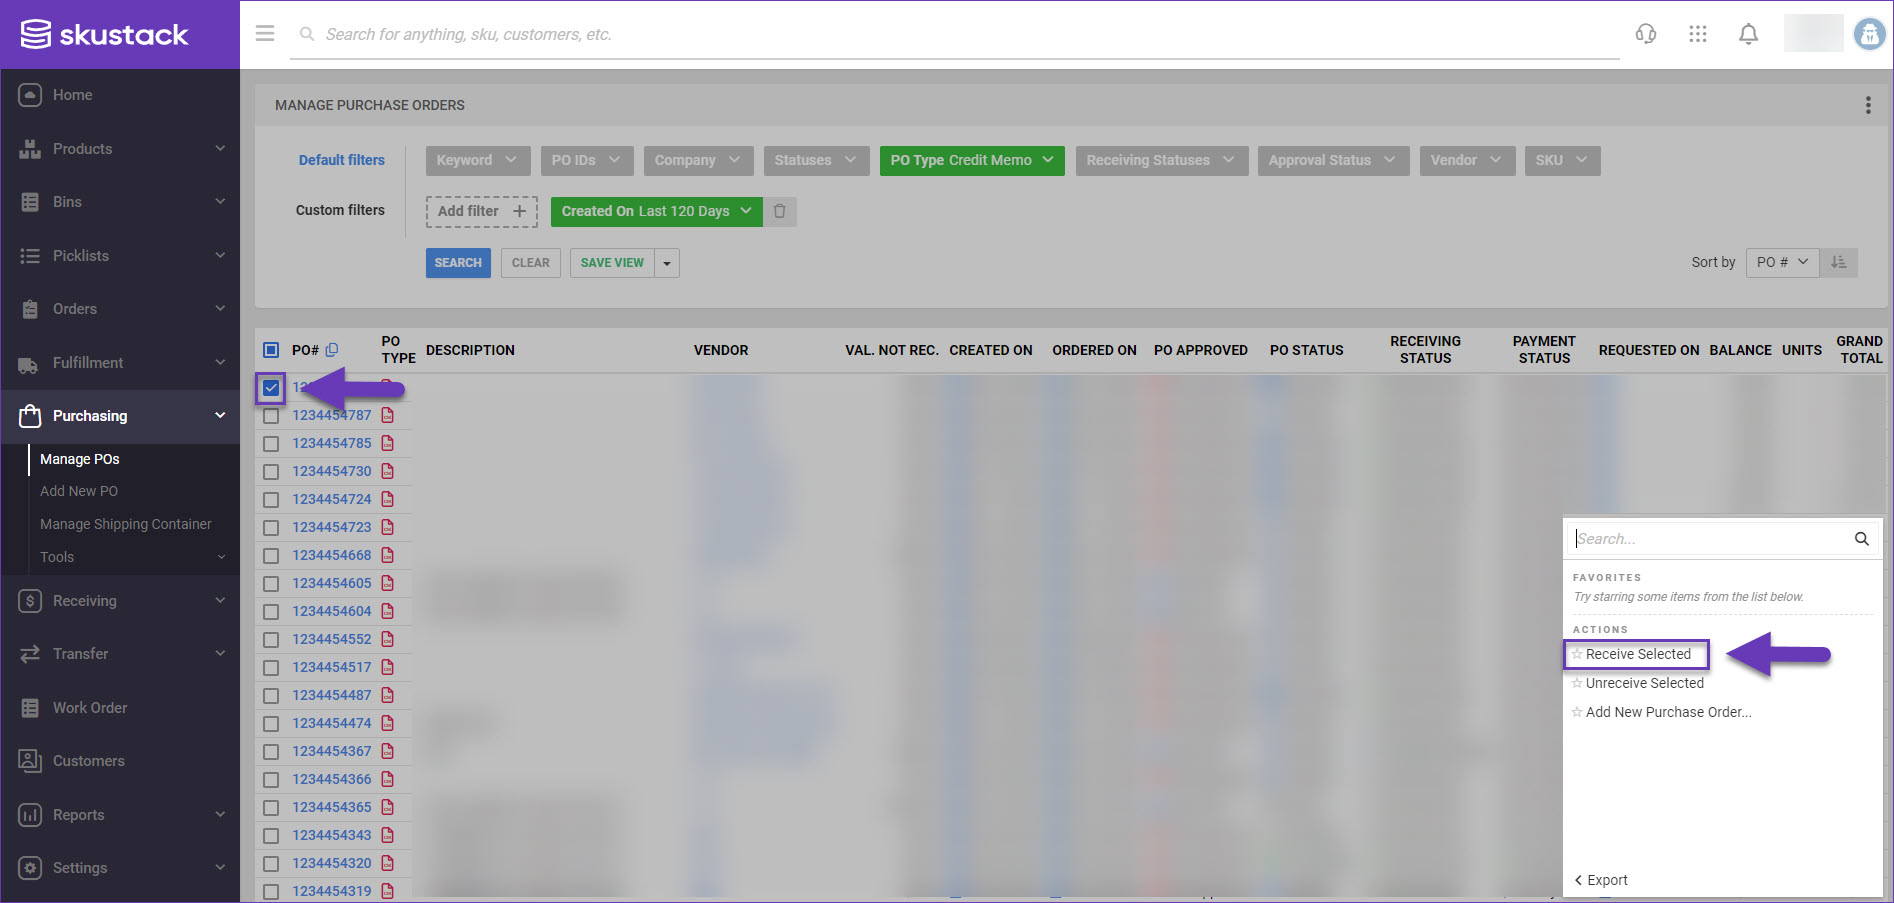
You also have the option to ship Credit Memos from the Manage POs page:
- Navigate to Purchasing > Manage POs.
- Select the required Credit Memo from the grid.
- Access the Actions menu and click Receive Selected to mark it as received by its Vendors.
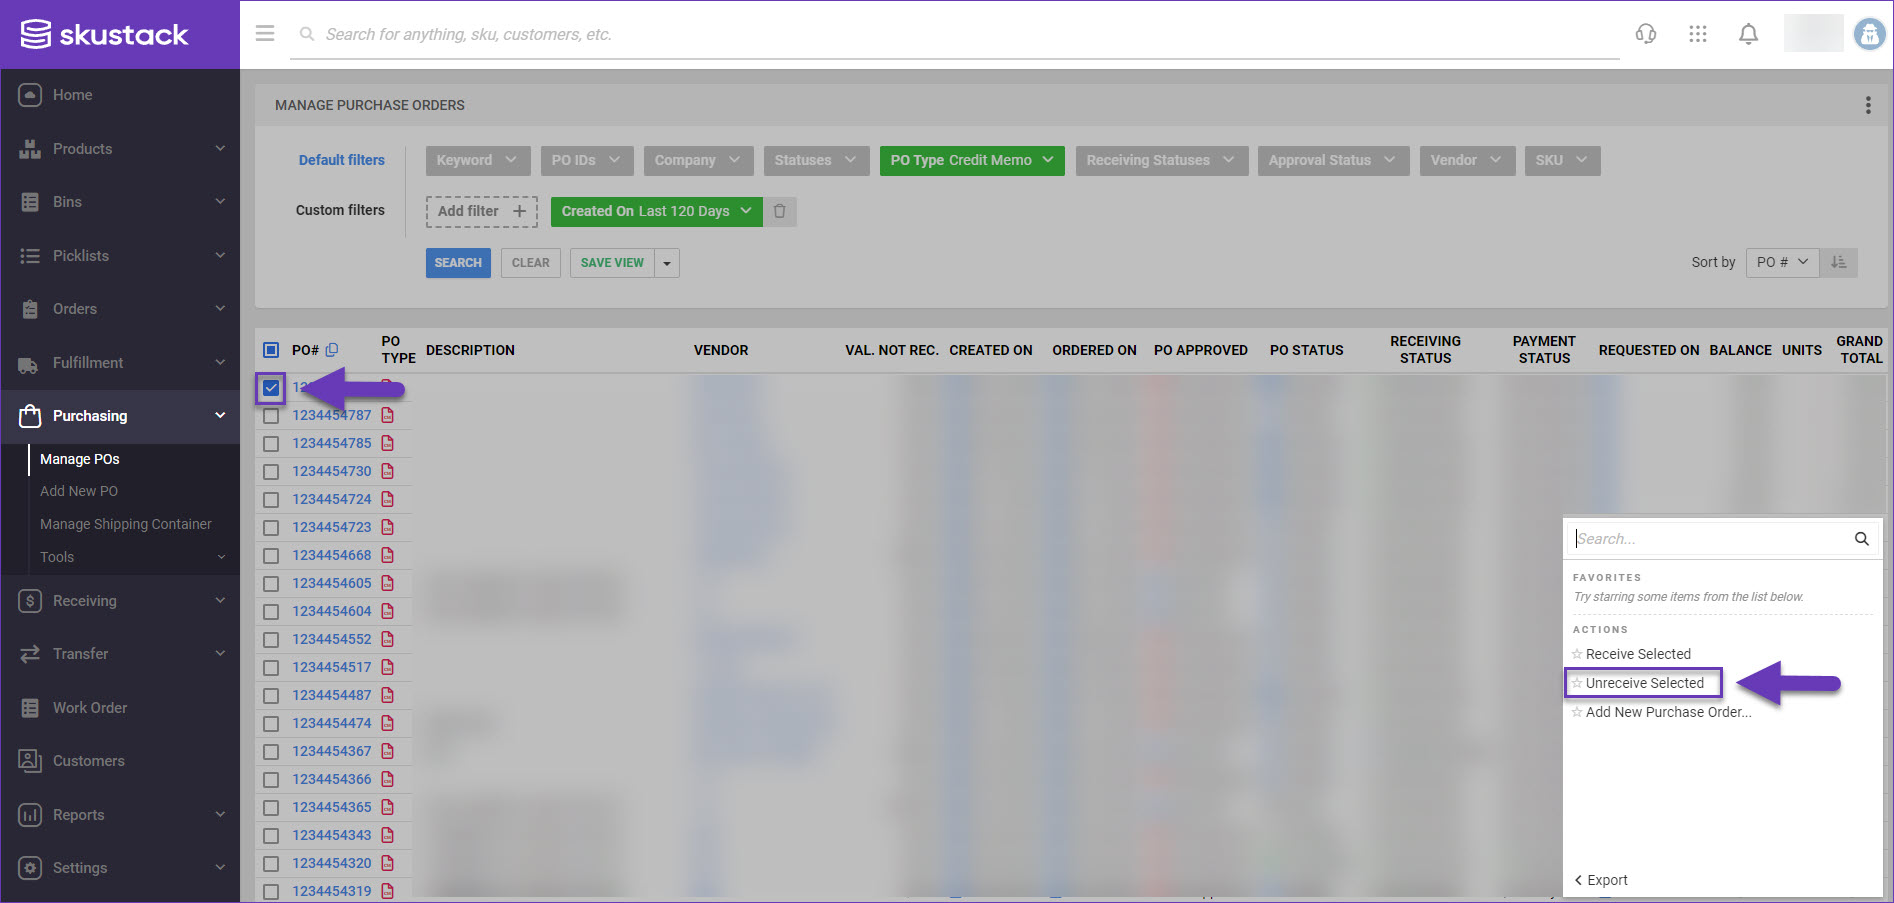
To mark a Credit Memo as Not Received by its Vendor:
- Navigate to the Manage POs page and select the required Credit Memo from the grid.
- Access the Actions menu and choose Unreceive Selected.
- A Queued job will be generated, from which you can monitor the status of the task. Once successfully completed, the Credit Memo will be unshipped.
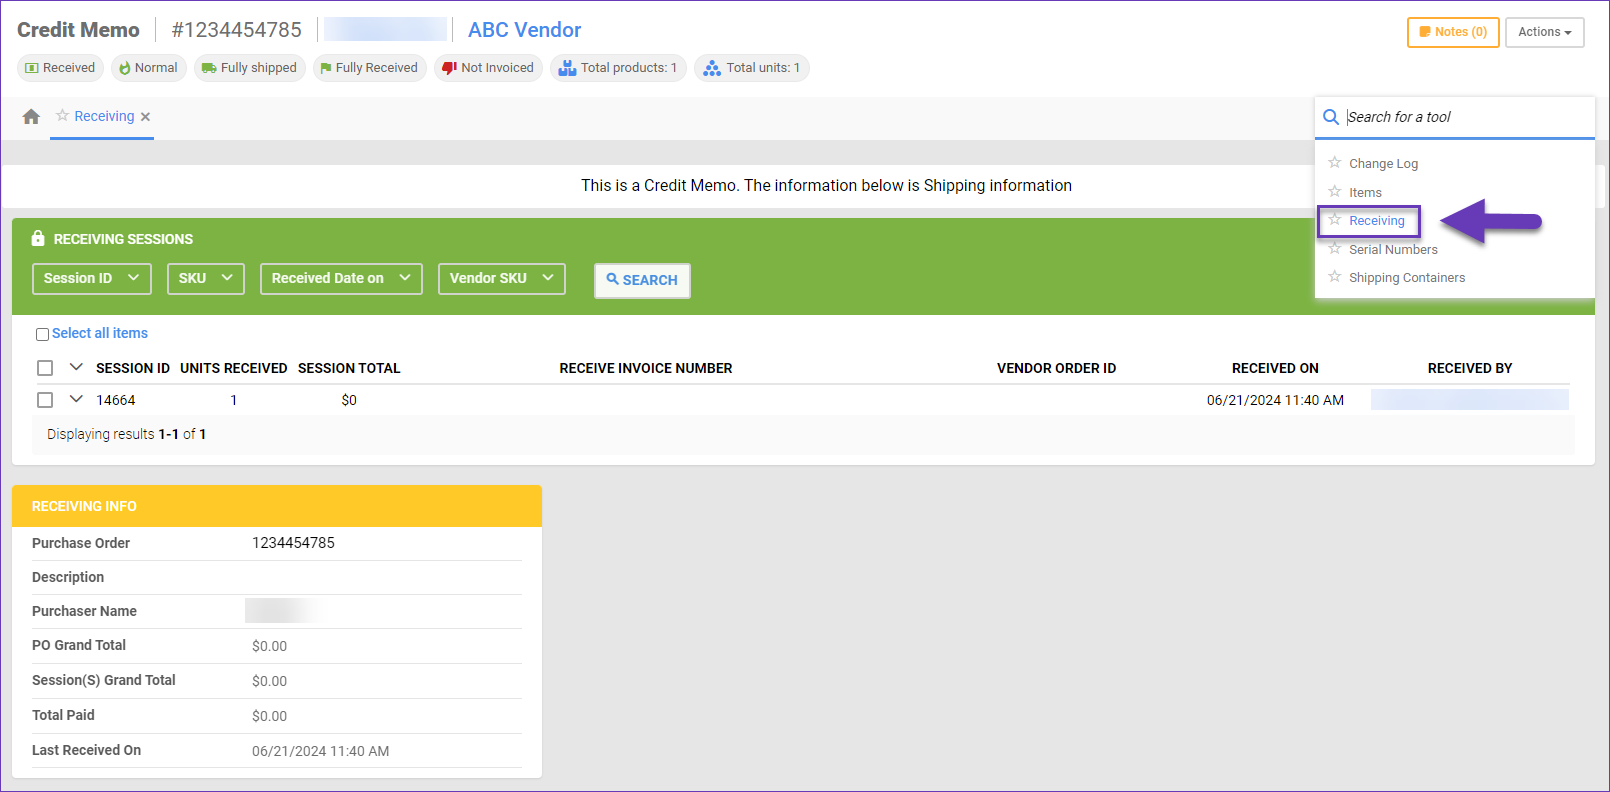
Search Receiving Sessions
On the Credit Memo’s Receiving page, you can view its Shipping details. To display the list of Receiving sessions, navigate to the memo’s Toolbox and choose Receiving.
You can filter the list of Receiving Sessions by:
- Session ID – Search sessions by their unique identification number.
- SKU – Show only sessions with a specific SKU.
- Received Date On – Show sessions by their receive date.
- Vendor SKU – Show sessions based on the received item’s Vendor-Specific SKU.
The Receiving Sessions grid shows the following details about each session:
- Session ID – The unique ID of the receiving session. Clicking the dropdown arrow to the left of the Session ID displays an additional row with more details:
- Receive ID – Each SKU within a receiving session has a unique Receive ID.
- SKU – The product’s SKU.
- Vendor SKU – The product’s Vendor-Specific SKU.
- Product Name – The product’s name.
- Quantity Received – The number of product units received in the session.
- Warehouse – The warehouse where the item has been received.
- Units Received – The number of received units.
- Session Total – The total amount paid for the received items.
- Receive Invoice Number – The number of the invoice associated with the receiving session.
- Vendor Order ID – The number of the associated order issued by the vendor.
- Received On – The date when the receiving session was added.
- Received By – The Employee who completed the receiving session.
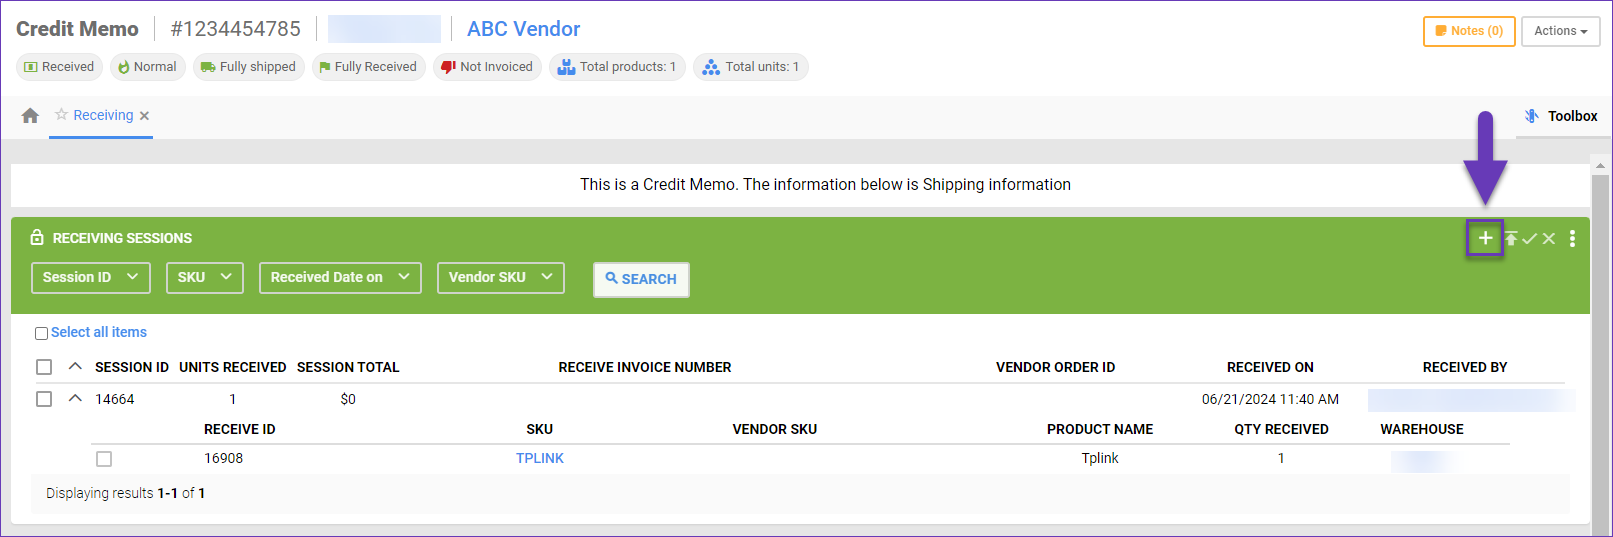
Add and Delete Receiving Sessions
To add a new Receiving Session:
- Open a Memo’s Receiving page.
- Click the Edit icon at the top right of the Receiving Sessions panel.
- Click the + icon.
- Optionally, in the Session Details panel, you can enter:
- Receive Invoice # – The number of the invoice associated with the receiving.
- Vendor Order ID – The number of the associated order issued by the vendor.
- In the Items panel:
- Quantity To Ship – Enter the number of products to ship or click the blue arrow icon to autofill the remaining quantity of all SKUs.
- Optionally, update the rest of the details.
- Click Ship Items.

To delete receiving sessions in regular warehouses:
- Open the required Credit Memo’s Receiving page.
- Check the box next to the Session ID, to select it.
- Click three dots at the top right and select Delete Receivings. Note that you can’t undo this action.

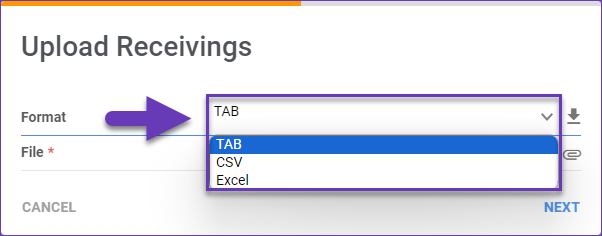
Bulk Import Receiving Sessions
To bulk-import receiving sessions:
- Click the Edit icon at the top right of the Receiving Sessions panel.
- Click the Upload Receivings icon.

- To download a sample template, select the appropriate file Format (Tab delimited, CSV, or Excel) and click the Download icon.
- Open the file and populate the following columns:
- ID – The Receiving Session ID.
- ProductID – The item’s SKU.
- QtyReceived – The quantity to receive.
- BinName – If you are receiving to a Bin-Enabled Warehouse, enter the bin name. Otherwise, leave this column blank.
- Save the updated template.
- Return to the Upload Receivings popup, upload the file, and click Next.

- In the Receive Session dialog box, complete the rest of the details and click Save.

Print Sessions
To export session details to a PDF file or an Excel spreadsheet:
- Open the required Credit Memo’s Receiving page.
- Check the boxes next to the Session IDs, to select them.
- Click three dots at the top right and select Print Session to Excel/PDF.

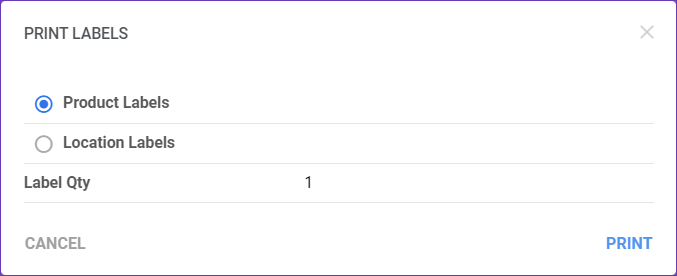
Print Labels
To print Product or Location labels for the SKUs in a Receiving Session:
- Open the required Credit Memo’s Receiving page.
- Check the boxes next to the Session IDs, to select them.
- Click three dots at the top right and select Print Labels.

- Select the Label type you want to print – either Product or Location.
- Enter the Label Quantity to print.
- Click Print.
Product Serials
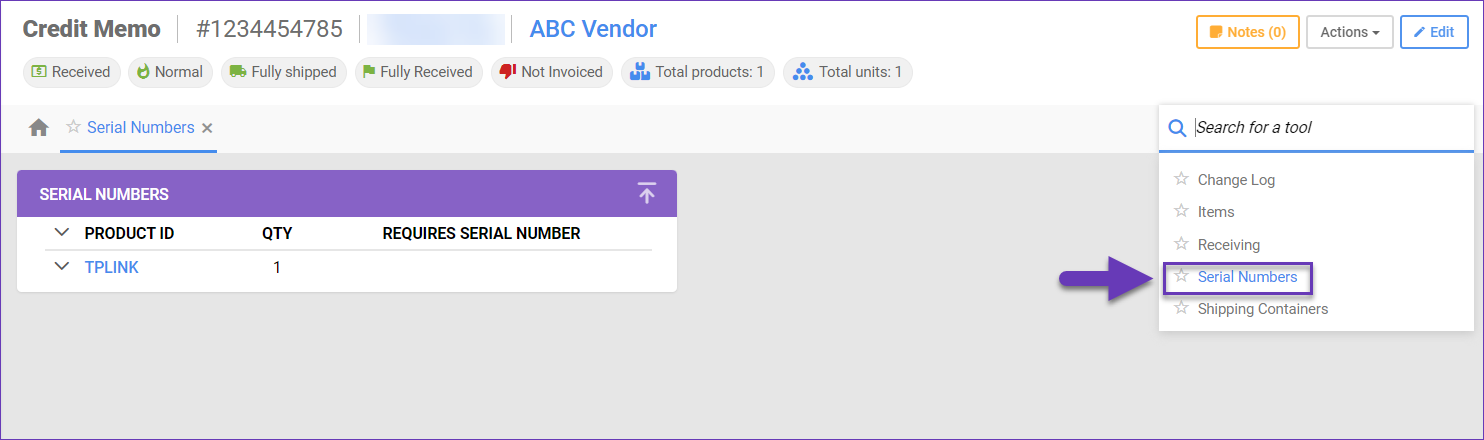
If the Credit Memo products have Serial Numbers, you can view and manage them by clicking Toolbox and selecting Serial Numbers.
If required, you can import product Serial Numbers in a few simple steps:
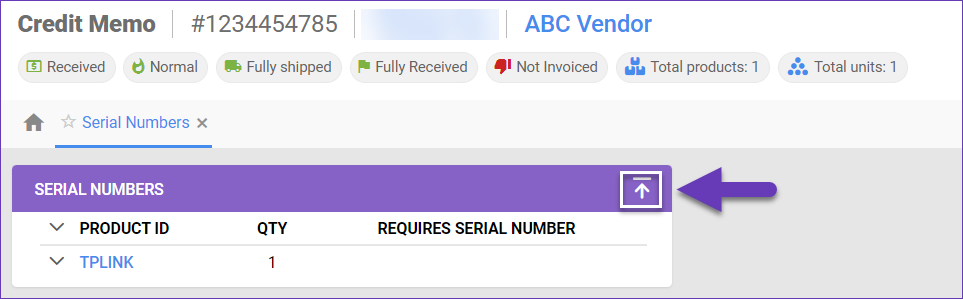
- Click the Upload Serials icon.
- Click Download Template.
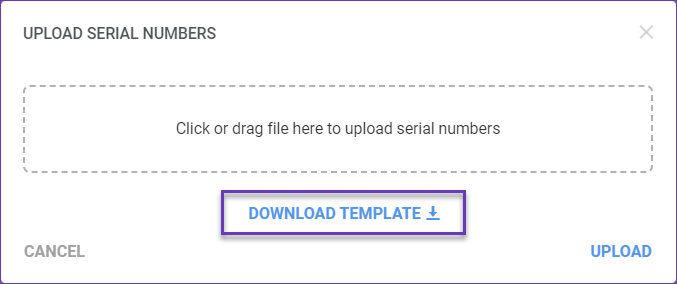
- Populate the ProductID, Serial Numbers and Notes, and Save the file.
- Return to the Upload Serial Numbers popup, add the file, and click Upload.

Shipping Containers
Any Shipping containers associated with a Credit Memo can be viewed by navigating to the memo’s Toolbox and selecting the Shipping Containers tab. Further information on Shipping Containers can be found here.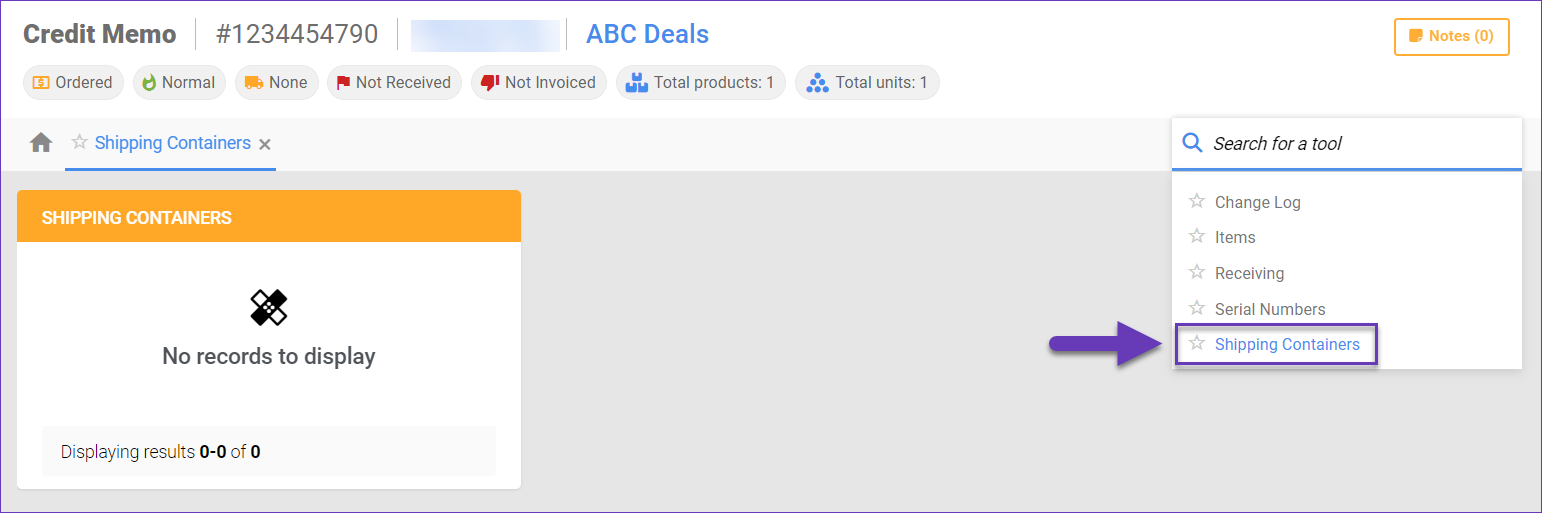
Related Settings
| SETTING | DESCRIPTION |
| Validate serial globally |
Client Setting. Enables serial number validation in Skustack. Learn more about serial number validation and relevant client settings here. |
| Require serial scan when picking | Skustack’s Warehouse Management setting. When enabled, will force the user to scan serials for products that are set to require serial scan. |
| Auto populate progress quantity when bin is selected | Skustack’s Warehouse Management setting. When a bin is selected, the Pick Qty field will automatically be set to the total quantity available in that bin, up to the quantity required. |