
Overview
The FBA Inbound PickList module is located within Skustack’s Fulfillment tab. In this module, you can pick units for your FBA Inbound Shipments.
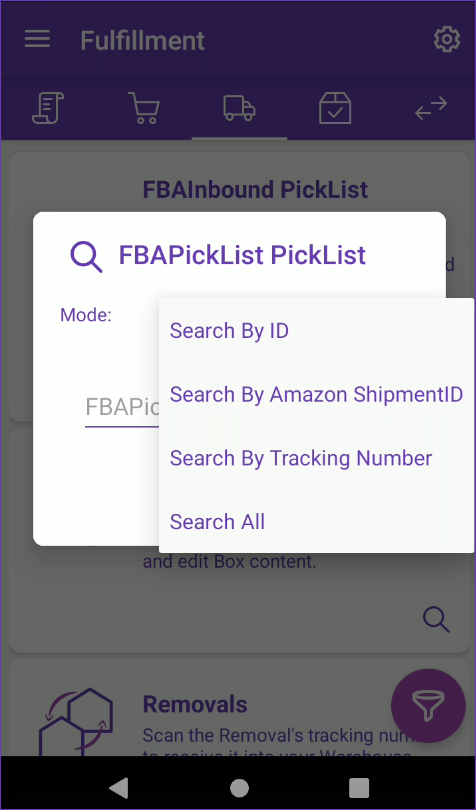
You can search for FBA Shipments in one of four modes. Refer to the below list for a definition of each mode.
- Search By ID – Opens a single FBA Shipment using the internal Sellercloud ID.
- Search By Amazon Shipment ID – Opens a single FBA Shipment using the Amazon ID.
- Search By Tracking Number – Opens a single FBA Shipment using the Amazon tracking number.
- Search All – Searches for all FBA shipments. You can filter by:
- Status
- Defaults to previewed/working. You can choose from one of the available statuses:
- Saved
- Previewed/Working
- Previewed
- Working
- Shipped
- InTransit
- Delivered
- CheckedIn
- Receiving
- Closed
- Canceled
- Error
- Warehouse
- Defaults to the warehouse you are logged into.
- SKU/UPC
- Filters by a specific product or UPC.
Pick FBA Shipments
- In the Fulfillment tab, select FBAInbound PickList module > Search.
- Tap Mode > Select your desired mode.
- Scan/enter the Sellercloud ID, Amazon ID, or Amazon tracking number, depending on the search option.
- Tap Go and the picklist will load on your screen.
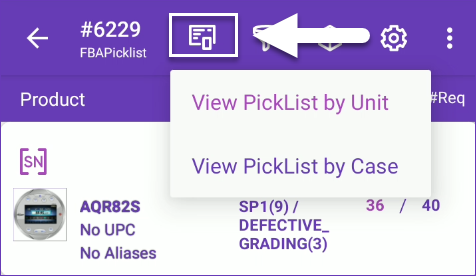
- To manage your picklist by the case, tap on the top left picklist icon and select View PickList by Case. Case Qty mode must be enabled for the FBA shipment. Skustack will save your View PickList choice as your preferred viewing method and automatically apply it the next time you manage FBA picklists.
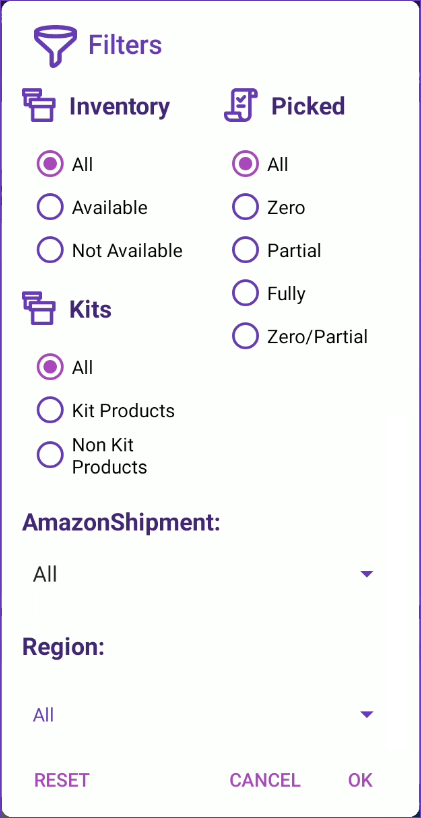
- You can also filter open shipments. Simply tap the Filter icon and filter by Inventory, Picked status, Kit products, Amazon Shipment, and Region.
- All products in the shipment with their picked quantity and total quantity required will load. Icon indicators above each item display key details. Refer to the definitions below for a description of each icon.

- A serial number icon indicates that the product is serialized.
- An hourglass icon indicates that the item is expirable.
- A barcode icon indicates that the product requires an FNSKU label.
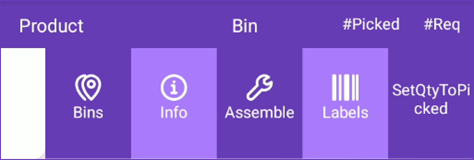
- Swipe left on an item to reveal shortcuts to other actions:
- Bins – Here you can view all bins where the product is stored.
- Info – Tap to reveal the product info module.
- Assemble – Use this option to assemble kits for your FBA shipment.
- Labels – Print FBA product labels for each item. To include expiration dates on the FNSKU labels, enable the Enter expiration date on FBA Labels Warehouse Management setting.
- Set Qty to Picked – Tap to manually set the Required Quantity to be equal to the current Quantity picked here.
- Scan the ProductID/UPC/Serial, or select the item on the screen. The product will open.
- Tap on the three dots menu in the upper right-hand corner to:
- Reset Dialog – Use this option to remove selected data from the picking dialog.
- Print Labels – This option allows you to print a custom number of product labels with the product’s FNSKU barcode. Use the up and down arrows, or simply enter the required amount. Check the Include Product Name box, to include the product name in the labels. When the Enter expiration date on FBA Labels Warehouse Management setting is enabled, you can also include expiration dates on the FNSKU labels. Once done, tap Print.
- Prep Instructions – Tap on this option to view the product’s FBA preparation instructions.
- Assemble Kits – When picking Kits, you can select a parent product and use this option to pick all required kit components, and assemble the necessary kits.
- Enter the bin from which you are picking or select the suggested bin. The suggested bin may appear next to the Bin field. This suggestion is based on the following factors:
- The bin is sellable. Although unsellable bins are excluded from the suggestions list, you can still manually enter an unsellable bin name if needed.
- The bin type is Normal or Temp.
- Primary bins will always be suggested first.
- The bin with the most or least quantity will be suggested based on the client setting PickList Bin suggestion sort qty by ASC Order.
- Scan units to add to the picked qty or adjust the number manually. To auto-populate the total quantity available for the scanned product in that bin, enable Skustack’s Warehouse Management setting Auto populate progress quantity when bin is selected.
Picking replacement products is disabled for FBA Shipments.
- If the Lot Number workflow is enabled for your company and the product is set as expirable, you must select a Lot Number before being able to pick it.
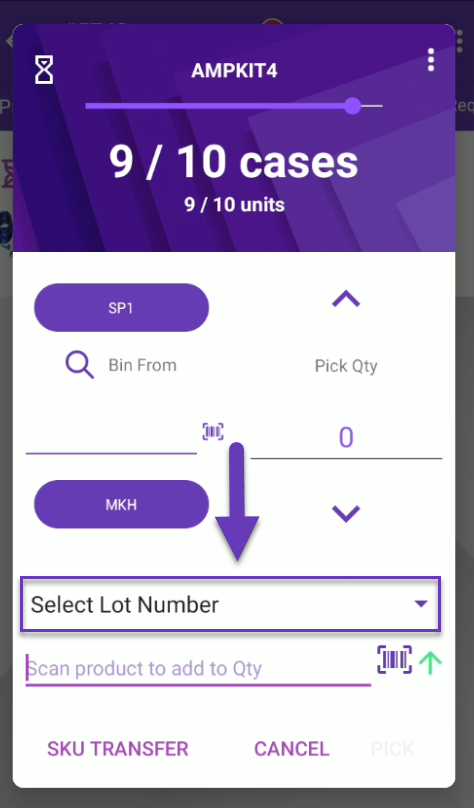
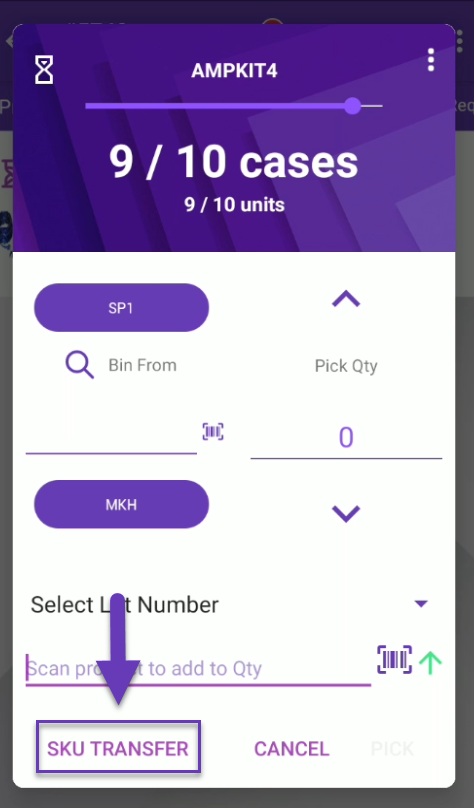
- If you need to pull inventory from a different SKU, tap on SKU Transfer.
- Tap Pick to update the picked quantity.
To switch between positive and negative movements for serialized products, tap on the green arrow. Note that the arrow indicator must be red in order to unpick products with serial numbers.
- If you are not picking the full quantity, a dialog will open with a list of Amazon shipments with products that are not yet fully picked (either zero-picked or partially picked).
- Select the shipment or select all.
- The quantity picked will be updated.
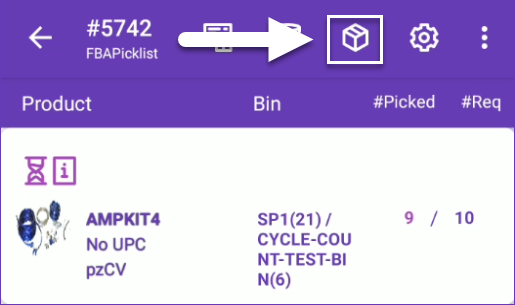
Manage Boxes
Once you’re done picking the items, you may want to start grouping them into boxes. To manage box content and assign products to each box:
- Tap the Box icon and select an Amazon package from the list.
You can also manage boxes from the FBAInbound BoxContent module. Learn more about that here. - Tap the Box# you want to add items to or swipe left to reveal shortcuts to other actions:
- Dimens – Set package types and box dimensions, enter a tracking number, or get a 4D scale reading.
- Delete – Delete the box.
- Duplicate – Duplicate the box.

- Scan units to add qty to boxes or adjust the number manually.
- Print the box labels in the desired format – Amazon 2D Barcode, Skustack BoxId, Amazon Box Label.
Based on Amazon’s Shipping and routing requirements, boxes containing multiple items should not exceed 50 pounds. A warning message during the boxing process will indicate if the weight of the boxed items exceeds this limit. The verification will only occur if valid product weight information has been entered.
Note that only the quantity picked is available to be boxed.
Related Settings
| SETTING | DESCRIPTION |
| Validate serial globally |
Client setting. Enables serial number validation in Skustack. Learn more about serial number validation and relevant client settings here. |
| Require serial scan when picking | Skustack’s Warehouse Management setting. When enabled, will force the user to scan serials for products that are set to require serial scan. |
| Auto print FNSKU label when picking an item for an FBA Shipment | Skustack’s Warehouse Management setting. When enabled, FNSKU labels will be printed automatically when an item is picked. |
| Auto Print FBA Box Label When Picking | Skustack’s Warehouse Management setting. When enabled, box labels will be printed automatically when the items in the box are fully picked. |
| Allow unpick | Skustack’s Warehouse Management setting. When enabled, the unpicking option within the Order picking dialog will be available. |
| PickList Bin suggestion sort qty by ASC Order | Client Setting. Once enabled, the suggested picking bin will be the one with the lowest product quantity. |
| Enter expiration date on FBA Labels | Skustack’s Warehouse Management setting. Enables you to manually include an expiration date when printing FNSKU labels. |
| Print labels as QR codes | Skustack’s Warehouse Management setting. Enable this setting so your product labels contain a QR code, instead of a barcode. |
| Auto populate progress quantity when bin is selected | Skustack’s Warehouse Management setting. When a bin is selected, the Pick Qty field will automatically be set to the total quantity available in that bin, up to the quantity required. |