
Overview
Skustack helps you track and manage the shipping and receiving process for Purchase Orders (POs) delivered with Shipping Containers. This workflow allows you to stay on top of different parts of the process, from the initial order placement to the arrival of the shipping container at the shipping port and up to the receiving of the purchased items at your warehouse.
You can also use this workflow to group together multiple regular POs just to organize the receiving process. Once you receive orders grouped with the shipping container feature, associated POs are automatically updated with any relevant information, such as received quantities.
Creating and managing the items in a container is only possible through the Skustack Admin, while the receiving process can be handled through the Skustack app.
Receive Container Module
The Receive Container module is located within Skustack’s Receiving tab and allows you to easily receive your products by container. A container can include products from different Purchase Orders.
You can search containers by:
- Search by ContainerID – Opens a specific Container ID. The container can include items from different Purchase Orders.
- Search by PO# – Opens all related containers associated with that PO#.
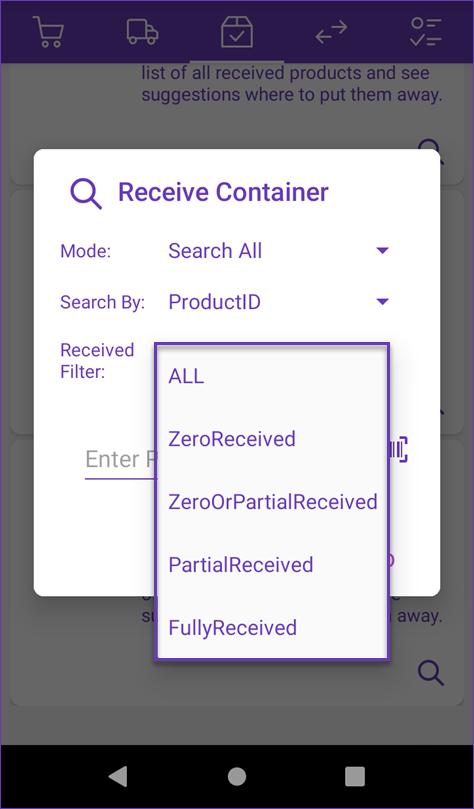
- Search All – Searches for all containers. You can filter by:
- Product ID/Container Name
- Filters by a specific product or container.
- Received Filter
- Defaults to previewed/working. You can choose from one of the available statuses:
- All
- Zero Received
- Zero Or Partial Received
- Partial Received
- Fully Received
Receive Containers
To receive your products by container, follow the steps below:
- Navigate to Receiving > Receive Container.
- Select your desired Search Mode.
- Scan/enter the ContainerID or PO # depending on the search mode or simply search all.
- Tap Go.
- Select your desired container. You can also filter items within the container by their received status. Simply tap the Filter icon and choose your filters.
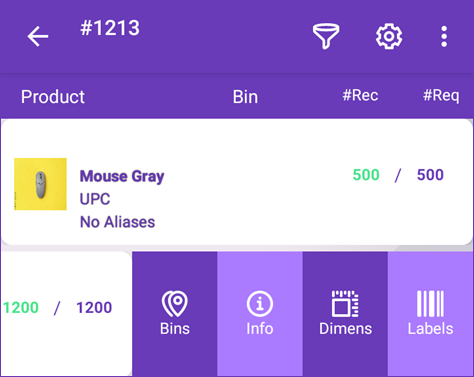
- Swipe left on an item to reveal shortcuts to other actions:
- Bins – here you can find all the bins where the product is stored.
- Info – this will reveal the product info module.
- Dimens – set product dimensions or get a 4D scale reading.
- Labels – you can print product labels for each item.
- Scan the ProductID/UPC/Serial, or select the item on the screen. The product will open.
- Scan/enter a bin, or select from the list of suggested bins.
Enable the Use Receiving Bin setting in Skustack to only allow receiving into a receiving bin. You can then use the PutAway workflow to transfer inventory from the temporary receiving bin to permanent bins on the warehouse shelf.
- Scan units to add to the received qty or adjust the number manually.
To receive more units than originally specified in the container’s Total Qty, enable the Allow To Over Receive Container Client Setting.
- If you’re not receiving the full quantity in the container, a dialog will open, giving you the option to select which PO you are receiving it for. If you are receiving the full amount, that dialog will not appear.
- If the Lot Number workflow is enabled for your company and the product is set as expirable then you must select a Lot Number before receiving it. Tap on More Lot/Expirys to view existing or add new lots. Learn more about Lot Numbers here.
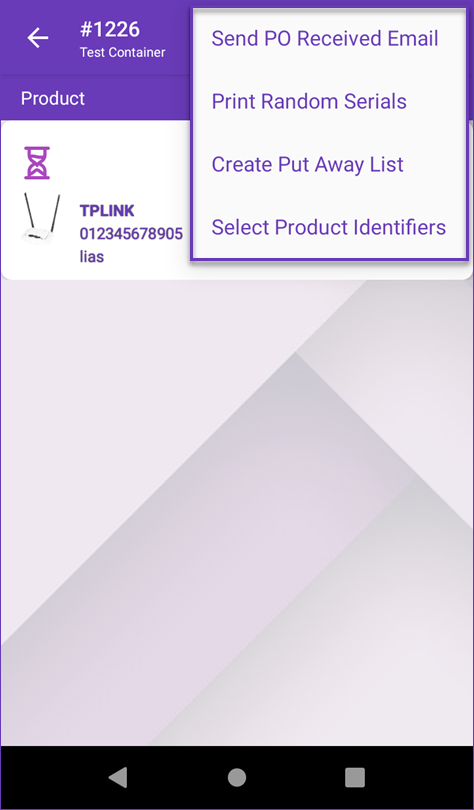
- Tap the menu in the upper right-hand corner to:
- Send PO Received Email
- Print Random Serials
- Create Put Away List
- Select Product Identifiers
Overview
Skustack helps you track and manage the shipping and receiving process for Purchase Orders (POs) delivered with Shipping Containers. This workflow allows you to stay on top of different parts of the process, from the initial order placement to the arrival of the shipping container at the shipping port and up to the receiving of the purchased items at your warehouse.
You can also use this workflow to group together multiple regular POs just to organize the receiving process. Once you receive orders grouped with the shipping container feature, associated POs are automatically updated with any relevant information, such as received quantities.
Creating and managing the items in a container is only possible through the Skustack Admin, while the receiving process can be handled through the Skustack app.
Manage Shipping Containers
There are two pages related to shipping containers:
- The Manage Shipping Container Page:
- Lets you create new shipping containers.
- Lets you view all your shipping containers and filter them in various ways, such as by shipping or receiving status.
- Lets you perform bulk actions on multiple containers simultaneously, such as changing their shipping or receiving status.
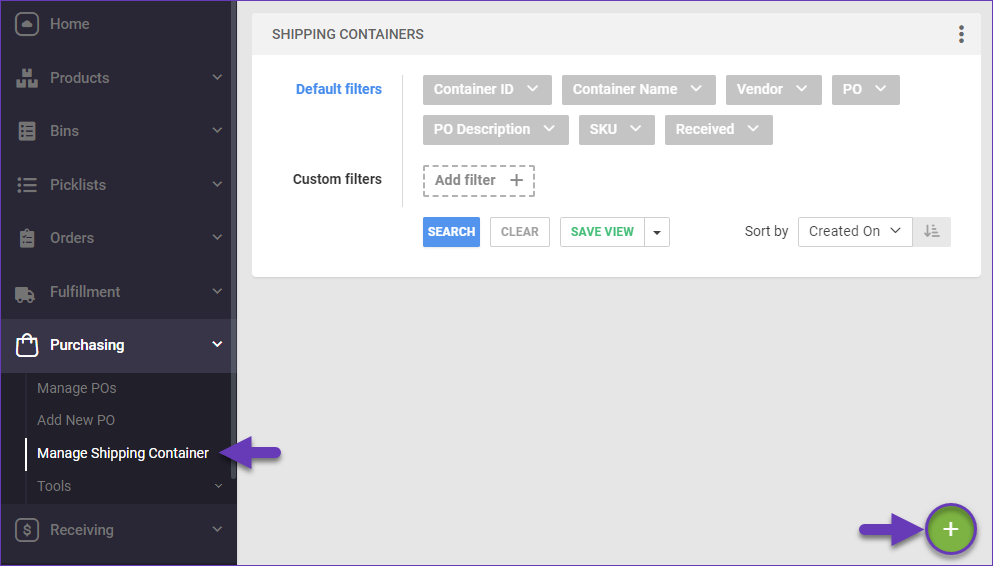
- To access the Manage Shipping Container page, go to Purchasing > Manage Shipping Container.
- The Shipping Container Details Page:
- Each individual shipping container has its own Shipping Container Details page.
- This page lets you view and manage everything about a specific shipping container, such as shipping and receiving, expected delivery dates, and more.
- To access the Shipping Container Details page, go to the Manage Shipping Container page and click a Container ID.
Search Shipping Containers
The Manage Shipping Container page consists of three components:
- Search Filters – Search options that let you narrow down your results and show only the shipping containers you are interested in. You can save specific searches for repeat use.
- Search Results – A list of containers that match your search criteria. You can sort it differently and even show or hide different data columns.
- Actions – A wide range of actions you can perform on one shipping container at a time or in bulk. These actions help you manage your containers quickly and easily.
Filters
Filters offer multiple-choice selection lists or allow you to enter specific values. Your choices build on each other. Each subsequent choice narrows the scope of your search results further and affects what the page displays. You can add as many filters as you like or none at all.
There are Default filters that are always displayed and Custom filters that you can display manually by clicking the Add filter button and selecting a filter from the list. To remove a custom filter from the page, click the Trash icon next to it.
After you click Search, each filter you apply gets highlighted in orange or green. If a filter is gray or not displayed at all, it’s not active. You can add or remove filters and search again at any time.
Once you set up your filters, click Save View to save the search. Then, you can repeat the same search by selecting it from the Saved Views menu on the top right.

Refer to the tables below for all filters and their descriptions.
Default filters
| Filter | Description |
| Container ID | Show only specific shipping containers by their unique Container ID. |
| Container Name | Show only specific containers by Container Name. |
| Vendor | Show only containers with POs from one or more specific Vendors. |
| PO | Show only containers with specific POs, searching by PO ID. |
| PO Description | Show only containers with specific text in their description. |
| SKU | Show only containers with one or more specific SKUs. |
| Received | Show only containers with one or more receival status values: Fully Received, Partially or Fully Received, Partially Received, None or Partially Received, or Not Received. |
Custom filters
| Filter | Description |
| Container Status | Show only containers with one or more specific Container Status values: Saved, Ordered, Pending, Received, or Completed. |
| Created On | Show only containers created within a specific time range. |
| ETA Port | Show only containers whose estimated time of shipping port arrival is within a specific time range. |
| Estimated Arrival Date | Show only containers expected to arrive at the warehouse within a specific time range. |
| Invoice Number | Show only specific shipping containers by their unique Invoice #. |
| Is Exported | Show only containers that are or are not marked as Exported. |
| Order Source/SPO # | Show only specific shipping containers by their unique Order Source/SPO #. |
| Port | Show only containers arriving at one or more specific shipping ports. |
| Received Date | Show only containers received within a specific time range. |
| Shipped On Date | Show only containers shipped within a specific time range. |
| Shipped On Date Range | Show only containers shipped within specific predefined time periods. |
| Shipping Status | Show only containers with one or more Shipping Status values: Arrived, Not Arrived, Shipped, Not Shipped, or Receiving Errors. |
| Vessel Number | Show only specific shipping containers by their Vessel Number. |
| Warehouse | The warehouse where the container is expected to arrive. |
Search Results
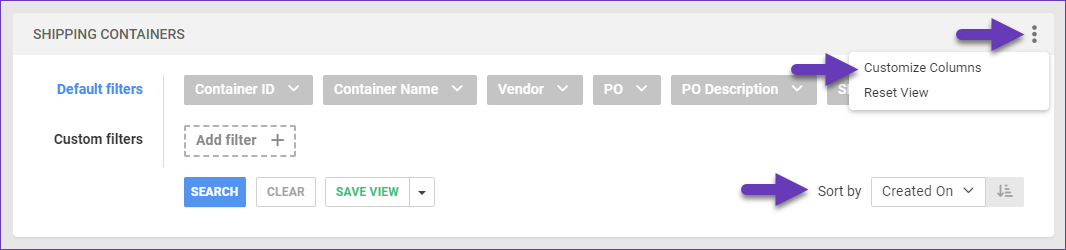
The search results show a list of shipping containers matching your search criteria. This list is comprised of various data columns showing related information. You can add, remove, and re-order data columns by clicking the three dots icon on the top right and selecting Customize Columns.
You can also sort the containers in a different order based on a specific column using the Sort by drop-down menu.
Refer to the table below for all data columns and their descriptions.
| Data Column | Description |
| Container ID | The shipping container’s unique identifier. |
| Vendor Name | The Vendor associated with the first line item in the container. |
| Container Name | The container’s name. |
| ETA Port | The shipping vessel’s estimated arrival time at the shipping port. |
| Port Name | The name of the shipping port where the container is expected to arrive. |
| Created On | The date when the container was created. |
| Shipped On | The date when the creator was shipped. |
| ETA | The container’s estimated time of arrival at the warehouse. |
| Received On | The date when the container was received at the warehouse. |
| Total Qty | The total product unit quantity in the container. |
| Total Received | The total received quantity. |
| Total Cost | The total cost of all products in the container. |
| Status | The value of the Container Status field: Saved, Ordered, Pending, Received, or Completed. |
| Is Exported | The Exported status: Exported or Not Exported. |
| Invoice Number | The Invoice # associated with the container. |
| Shipping Cost | The total shipping cost of the container. |
Actions
The Manage Shipping Container page also offers actions you can perform on one container at a time or in bulk. These actions help you quickly manage your containers.
The Actions icon is located on the bottom right of the page. By default, it is a green plus icon that lets you create a new container. However, the icon turns blue when you select containers from the search results by checking the boxes to their left. Once it’s blue, you can click it to perform actions on any selected containers.

Refer to the table below for all actions and their descriptions.
| Action | Description |
| Create Container | Create a new shipping container. |
| Delete | Permanently delete a container. |
| Receive Containers | Mark all items in the selected containers as fully received at the warehouse. This action sets the Container Status to Received and updates the Received On date and any Received item quantities. The received inventory will appear in the selected warehouse, and the relevant POs will also update their Status to Partially Received or Fully Received and reflect any Received item quantities. |
| Export To Excel | Export information about the selected containers to a spreadsheet. |
| Export To Excel With Items | Export information about the selected containers to a spreadsheet. This option also includes item information, each on a different row. |
| Mark Arrived | Set the Shipping Status of the selected containers to Arrived to indicate they arrived at the shipping port. |
| Mark Not Arrived | Set the Shipping Status of the selected containers to Not Arrived to indicate they have not arrived at the shipping port. |
| Set Containers Status | Update the selected containers’ Container Status field to Saved, Ordered, Pending, Received, or Completed. |
| Create Vendor Invoices | Creates Vendor Invoices for all POs in the selected containers. |
| Mark Exported | Set the Exported status of the selected containers to Exported. |
| Mark Un-Exported | Set the Exported status of the selected containers to Not Exported. |
| Export Via Plugin | Export the selected containers using a custom Container Export plugin. |
Create Shipping Containers
To create a shipping container:
- Go to the Manage Shipping Container page.
- Click the green plus icon at the bottom right.
- Complete as follows:
- The Container Name must match the container ID your Vendor provided when applicable.
- The Receiving Warehouse must match the receiving warehouse on any POs you plan to add to this container.
- The Shipping Status indicates the container’s current stage within the shipping process: Receiving Errors, Not Shipped, Shipped, Not Arrived, or Arrived.
- Shipped On is the date when the container has been or will be shipped.
- The Estimated Arrival Date is the date when the items are expected to arrive at the warehouse.
- Click Create.

Add Items to a Container
You can fill a container with items manually or by importing a file.
Manually
To add items to a container manually:
- Go to the Shipping Container Details page.
- Click the Add New Item plus icon at the top right of the Items panel.

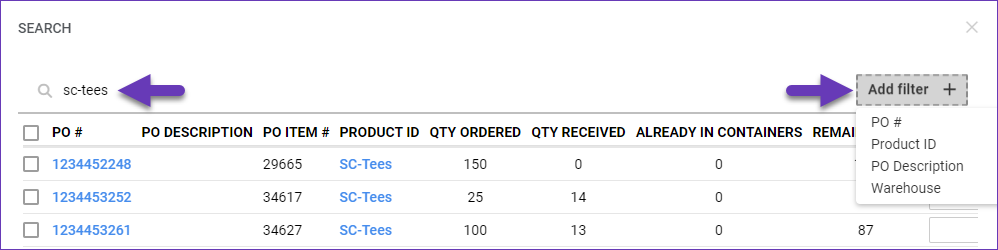
- Search for items by SKU. Optionally, you can filter your search by clicking the Add Filter button. You can filter by PO ID, PO Description, or Warehouse.
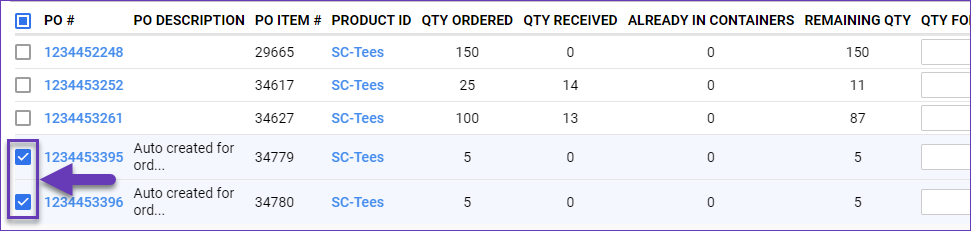
- When an item appears next to the correct PO, check the box to the left to select it.
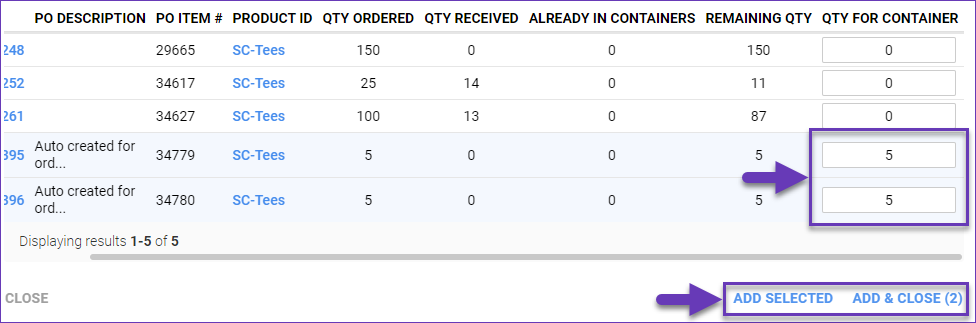
- Enter the Qty For Container in the last field to the right.
- Click Add & Close. Alternatively, click Add Selected to keep searching and adding items.
File Import
To import products to a Shipping Container via a file:
- Go to the Shipping Container Details page.
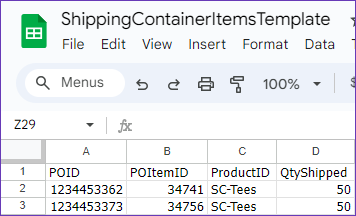
- Click the Download template icon at the top right of the Items panel.

- Fill out the spreadsheet template:
- POID – A PO’s unique identification number.
- POItemID – The automatically generated line item ID on the PO. You can find it by going to the PO > Toolbox > Items tab. You can also use it to update items in the shipping container.
- ProductID – The product’s SKU.
- QtyShipped – The item’s quantity in the container.
- Click the Upload New Items icon and select the updated spreadsheet.

Receive Containers
You can mark the items in a shipping container as received for one container at a time or for multiple containers in bulk:
Single Container
To receive items in a single container:
- Go to the Shipping Container Details page.
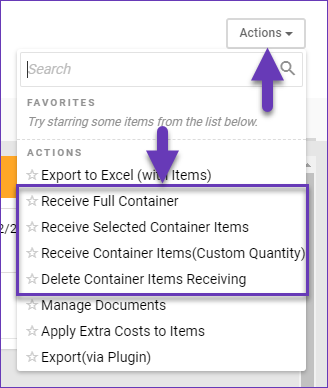
- In the upper right, click Actions and select the appropriate option:
- Receive Full Container – Mark all items in the container as fully received at the warehouse. This action sets the Container Status to Received and updates the Received On date and any Received item quantities. The received inventory will appear in the selected warehouse, and the relevant POs will also update their Status to Partially Received or Fully Received and reflect any Received item quantities.
- Receive Selected Container Items – Mark only specific selected items as received at the warehouse. This action updates any Received item quantities. If all items are received after this action, it also sets the Container Status to Received and updates the Received On date. The received inventory will appear in the selected warehouse, and the relevant POs will also update their Status to Partially Received or Fully Received and reflect any Received item quantities.
- Receive Container Items (Custom Quantity) – Mark partial item quantities as received at the warehouse. This action updates any Received item quantities. If all items are received after this action, it also sets the Container Status to Received and updates the Received On date. The received inventory will appear in the selected warehouse, and the relevant POs will also update their Status to Partially Received or Fully Received and reflect any Received item quantities.
- Delete Container Items Receiving – Delete any received quantities of items in the container, which also sets the quantities in the Received column back to 0. If you do this action for all items in the container, it also clears the Received On date.
Multiple Containers
To receive items in multiple containers:
- Go to the Manage Shipping Container page and find the containers with items to receive.
- Check the boxes to the left of the containers to select them.
- Click the blue Actions icon at the bottom right.

- Select Receive Containers. This action updates the Received On date and any Received item quantities.
- Specify the Warehouse where the shipments will be received.
- Fill in the Bin Name if receiving in a bin-enabled warehouse.
- Click Receive. This action sets the Container Status to Received and updates the Received On date and any Received item quantities for all selected containers. The received inventory will appear in the selected warehouse, and the relevant POs will also update their Status to Partially Received or Fully Received and reflect any Received item quantities.
Update Container Statuses
You can update your shipping containers’ statuses for one container at a time or multiple containers in bulk:
Single Container
To update a single container’s status:
- Go to the Shipping Container Details page.
- Click Edit.
- Update the Container Status field to change the container’s general status: Saved, Ordered, Pending, Received, or Completed.
- Update the Shipping Status field to change the container’s shipping status: Arrived, Not Arrived, Shipped, Not Shipped, or Receiving Errors.

- Click Save.
Multiple Containers
To update multiple containers’s statuses:
- Go to the Manage Shipping Container page.
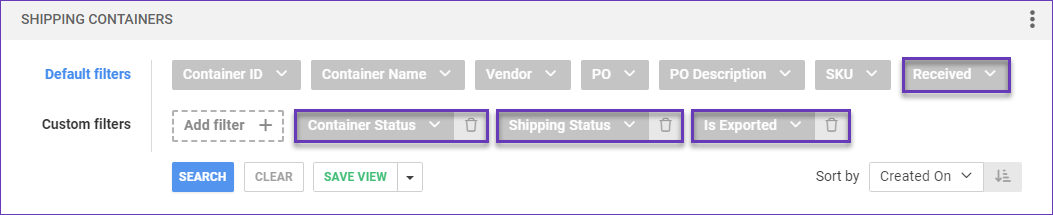
- Search to find containers. Optionally, you can filter them by their current status:
- Shipping Status – Show only containers with one or more Shipping Status values: Arrived, Not Arrived, Shipped, Not Shipped, or Receiving Errors.
- Container Status – Show only containers with one or more specific Container Status values: Saved, Ordered, Pending, Received, or Completed.
- Received – Show only containers with one or more receival status values: Fully Received, Partially or Fully Received, Partially Received, None or Partially Received, or Not Received.
- Check the boxes to the left of the containers to select them.
- Click the blue Actions icon on the bottom right.

- Select from the following status-related actions:
- Receive Containers – Mark all items in the selected containers as fully received at the warehouse. This action sets the Container Status to Received and updates the Received On date and any Received item quantities. The received inventory will appear in the selected warehouse, and the relevant POs will also update their Status to Partially Received or Fully Received and reflect any Received item quantities.
- Set Containers Status – Update the selected containers’ Container Status field to Saved, Ordered, Pending, Received, or Completed.
- Mark Arrived – Set the Shipping Status of the selected containers to Arrived to indicate they arrived at the shipping port.
- Mark Not Arrived – Set the Shipping Status of the selected containers to Not Arrived to indicate they have not arrived at the shipping port.
- Mark Exported – Set the Exported status of the selected containers to Exported.
- Mark Un-Exported – Set the Exported status of the selected containers to Not Exported.
Container Costs
Container shipping, duties & tariffs, and other expenses can be reflected in an item’s Average Cost.
Add Cost Information
To add container costs:
- Go to the Shipping Container Details page.
- Update the Shipping Cost and Cost Based Fees fields in the Cost Info panel.
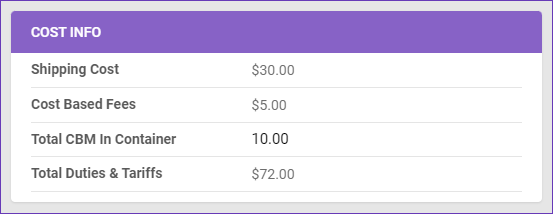
- Adjust the Unit CBM, Duties %, and Tariffs % in the Items panel.
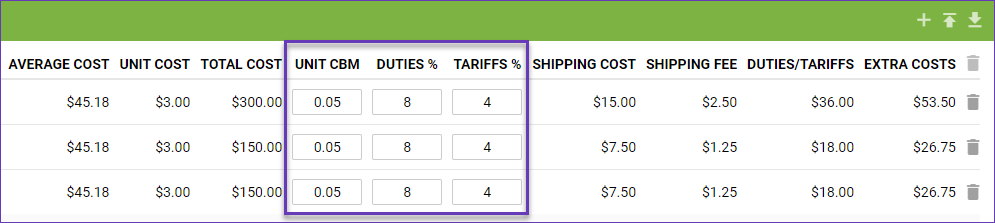
- The Total CBM In Container and Total Duties and Tariffs will be calculated automatically.
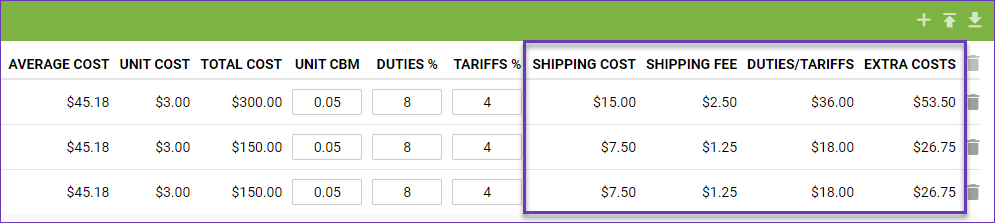
- In the Items panel, you can see your Shipping Cost, Shipping Fee, and Duties/Tariffs per item. The total amount of these three fields will be summed up as Extra Costs.
Apply Costs to Products
Once you receive a container and enter all costs, you can apply the cost adjustment to your products. The adjustment amount will be the Extra Costs divided between all units currently in stock and factored in towards the Average Cost of the products.
To apply costs to products:
- Go to the Shipping Container Details page.
- Click Actions and select Apply Extra Costs to Items.

To update costs after applying an adjustment, edit the cost fields to reflect the changes and use the Apply Extra Costs to Items action again. This will update the existing Average Cost modification.
Related Settings
| SETTING | DESCRIPTION |
| Validate serial globally | Client Setting. Enables serial number validation in Skustack. Learn more about serial number validation and relevant client settings here. |
| Allow To Over Receive Container | Client Setting. Enable to permit the receival of more units than originally specified in the container’s Total Qty. |
| Require serial scan if necessary | Skustack’s Warehouse Management setting. When enabled, will force the user to scan serials for products that are set to require serial scan when receiving. |
| Use Receiving Bin |
Skustack’s Warehouse Management setting. When enabled, only allows receiving into the Receiving bin. |