
Overview
The Return Merchandise Authorization (RMA) process is the recommended workflow for managing order returns. RMAs allow you to track and manage returns from the initial customer contact to the receipt of the returned items in your warehouse. You can utilize the Skustack Admin portal to create RMAs and effortlessly receive existing ones through the Skustack application.
Receive RMA Module
The Receive RMA module is located within Skustack’s Receiving tab. Here you can receive RMA items into your warehouse bins and consequently update the RMA’s status. You may want to receive returns in non-sellable bins until the items have been inspected by management, or receive and transfer them to separate SKUs in suitable conditions (e.g. Used, Open box, etc.) right away.
Search RMAs
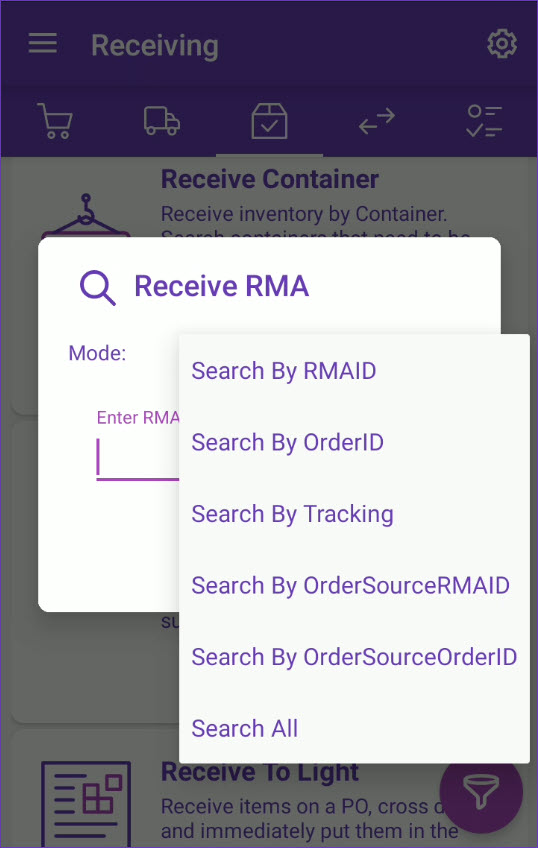
You can search for RMAs in one of six ways:
- Search By RMAID – Search by the internal RMA ID
- Search By OrderID – Search by the internal Order ID.
- Search By Tracking – Search by the tracking # for the RMA (not the order).
- Search By OrderSourceRMAID – Search by the Order Source RMA# field on the RMA details page.
- Search By OrderSourceOrderID – Search by the Channel order ID of the related order.
- Search All – Search for all RMAs. You can filter by:
- Status
- Defaults to all. You can choose from one of the RMA statuses:
- All
- Open
- On Hold
- Processing
- Closed
- Reason
- List of available RMA reasons. Defaults to all.
- SKU/UPC/Alias
- Filters by a specific product, UPC, or alias.
Receive RMA Items
Follow the steps below to receive RMA items:
- Navigate to Receiving tab > Receive RMA module and open the desired RMA.
- The return product quantities will load.
- To capture a photo of the returned item’s condition and add it to the RMA documents, tap the Take Photo icon.
- To add and view custom note entries for the RMA, tap the Notes icon.
- You can choose employees to tag in an RMA Note. Such users will receive it as a notification in the Skustack Admin Portal.
- The three dots menu in the upper right corner leads to the following actions:
- Select Product Identifiers – Allows you to choose the preferred SKU identifiers to display – UPC, Aliases, and Product Name.
- Print RMAID Label – Trigger the printer connected to your device to print a label with the RMA ID.
- Print Product Barcodes – Trigger the printer connected to your device to print labels with the product’s barcodes.
- Swipe down to see the total number of products on the RMA and the number of the received units.
- Swipe the items to the left to reveal shortcuts to other actions:
- Bins – Tap the icon to see all bins where the product is stored (bins will show only if you’re logged into a bin-enabled warehouse).
- Info – Tap to be directed to the Product Info module.
- Scan a product, or select it manually. The receive dialog will open.
- The three dots menu in the upper right corner of the dialog leads to additional actions:
- Flag – Allows you Flag the item and indicate its specifics.
- Reset Dialog – Removes selected data from the receiving dialog.
- Scan/enter a bin, or select from the list of suggested bins. It is recommended to receive returns in non-sellable bins until the items have been inspected.
- Scan the units to receive them, or adjust the number manually.
- If the Lot Number workflow is enabled for your company and the product is set as expirable then you must select a Lot Number before receiving it. Tap on More Lot/Expirys to view existing or add new lots.
- To transfer the received quantity to another item (for example a product with a “used” or “open box” condition), tap the Receive and Transfer toggle.
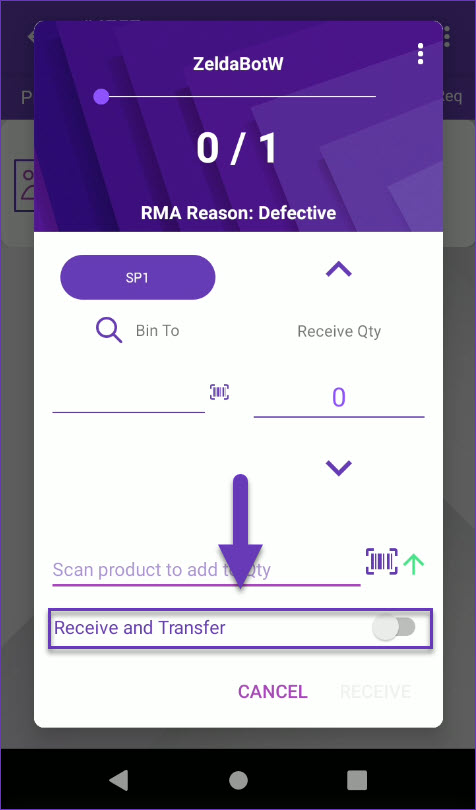 If enabled, the Sku to Sku Transfer module will open as soon as the quantity is received, and the source product will be prepopulated with the received item and quantity.
 - Tap Receive.
- Repeat for all SKUs in the RMA, if applicable.
- The RMA received status will be updated, as well as the quantities received.
Manage RMA
The Skustack Admin portal enables you to easily create new RMAs, search for existing ones, monitor their progress, export them to Excel, and more.
Create RMAs
You can create RMAs either individually through a fully shipped order or in bulk via a file import.
Individually
Whenever an item from a fully shipped order should be returned, an RMA can be created in a few simple steps:
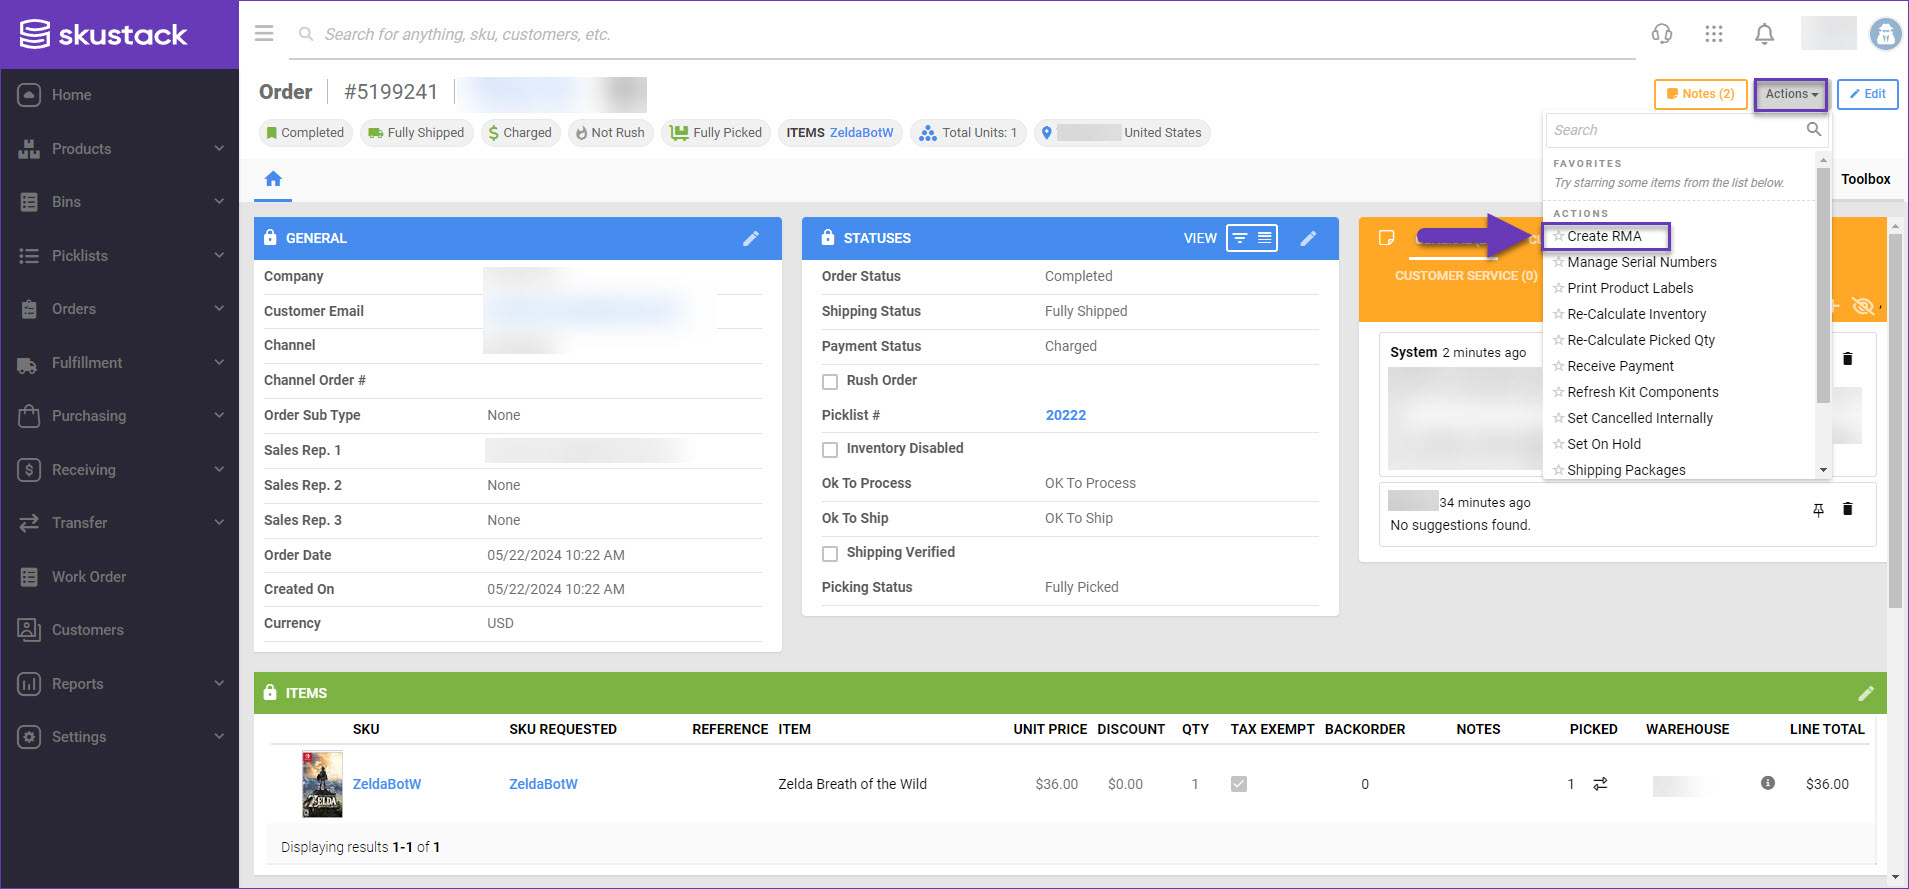
- Navigate to the Skustack Admin portal at https://xx.skustack.com (replace “xx” with your server ID or team name).
- Enter your login credentials.
- Click Orders > Manage Orders and open the desired Orders Details page.
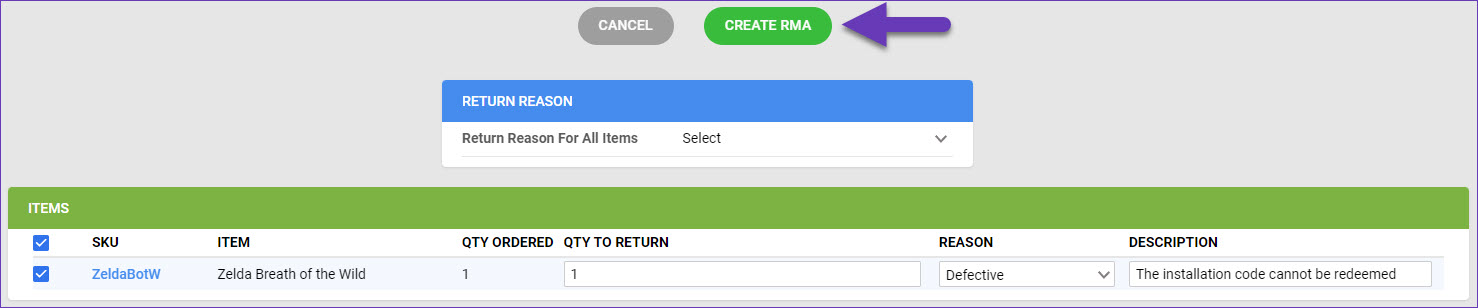
- From the Actions menu, select Create RMA.
- In the Items panel, check the boxes of the products that should be returned.
- Enter a Qty to Return.

- Enter a Reason. You can do this per item or select the Return Reason For All Items.
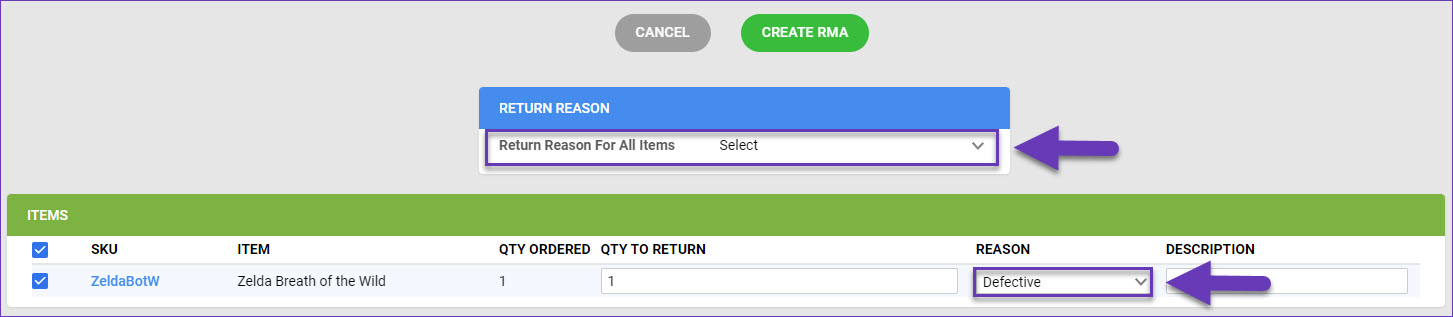
- Optionally, enter a Description.
- Click Create RMA.
In Bulk
To create multiple RMAs at once:
- Navigate to the Skustack Admin portal at https://xx.skustack.com (replace “xx” with your server ID or team name).
- Enter your login credentials.
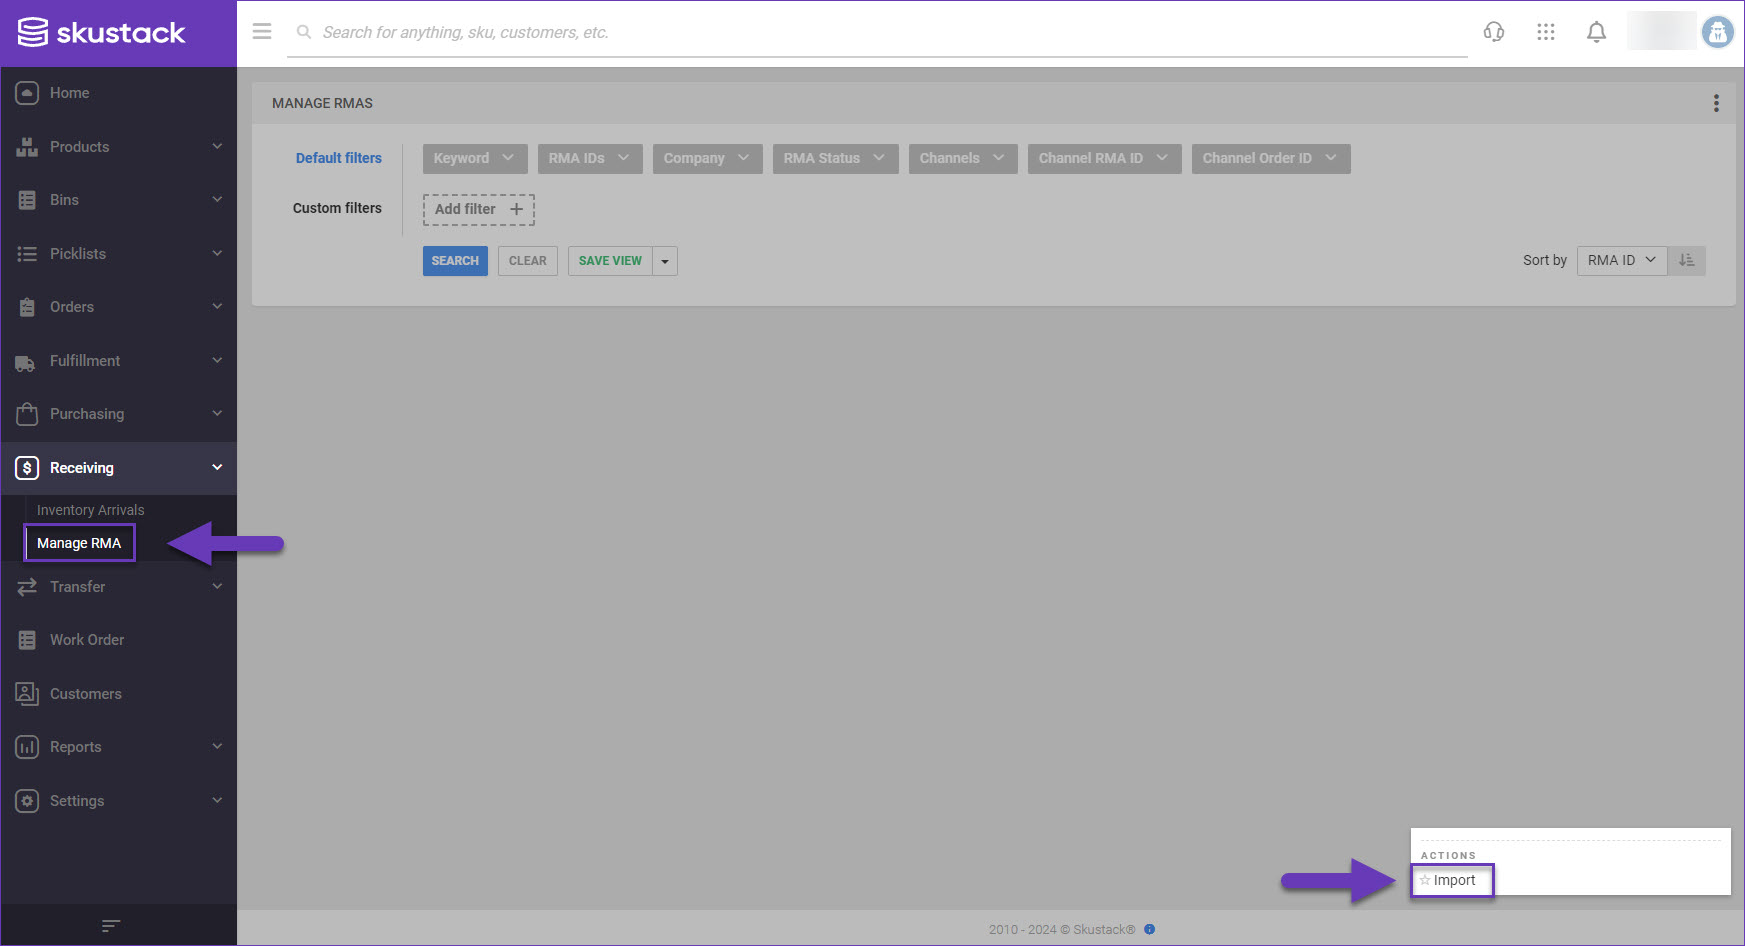
- Select Receiving > Manage RMA.
- Click the Actions icon at the bottom-right corner of the page and select Import.
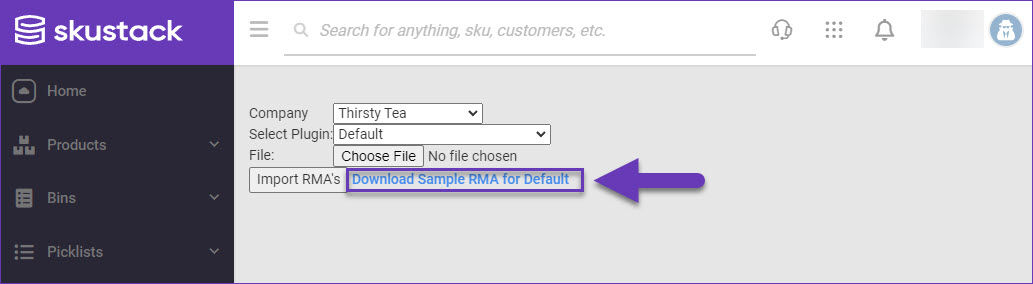
- Click Download Sample RMA for Default and a template file will be saved in your computer’s Downloads folder.
- Enter the required details in the downloaded spreadsheet:
- OrderID
- SKU
- QtyToReturn
- ReturnReason
- Description
- ChannelRMANumber
- Channel
- ChannelOrderNumber
- CompanyID
- TrackingNumber

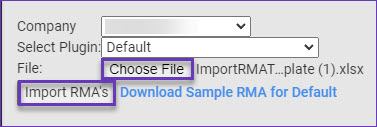
- Once done, save the file and return to the import prompt.
- Click Choose File and select the populated spreadsheet.
- Click Import RMAs.
- A Queued job will be created, from which you can monitor the status of the import. Once completed the RMAs will be created in the system.

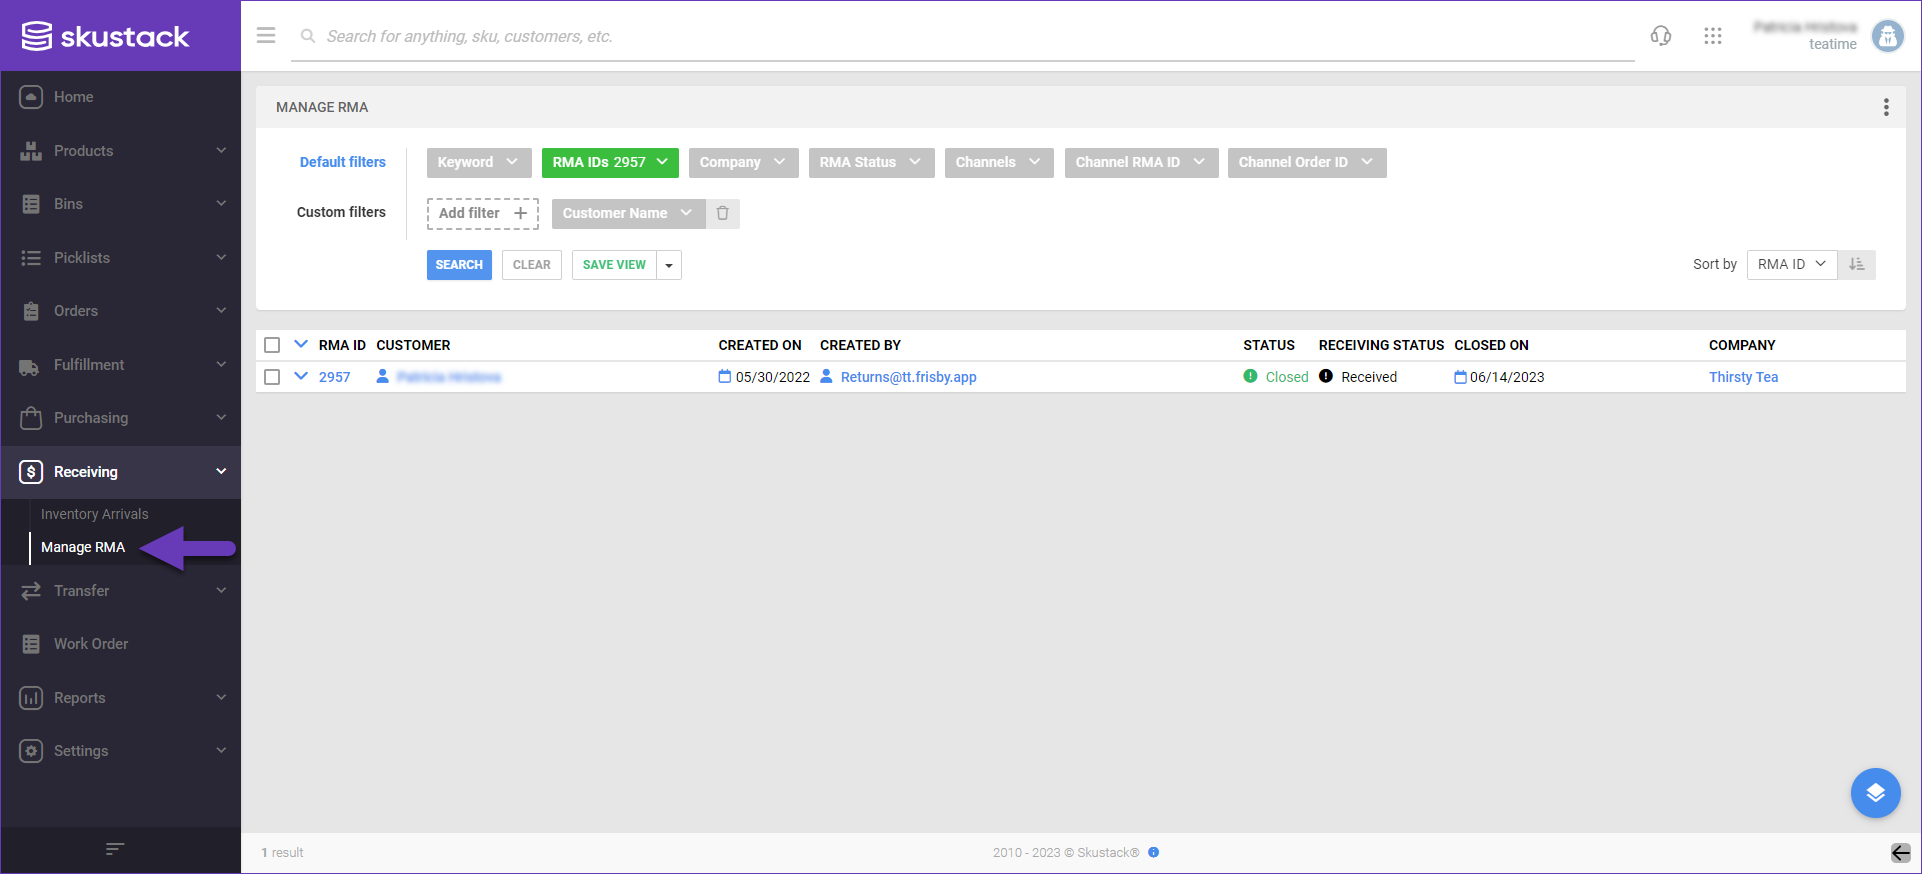
Search RMAs
To search for existing RMAs:
- Navigate to the Skustack Admin portal at https://xx.skustack.com (replace “xx” with your server ID or team name).
- Enter your login credentials.
- Select Receiving > Manage RMA.
- Configure your Default filters to make sure that the results display exactly what you need.
- Click Search. Each filter you apply gets highlighted. If a filter is gray or not displayed at all, it’s not active.
- To manage the columns in the grid, click the three dots icon on the top right and select Customize Columns. You can:
- Reorder columns by dragging them up or down in the list;
- Hide columns by clicking the Trash icons;
- Add columns by clicking Add column.
- To arrange the data in a different order, use the Sort by menu.
- To save your filtering and sorting options, click Save view, enter a Name, and click Save.
- Access the Actions menu to either import a new RMA, or export existing RMA information.
- Click on an RMA ID to be directed to the RMA details page.
Approve RMAs
To ensure control over which RMAs are processed, you can incorporate an approval step into your workflow. By enabling the Client Setting Enable RMA Item Approval Status, you require that RMAs be reviewed and approved before moving forward. If you use Skustack as a standalone product, contact Sellercloud Support or your onboarding representative to enable this option.
To approve RMAs:
- Navigate to the desired RMA details page and click the Edit in the Items panel.

- Select an approval status from the Approved dropdown menu:
- Undecided
- Approved
- Rejected

- Once done, click the Save icon.

RMA Details
On the RMA details page, you will see four panels with RMA-related information. Refer to the details below for more information about each panel.

General Panel
| Field | Description |
| Approval Status | Internal RMA approval status. Available statuses are Pending Review, Approved, Denied, and Awaiting more info. |
| Status | The status of the RMA. Available statuses are Open, Processing, On Hold, and Closed. |
| Original Order Total | The total amount paid for the order. |
| Original Order Shipped By | The email address of the user who shipped the order. |
| Replacement Order ID | The internal replacement order number. |
| Tracking Number | The RMA tracking number. |
| Order Source RMA# | The channel RMA number. |
Changes Panel
| Field | Description |
| Updated By | The email address of the user who last updated the RMA. |
| Received By | The email address of the user who received the RMA. |
| Updated On | The date when the RMA was last modified. |
| Received On | The date when the RMA was received. |
Items Panel
| Field | Description |
| SKU | The product SKU. |
| Original Order | The internal order number. |
| Item | The product name. |
| Qty Ordered | The quantity ordered. |
| Qty To Be Returned | The quantity expected to be returned. |
| Qty Received | The quantity received back in your warehouse. |
| Reason | The reason for the return. |
| Resolution | The resolution for the return. |
| Description | The RMA description. |
| Approved | Approval status on an item level. Client setting Enable RMA Item Approval Status must be enabled for this workflow. If you use Skustack as a standalone product, contact Sellercloud Support or your onboarding representative to enable this option. |
| Serials Returned | The serial numbers of the items being returned, if applicable. |
Notes Panel
| Field | Description |
| RMA Notes | Notes that were added to the RMA during the receiving session. When creating a new note, you can tag one or several employees, who will receive it as a notification when they log into the Skustack Admin Portal. |
| Order Notes | System notes. |
Toolbox
The Toolbox on the RMA Details page provides additional functionalities.
| Tool | Description |
| Change Log | The records of all changes made to the RMA. |
| Documents | RMA documents or attachments, such as camera images. Typically added during the receiving session. |
| Serials | The serial numbers of the items being returned, if applicable. |
Actions
Some of the available Actions on the RMA details page are:
- Export to Excel – Downloads an Excel spreadsheet with the RMA’s details.
- Manage Documents – RMAs can store documents. You can Upload, View, Edit, Download, and Delete them from the corresponding RMA Documents page.
- Manage Serials – Here you can view and import item’s Serials.
- Print to PDF – Use this action, to issue a PDF document with information about returned and received quantities, as well as related order payment and refund details.
- Receive Return – This action allows you to receive all RMA items simultaneously.
- Un-receive Return – Allows you to unreceive returned RMAs.
Related Settings
| Setting | Description |
| Validate serial globally | Client setting. Enables serial number validation in Skustack. Learn more about serial number validation and relevant client settings here. |
| Require serial scan if necessary | Skustack’s Warehouse Management setting. When enabled, will force the user to scan serials for products that are set to require serial scan when receiving. |
| Use Receiving Bin | Skustack’s Warehouse Management setting. When enabled, only allows receiving into the Receiving bin. |