
Overview
The purchase order process is the recommended workflow for ordering units from your vendors and managing their receipt in your warehouse, helping you streamline procurement and inventory management operations. By following this process, you establish a clear communication channel with your vendors, ensuring accurate and consistent ordering of items, and maintaining visibility and control over the inventory entering your warehouse. Efficiently manage your relationship with vendors, minimize errors, maintain accurate inventory records, and ensure a smooth flow of goods into your warehouse.
Receive PO Module
The Receive PO module is located within Skustack’s Receiving tab. This module allows you to seamlessly receive your purchase orders directly into warehouse bins.
You can search for a PO in one of five modes:
- Search by ID – Search by a specific PO #.
- Search All – Search for all POs. You can filter by:
- Vendor
- Defaults to all.
- SKU/UPC
- Filters by a specific product or UPC.
If the Warehouse Management setting Only include Open POs is enabled, only POs with an Ordered status will be displayed. To load POs with all statuses, this setting must be disabled. - Search by Vendor Invoice ID – Search by a specific Vendor Invoice Number.
- Search by Tracking Number – Search by a specific Tracking Number.
- Search by PO Description – Search by a keyword in the PO description.
Receive POs
To receive POs, follow the steps below:
- Navigate to Receiving > Receive PO.
- Select your desired Search Mode > tap Go.
In the Search All mode, you can filter by the Received status of the PO’s (e.g Zero, Partial, etc.).
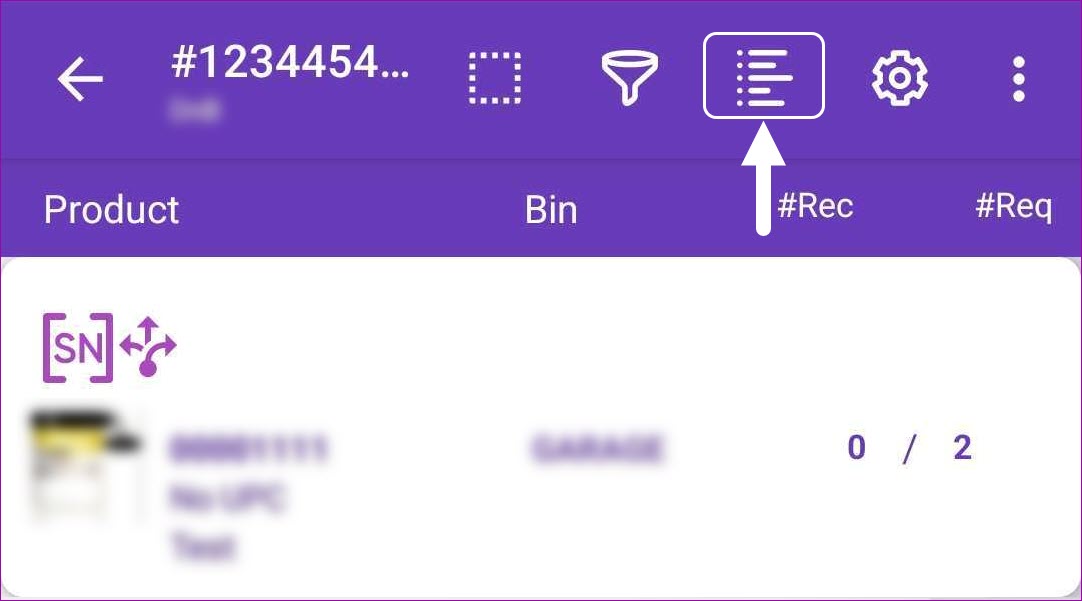
- Tap on the desired PO. Swipe down to see the number of received units and the number of total units in this purchase order. You can also filter items within the PO by their received status. Simply tap the Filter icon and choose your filters.
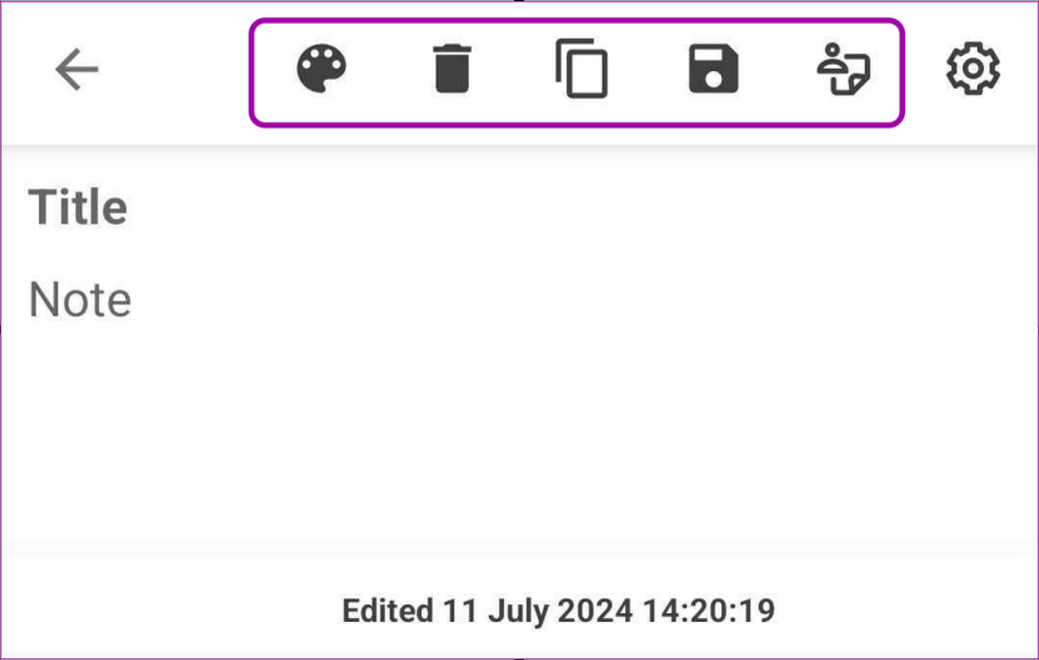
- Tap the Notes icon to add and view custom note entries for the PO.
- To create a new note, tap the + icon at the bottom of the screen.
- Use the additional icons at the top to:
- Change the Color Scheme.
- Delete the note.
- Create a Duplicate of the current note.
- Save the Note.
- Tag an employee. The pop-up window will display a list of usernames. Check the boxes next to the employees you want to tag. They will receive a Notification in the Skustack Admin Portal.
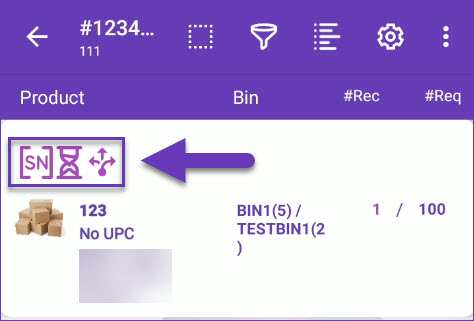
- Product specifics are represented by the following icons:
- If a product is serialized a serial number icon will be displayed. Learn more about the serial number workflow here.
- If a product has an expiration date, it will be indicated by an hourglass icon. Learn more about expiration dates and lot management here.
- If a PO item has cross-dock quantity, a cross-dock icon will be displayed on that row. Tap and hold the icon to see the cross-dock details. Learn more about cross-docking here.
- Swipe left on an item to reveal shortcuts to other actions:
- Bins – Here you can find all the bins where the product is stored.
- Info – This shortcut reveals the product info module.
- Dimens – Set product dimensions or get a 4D scale reading.
- Labels – Tap to print product labels for each item.
- Tap the three dots menu in the upper right-hand corner to find the following actions:
- Send PO Received Email – Sends a confirmation email when the PO is received.
- Print Random Serials – Prints labels with random serial numbers before the PO items are received.
- Create Put Away List – Creates a PutAway list from the receiving session.
- Take Photo – Use your Skustack device to take a photo and attach it to the respective PO Documents.
- Select Product Identifiers – Tap and choose the product identifiers:
- UPC
- Aliases
- Product Name
- Select Receive Into Bin – Allows you to appoint a Receiving Bin for the PO items.
- You can scan a product’s barcode or just tap it to open the receiving dialog. The action menu within the dialog provides options to Flag items, view PO Item Notes, cross-dock details, and more.
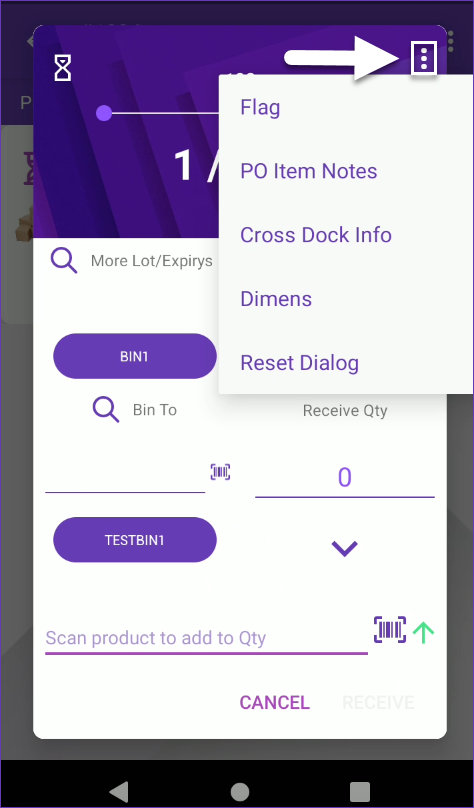 Flagged products will be updated with an icon indicator within the module.
 - Scan units to add to the received qty or adjust the number manually.
- Enter a Receiving Bin. There may be a suggested bin to select. The suggestion is based on where the product is currently stored and the unit capacity set on the bin.
Enable the Use Receiving Bin Warehouse Management setting to only allow receiving into a receiving bin. You can then use the PutAway workflow to transfer inventory from the temporary receiving bin to permanent bins on the warehouse shelf.
- If the Warehouse Management setting Require serial scan when necessary is enabled and the product is set to require serial scan, you must scan its serial to receive the item.
- If the Lot Number workflow is enabled for your company and the product is set as expirable, you must select a Lot Number to receive it. Tap on More Lot/Expirys to view existing or to add new lots.
- If the Require Transparency Sticker option is enabled in the product’s shipping preferences, you will be prompted to verify that the item you are receiving is affixed with a transparency sticker. Learn more about Transparency here.
- Tap Receive. The product’s quantity will be updated immediately in the system. When all items are received, the PO will be marked as Fully Received.
To enable automatic printing of product labels when PO is received, activate the Auto print labels on receive PO Warehouse Management setting and configure the Set PO Label Type and Print expiration date on auto print label PO settings.
To unreceive products, simply use the arrows on the item’s receiving dialog:
- Tap the down arrow under the Receive Qty to manually unreceive products.
- To unreceive items by scanning, select the green arrow near the Scan products to add to Qty, then scan the products you would like to subtract. Note that the arrow indicator must be red in order to unreceive products.
Receive POs in Bulk
If you are receiving multiple items in the same bin, using the Bulk Mode might be a faster option. With bulk mode, you do not need to open the receiving dialog and then enter the quantity and the bin for every product. Instead, you will select the receiving bin once, scan everything, and then tap receive.
To switch to bulk mode follow the steps below:
- Go to Receiving > Receive PO and open the desired PO.
- Tap the dotted rectangle next to the PO ID to open the mode menu and select Bulk.

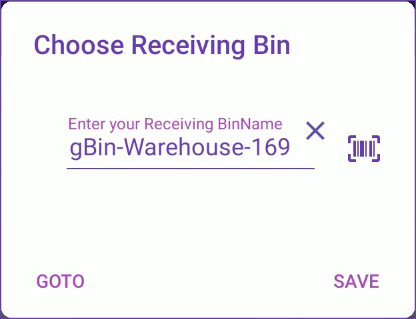
- Choose the Receiving Bin and tap Save. You can also tap GoTo to open the bin details. If you need to change the Receiving Bin later on, you can open the mode menu and select Bulk again to open the select receiving bin dialog.
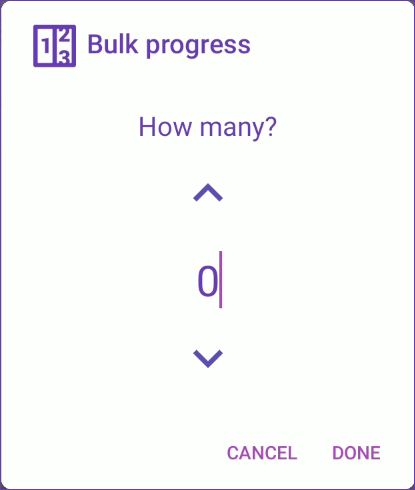
- The scanned but not received quantity will now be displayed below the qty received/total qty to receive. Scan the product or enter the quantity manually by tapping on the product and using the up and down arrows.
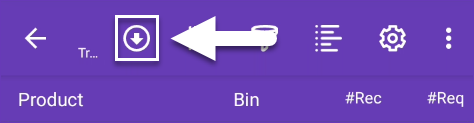
- Tap the receive button at the top to receive all the scanned quantities at once.
Manage POs
The Skustack Admin portal enables you to easily search for existing POs, create new ones, manage purchased goods, and more.
Search POs
To search POs, follow these steps:
- Navigate to the Skustack Admin portal at https://xx.skustack.com (replace “xx” with your server ID or team name).
- Enter your login credentials.
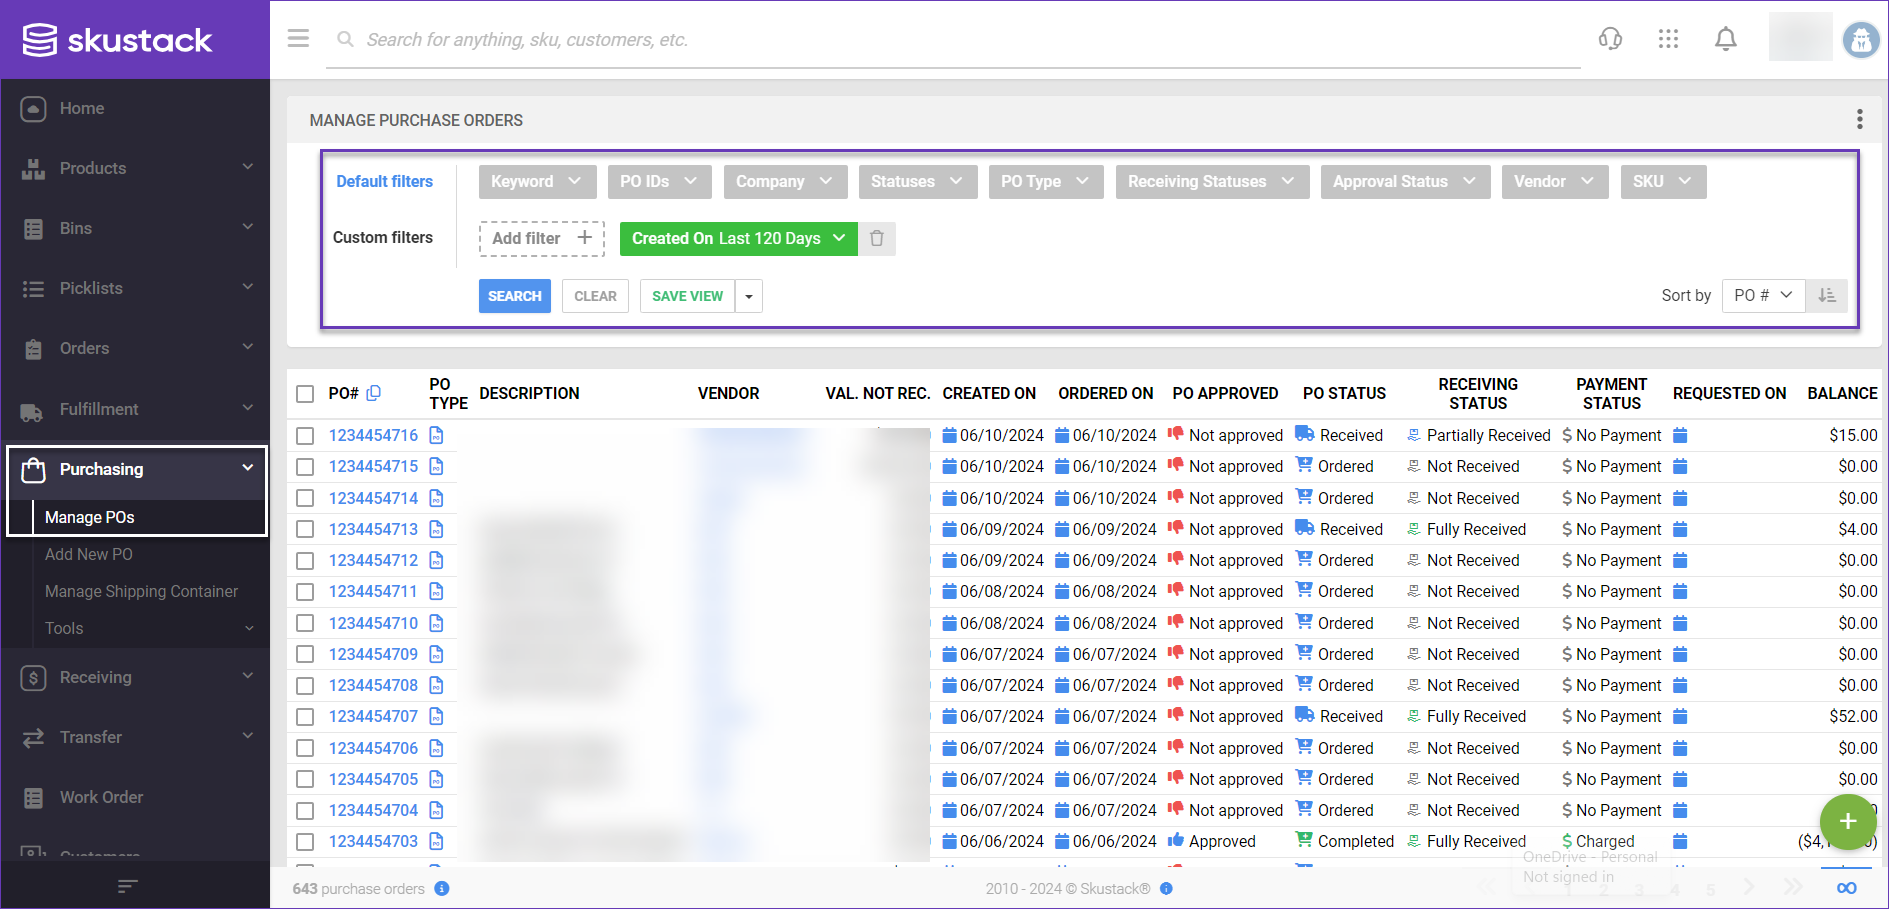
- On the left, select Purchasing > Manage POs.
- Configure your Default filters to make sure that the results display exactly what you need.
- Click Search. Each filter you apply gets highlighted. If a filter is gray or not displayed at all, it’s not active.
- To manage the columns in the grid, click the three dots icon on the top right and select Customize Columns. You can:
- Reorder columns by dragging them up or down in the list;
- Hide columns by clicking the Trash icons;
- Add columns by clicking Add column.
- To arrange the data in a different order, use the Sort by menu.
- To save your filtering and sorting options, click Save view, enter a Name, and click Save.
- Select a PO from the grid and access the Actions menu to either Receive and Unreceive items, or Export PO data in your preferred format.
Add New PO
To create a new PO:
- Navigate to Purchasing > Add New PO, or go to the Manage POs page and click on the green + icon at the lower right-hand corner.
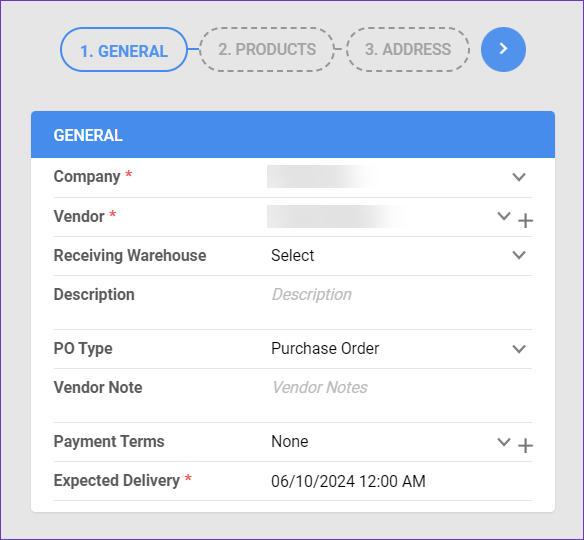
- Populate the following fields:
- Company
- Vendor
- Receiving Warehouse — The warehouse to which the purchased items will be delivered.
- Description — The PO description.
- PO Type — Purchase Order, Credit Memo, or Vendor Offer.
- Vendor Note — Displayed on the Purchase Order.
- Payment Terms — Indicates when a payment is due. Typically applied to invoices.
- Expected Delivery — Estimated date of arrival.
- Click the blue arrow icon to proceed to the next step, Add Products.
Products
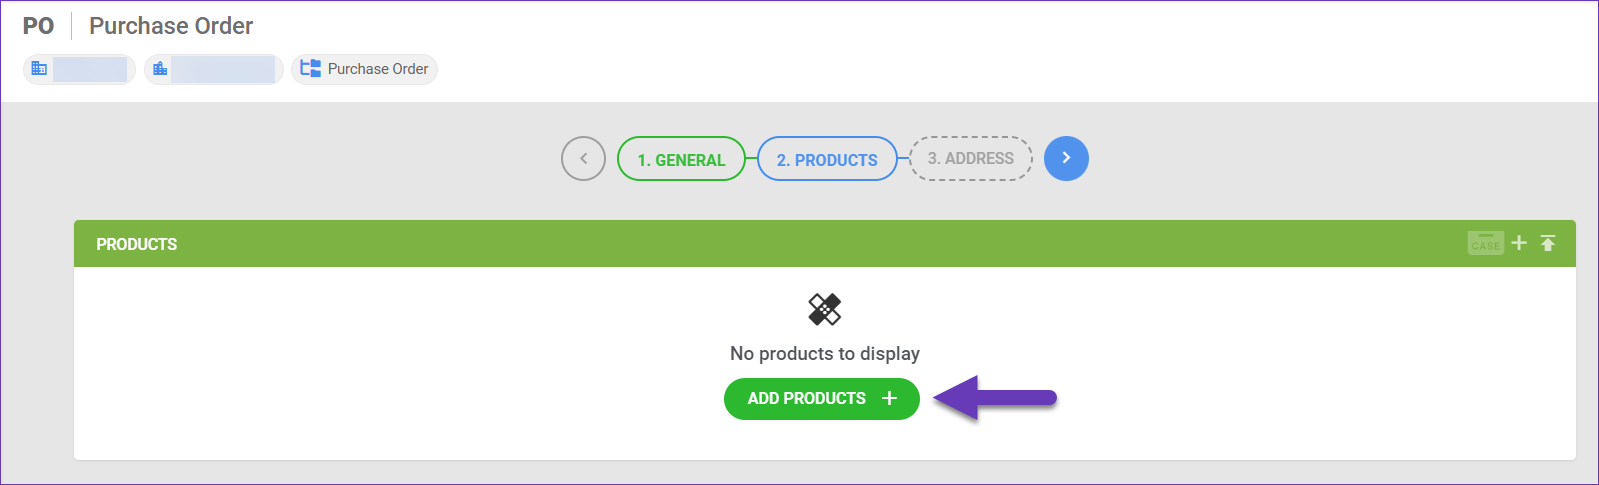
To add products to the PO:
- In the Products panel, click Add Products.
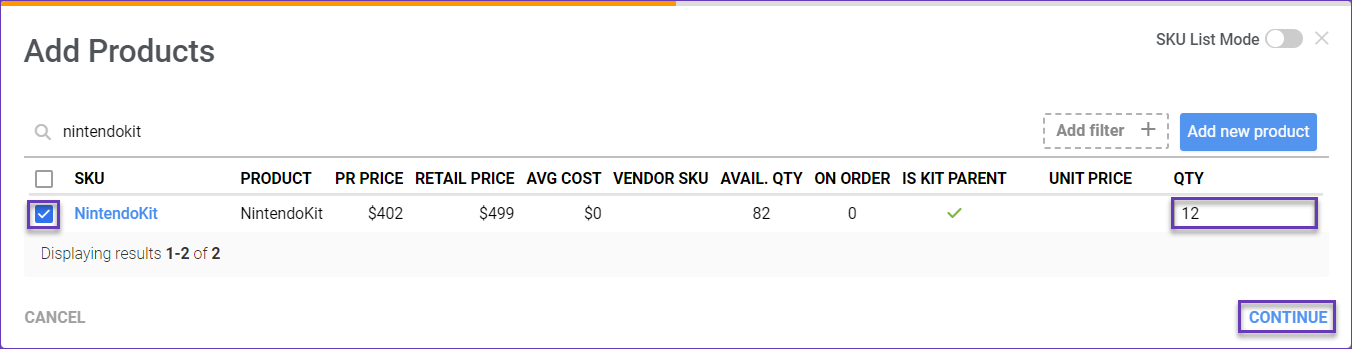
- Search for existing products in your catalog or create a new product by clicking the Add new product option.
- Select the item from the grid, enter the required quantity and click Continue.
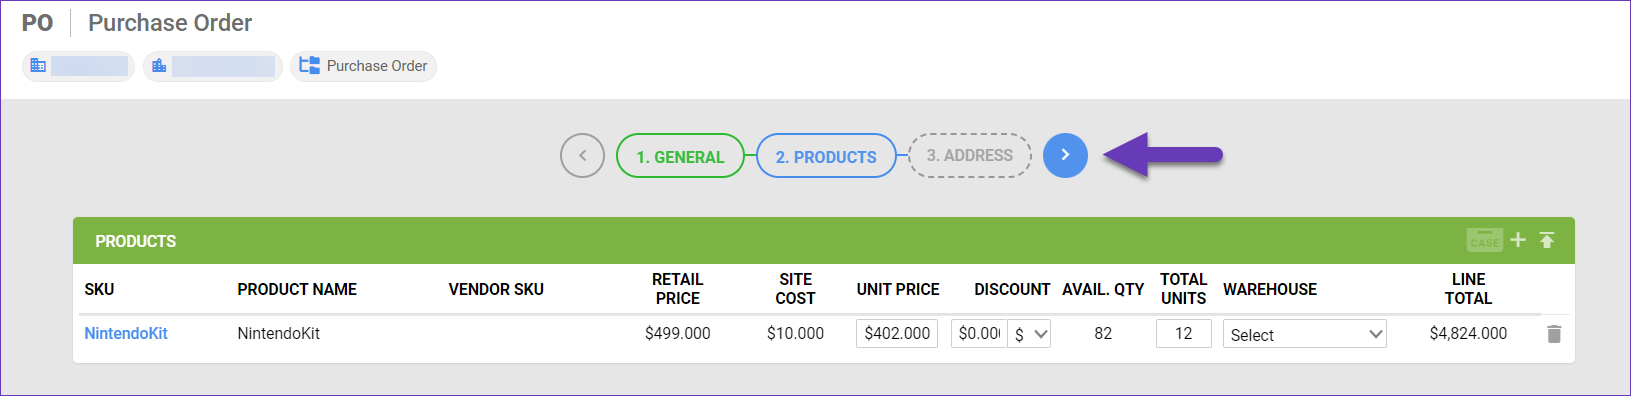
- Confirm the total units being ordered and the price per unit in the grid and click Add Selected.

- Click the blue arrow icon to proceed to the next step, Address.
Alternatively, you can also add multiple products at once via a file upload:
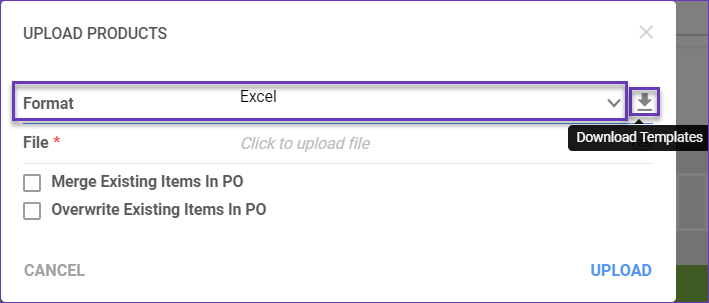
- Click the Upload Products icon, in the upper right-hand corner of the Products panel.

- To obtain a template file, select the desired file format (Excel, Tab Delimited or CSV) and click the download icon.
- Populate the following columns:
- ProductID
- VendorSKU
- UnitPrice
- Qty
- Discount
- DiscountType
- TotalPrice
- Once done, save the document, return to the Upload Products dialog, and upload it to the system.
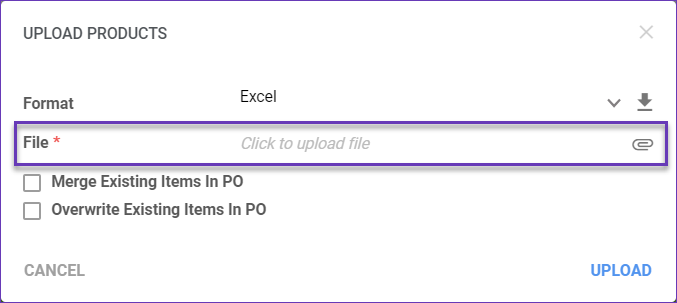
- You can either Merge or Overwrite Existing Items in PO, by checking the appropriate box.
- Click Upload and the products will be added to the PO. Click the blue arrow to proceed.
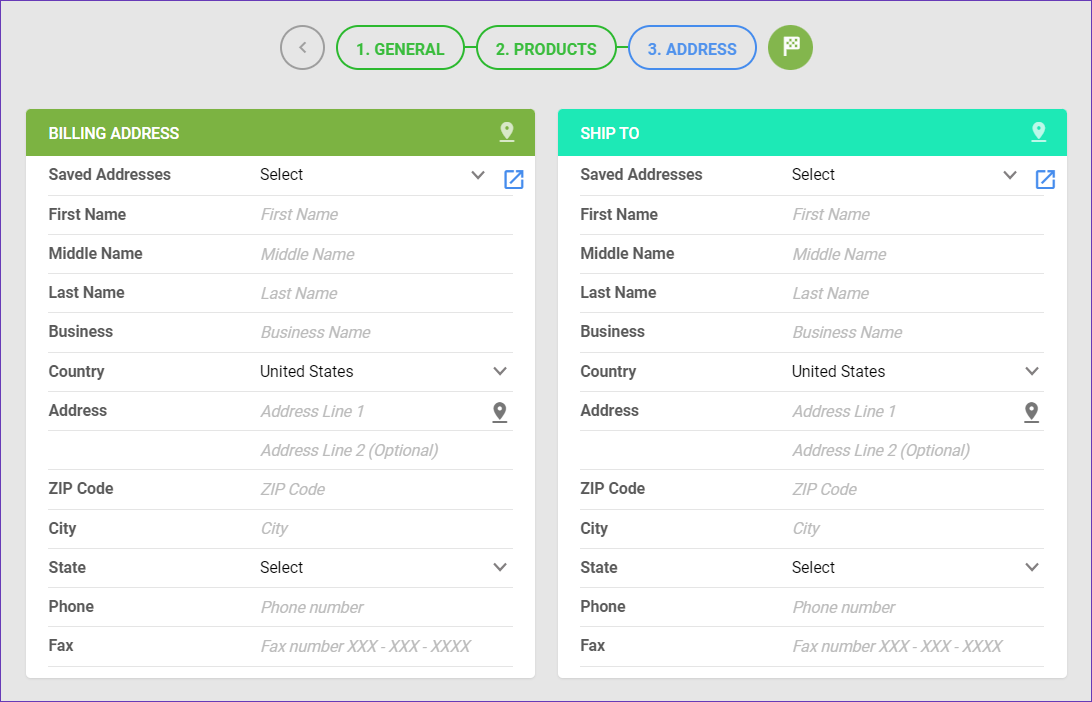
Address
- Fill out all the necessary information regarding the shipping and billing addresses for the purchased items. Alternatively, select a pre-saved address from the Saved Addresses drop-down list.
- Click the green flag icon to finalize the Purchase Order.
Import Purchase Info
You can also create multiple Purchase Orders simultaneously using the Import Purchase Orders option. To do that:
- Navigate to Purchasing > Tools > Import Purchase Info and select the Import Purchase Orders option.
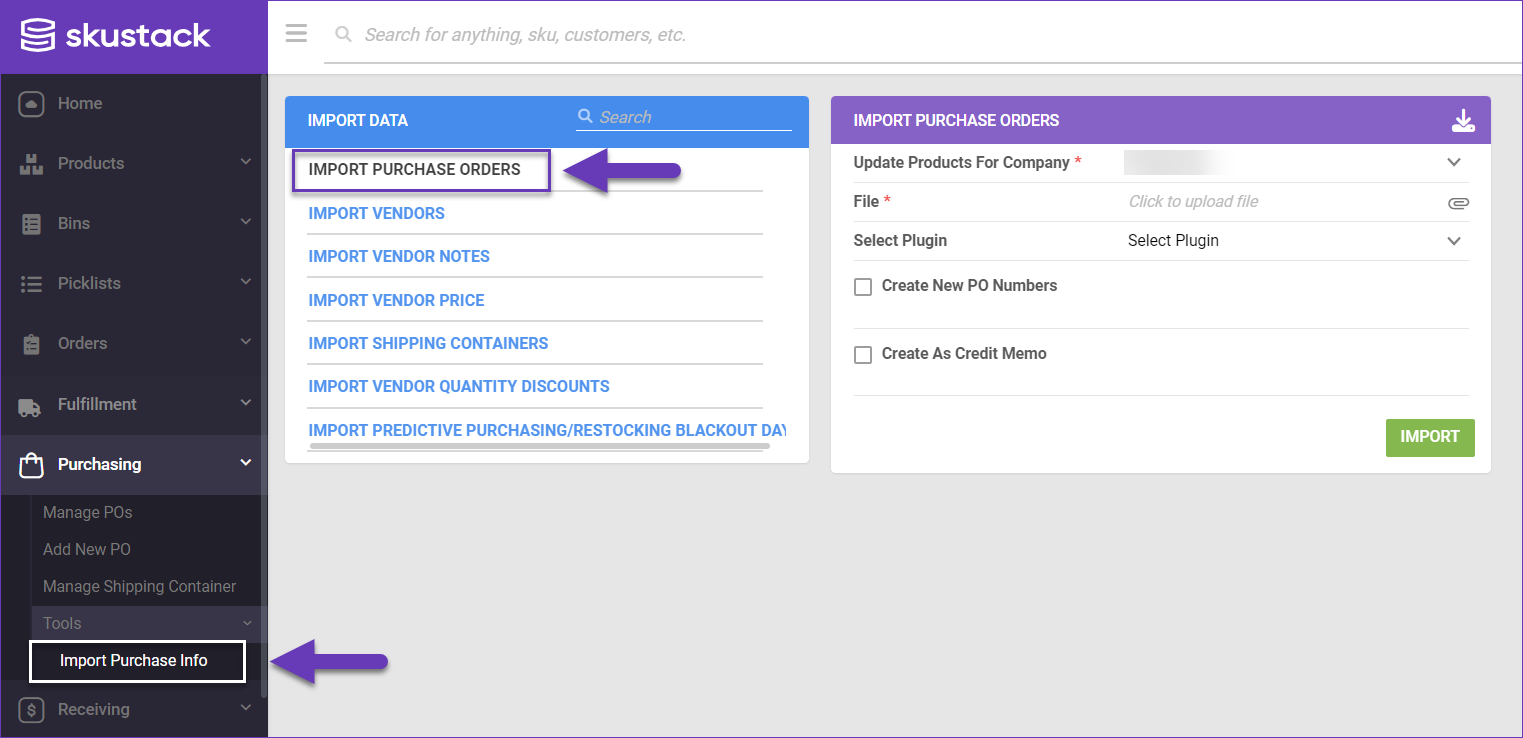
- To download a sample template, click the download icon on the Import Purchase Orders panel and select the desired file format (Tab Delimited, CSV, or Excel).

- Populate the file with your desired PO data.
- Return to the Import Purchase Orders panel. Select the file and fill in the required fields.
- (Optional) You can use a customized plugin for PO import. Contact our Support Team to request a customization for your account.
- Select the Create New PO Numbers checkbox to allow the system to generate numeric values for the POs. Alternatively, select Create As Credit Memo and the system will proceed accordingly.
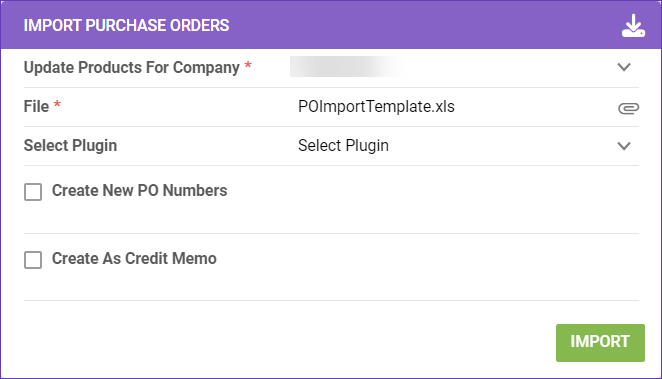
- Click Import and a Queued Job will be generated. Once processed, the new Purchase Orders will be visible on the Manage POs page.
Related Settings
| SETTING | DESCRIPTION |
| Validate PO warehouse when Receiving | Client setting. Enables warehouse-level validation in Skustack. This setting ensures employees can only view and receive POs assigned to the warehouse they are logged into. |
| Create New Bin For Each PO Received | Client setting. When enabled, the system will automatically create a new bin in the selected warehouse on the PO and add the products to it upon receipt. |
| Validate serial globally | Client setting. Enables serial number validation in Skustack. Learn more about serial number validation and relevant client settings here. |
| Require serial scan if necessary | Skustack’s Warehouse Management setting. When enabled, will force the user to scan serials for products that are set to require serial scan when receiving. |
| Only include Open POs | Skustack’s Warehouse Management setting. The Skustack app will only load POs with ordered status. |
| Sort POs by SKU | Skustack’s Warehouse Management setting. When this setting is enabled, POs will be sorted alphabetically by SKU, rather than by bin suggestion. |
| Use Receiving Bin | Skustack’s Warehouse Management setting. When enabled, only allows receiving into the Receiving bin. |
| Prefill Bin To field with previously received into bin | Skustack’s Warehouse Management setting. When a SKU is partially received on a PO, Skustack will automatically populate the “Bin To” field with the bin where the SKU was previously received for this PO, once the receiving process is resumed. |
| Only suggest bins with existing qty | Skustack’s Warehouse Management setting. When enabled, Skustack will not suggest bins with zero quantity of the product during receiving and putaway. |
| Prompt for Dimensions | Skustack’s Warehouse Management setting. If dimensions aren’t set, will prompt you to set them when the product is scanned for the first time. |
| Auto close after fully received | Skustack’s Warehouse Management setting. Closes the PO when everything on the PO is received. |
| Auto close when QtyToReceive is full | Skustack’s Warehouse Management setting. If enabled, the receiving dialog will automatically close, when the QtyToReceive is reached. |
| Send email on leave PO | Skustack’s Warehouse Management setting. Upon exiting the PO, a prompt to send an email for all products received in the session will be displayed. The prompt depends on the selected value of this setting. It may either be a manual prompt or an automatic email. |
| Send email on leave PO mode | Skustack’s Warehouse Management setting. Sub-setting of Send email on leave PO, which defines the sending mode, based on the chosen option:
|
| Auto print labels on receive PO | Skustack’s Warehouse Management setting. Automatically prints product labels upon receiving. The label type depends on the subsetting Set PO Label Type. |
| Set PO Label Type | Skustack’s Warehouse Management setting. Sub-setting of Auto print labels on receive PO, which defines the details included in the receiving PO labels:
|
| Print expiration date on auto print label PO | Skustack’s Warehouse Management setting. When enabled with the Auto print labels on receive PO setting, the received PO product expiration date will be included on the automatically printed product labels. |
| Allow Backorder Picklist Picking | Skustack’s Warehouse Management setting. Enables the cross-dock workflow. |
| Only load POs marked Release for Receiving | Skustack’s Warehouse Management setting. When enabled, Skustack will only load POs that are marked as Release for Receiving in Sellercloud. |