
Overview
Putting products away is an essential part of day-to-day warehouse operations, involving the movement of inventory from temporary receiving bins to permanent bins on the warehouse shelf. Products can be added to the PutAway list directly through the PutAway module within the Skustack app, or they can be added during a PO or Container receiving session.
By effectively utilizing the PutAway workflow, you can streamline your inventory management processes and ensure that products are quickly and accurately stored in their proper locations. Creating and working on putaway lists is possible through the Skustack app, while monitoring the progress and exporting data can be done through the Skustack Admin.
PutAway Module
To put away a product, add it to a PutAway list. You can either create a new PutAway list or search for an existing one.
Create PutAway Lists
- Navigate to the PutAway module of the Transfers tab.
- Tap the + icon to create a new PutAway.
- In the dialog select:
- Original BinName – Any bin you wish to put items away from. Scan or enter manually.
- Interim BinName – Represents the cart in which the product will be moved to its location in the warehouse. By default, this loads with a pre-configured PutAway Bin for that warehouse. This can be edited if needed.
- Decide how products should be added to the new PutAway list:
- Select all contents of the bin to build a list – All the products in the original bin will be added to the new PutAway list. The PutAway list will be created with an Open status. Please note that if you have selected the Select all option, you won’t be able to add items unless you manually set the status to Pending.
- Scan items to build a list – Only scanned products will be added to the new PutAway list. This option creates an empty PutAway list with a Pending status.
- Tap Go.
Search PutAway Lists
- Navigate to the PutAway module of the Transfers tab.
- Tap the Search icon to find an existing PutAway list.
- In the opened dialog choose:
- Mode – Search All or Search By ID (PutAwayList ID).
- Status – Shown when the Search All Mode is chosen.
- Product SKU/UPC – Shown when the Search All Mode is chosen. This is an optional field.
- Tap Go.
- Select a PutAway list and use the Progress and Region filters to narrow the scope of your work.
Add Products to a PutAway List
PutAway lists can have different statuses. Items can only be added to a PutAway list with a Pending status.
- Create a new PutAway list or search for an existing one and open it.
- For PutAway lists with a Pending status:
- Drag down;
- Tap the + button;
- Enter the product SKU or UPC;
- Tap OK;
- Adjust the quantity manually or scan the products and tap Add.
- For PutAway lists with an Open status:
- Change its status to Pending by tapping the ☑ icon at the top right corner.
- Add items as described for the Pending status above.
Put away Products from a PutAway List
Only products with an Open status can be put away.
- Open a PutAway list of products.
- Open the product you would like to put away by tapping it.
- In the dialog box, enter the following:
- Bin To – The bin into which the items will be received;
- PutAway Qty – Either enter manually or scan the products. To enforce a single unit scan during the putaway workflow, activate the Enable single unit scanning during PutAway setting and disable the Add initial scan to Qty field setting.
- Tap PutAway. To automatically close the dialog when the PutAway Qty is reached, enable the Auto close when QtyToReceive is full setting.
Put away from a PO or Container
PutAway lists can also be created from the Receive PO and Receive Container modules.
- From the PO/Container activity window, tap the three dots menu in the upper right-hand corner.
- Tap Add to PutAway List.
- Proceed with the steps as described above.
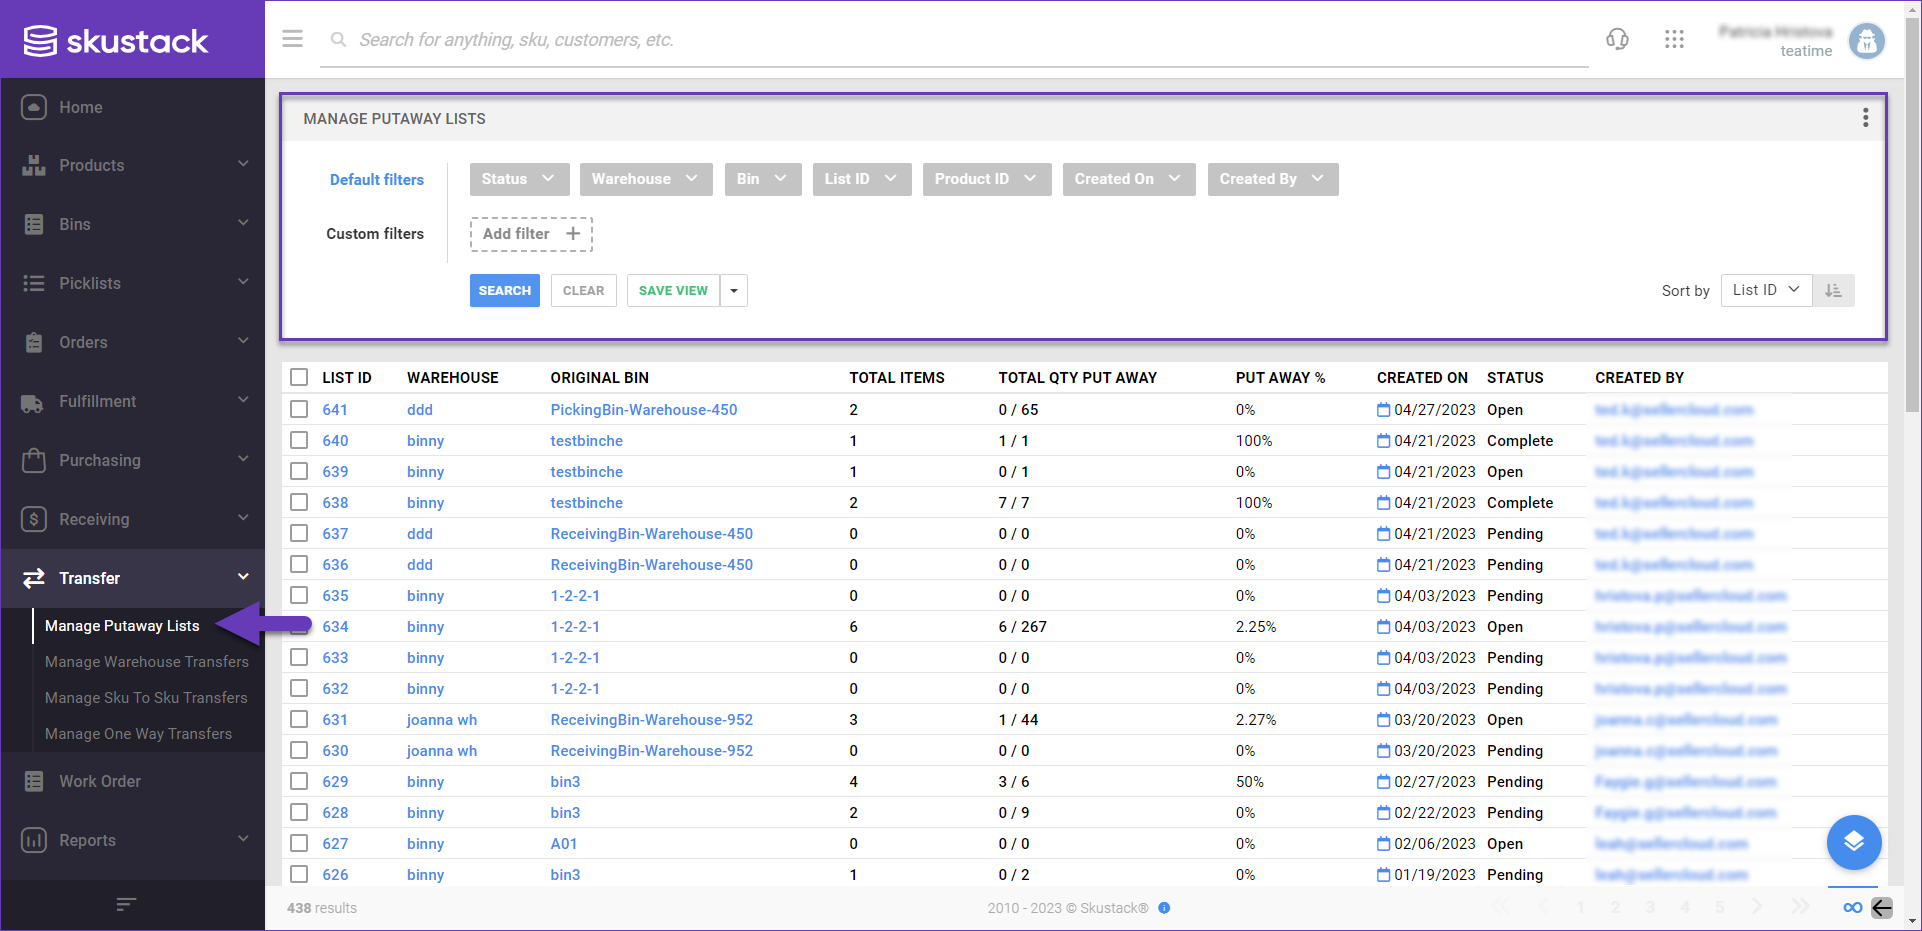
Manage PutAway Lists
The Skustack Admin portal lets you easily search for existing PutAway lists, monitor their progress, and export them to Excel.
Search PutAway Lists
To search PutAway Lists, follow these steps:
- Navigate to the Skustack Admin portal at https://xx.skustack.com (replace “xx” with your server ID or team name).
- Enter your login credentials.
- On the left, select Transfer > Manage Putaway Lists.
- Configure your Default filters to make sure that the results display exactly what you need.
- Click Search. Each filter you apply gets highlighted. If a filter is gray or not displayed at all, it’s not active.
- To manage the columns in the grid, click the three dots icon on the top right and select Customize Columns. You can:
- Reorder columns by dragging them up or down in the list;
- Hide columns by clicking the Trash icons;
- Add columns by clicking Add column.
- To arrange the data in a different order, use the Sort by menu.
- To save your filtering and sorting options, click Save view, enter a Name, and click Save.
- Select a putaway list from the grid and access the Actions menu to either Export To Excel or Close it.
Related Settings
| Setting | Definition |
| Enable Serial Number validation | Client setting. Enables serial number validation in the Skustack Admin. The Validate Serial Globally sub-setting controls the serial number validation in the Skustack app. |
| Validate Serial Globally | Client setting. Enables serial number validation in the Skustack app. Enabling this setting will force serial scans to increase or decrease quantities. Learn more about serial number validation and relevant client settings here. |
| Force bin scans during PutAway | Skustack’s Warehouse Management setting. When enabled, the bin field must be scanned to supply bin input during PutAway. |
| Enable single unit scanning during PutAway | Skustack’s Warehouse Management setting. If enabled, you will be required to scan a single unit during putaway. Be sure to also disable the Add initial scan to Qty field setting, as it interferes with this feature. |
| Auto close when QtyToReceive is full | Skustack’s Warehouse Management setting. If enabled, the putaway dialog will automatically close when the PutAway Qty is reached. |