
Overview
The Kitting module is located within Skustack’s Products tab and enables you to assemble or disassemble independent kits. Seamlessly package items together or break them down into individual components, ready for sale and shipment. This feature is typically used for kits that are not included in an existing FBA Shipment as they will not be associated with it or release any reserves. To assemble kits that have insufficient inventory for such shipments, we recommend using the FBA Inbound PickList module instead.
Kitting Module
To assemble and disassemble independent kits that are not associated with shipments or product reserves, navigate to the Kitting module in the Products tab.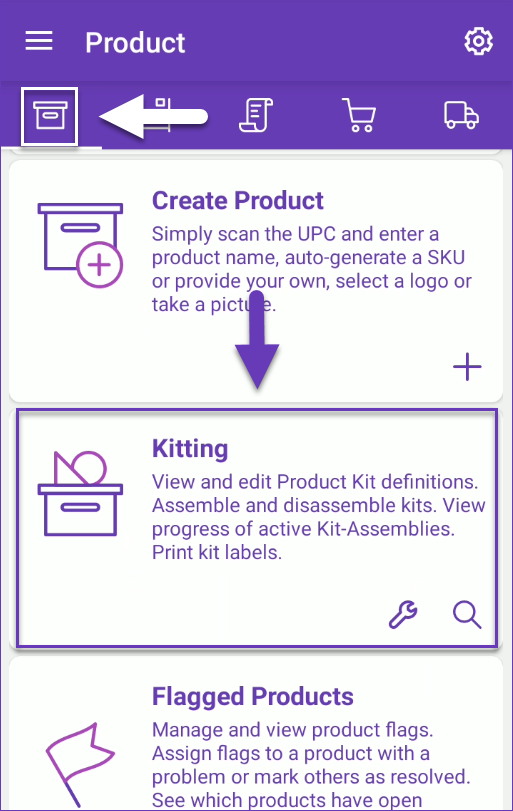
Search Kit Prep Sessions
Existing assembly activities can be found in your Kit Prep Sessions:
- Navigate to the Products tab and select the Kitting module.
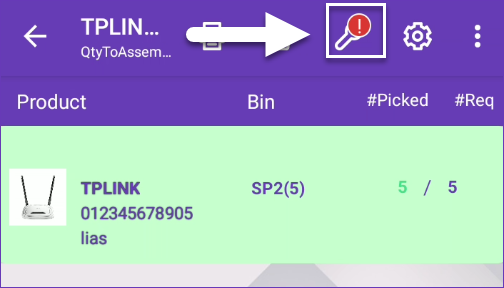
- Tap the Search icon.
- Select a Status from the dropdown menu:
- All
- Open
- Completed
- Canceled
- Void
- Scan/Enter the independent Kit Parent SKU and tap Search.
- All corresponding kit prep sessions will load.
- Tap the + icon to add a new kit prep session.
Manage Kit Prep Session
Existing Kit Prep Sessions can be managed with the following actions:
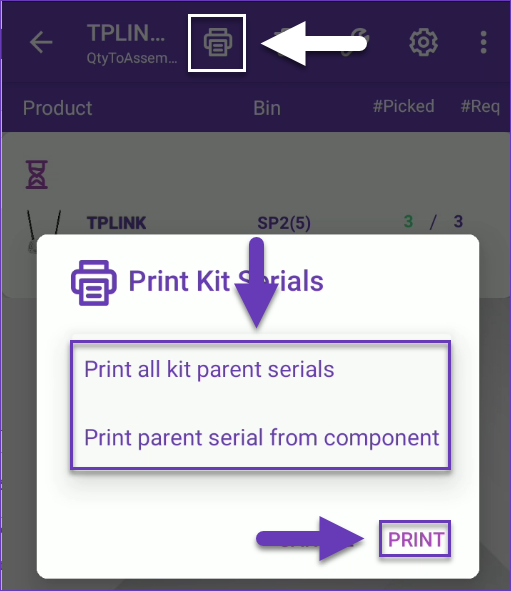
- Print Labels – Tap on the printer icon and select to print labels with either:
- Kit parent serials – Use this option to include product serials. You can choose to Print all kit parent serials, or Print parent serial from component.
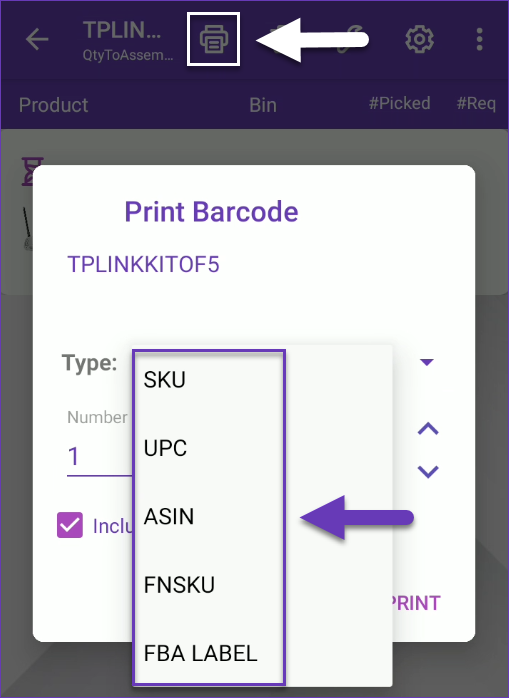
- Print kit product labels – Use this option to define the information to include on the labels – either SKU, UPC, ASIN, FNSKU, or FBA Label).
- Kit parent serials – Use this option to include product serials. You can choose to Print all kit parent serials, or Print parent serial from component.
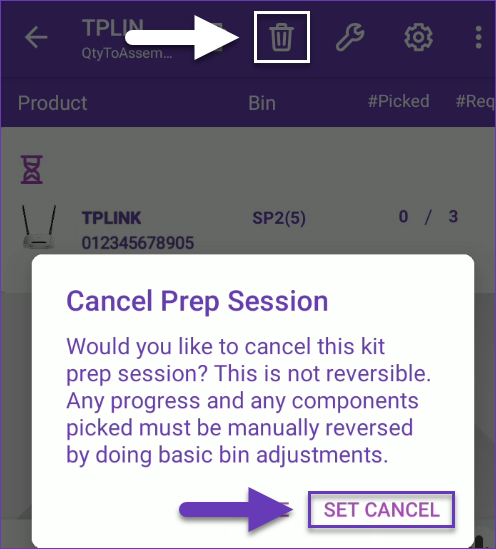
- Cancel – Tap on the trash icon, to permanently cancel the preparation session. Completed sessions cannot be cancelled.
- Assemble – Open sessions with picked components can be assembled, by tapping the Tool icon and following the Assemble Kits workflow below.
Assemble Kits
To assemble a kit:
- Navigate to the Products tab and select Kitting.
- Tap the Tool icon.
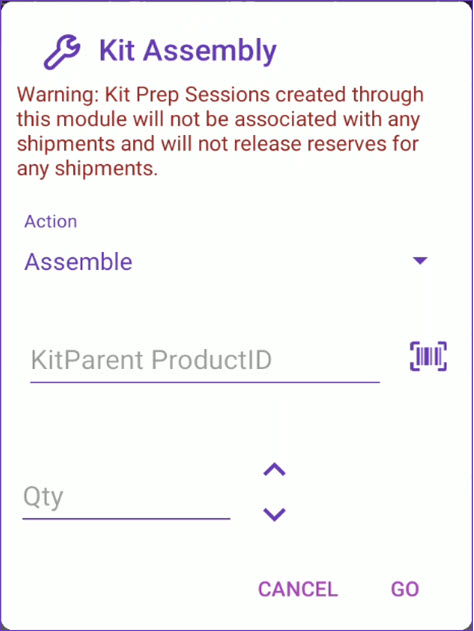
- Set the Action dropdown to Assemble.
- Scan/Enter an independent kit parent SKU.
- Use the arrows to enter the number of required kits and tap Go.
- The kit components will be displayed for assembly. If there are incomplete preparation sessions for the same kit, you’ll have an option to select from the existing list, or to initiate a new assembly.
- Scan or select a component.
- Enter the bin from which you are picking, or select the suggested bin that may appear next to the Bin field. This suggestion is based on the following factors:
- The bin is sellable.
- The bin type is Normal or Temp.
- Primary bins will always be suggested first.
- The bin with the most or least quantity will be suggested based on the client setting PickList Bin suggestion sort qty by ASC Order.
- Scan units to add to the picked qty or adjust the number manually. To auto-populate the total quantity available for the scanned product in that bin, enable Skustack’s Warehouse Management setting Auto populate progress quantity when bin is selected.
- If you are using the Lot Numbers workflow, the system will prompt you to select the lot numbers from the dropdown for each component. All units of each component must have the same lot number.
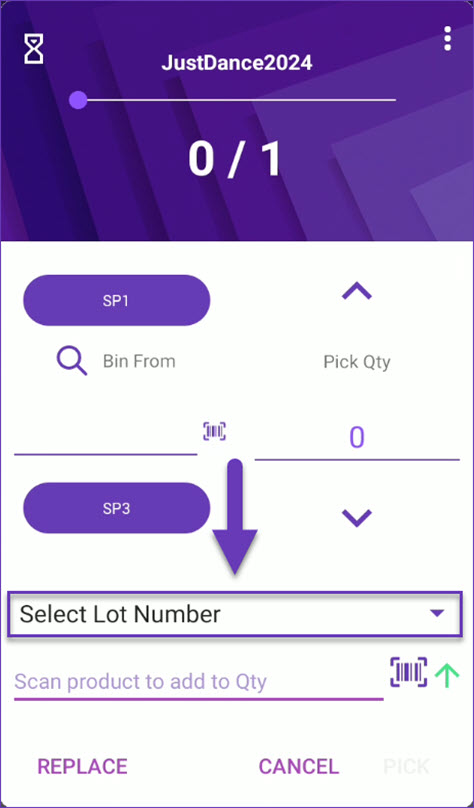
- Tap Pick. The kit component will be marked as Picked. Repeat for all components.
- The red notification icon will appear on the Tool icon when all components are picked and the kit is ready to assemble. Tap the Tool icon to assemble the component inventory to the parent.
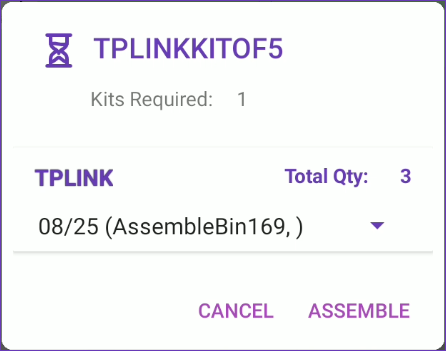
- Confirm the assembly in the following prompt.
- Select the bin where the kit will be assembled. If you decline to do so, the kit quantity will be placed in a default temporary bin.
- If you are using the Lot Numbers workflow:
- After all the units are picked, Skustack will show a dialog with each expirable component, the total qty needed (to assemble all the kit parents in the prep session), and a dropdown of the lot numbers available in the assembly bin for that component. The dropdown will default to the lot number that was picked for that specific prep session.
- When assembling an independent kit parent, a new lot number will be generated and assigned to the kit parent. Skustack will use the earliest expiration date/lot number combination from what was picked for the expirable components but will add a suffix (-L1, -L2, etc) to the lot number.
- Every time a kit is assembled an unique serial number is generated. This kit serial number can be included in the label printout. You can use the serial number when disassembling the kit to make sure you are disassembling the correct components even if the kit definition changed. You can automate the label printout by activating the setting Auto print kit labels or manually from the kit assembly workflow).
Disassemble Kits
To disassemble a kit:
- Navigate to the Products tab and select Kitting.
- Tap the Tool icon.
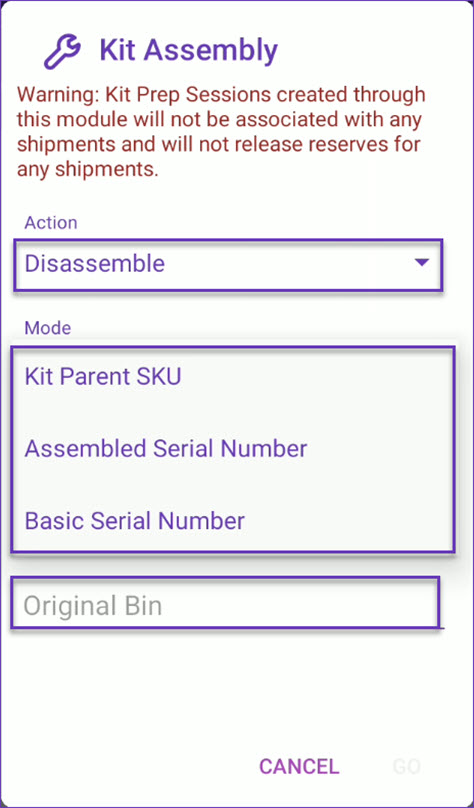
- From the Action dropdown, select Disassemble.
- Choose a search Mode and follow the instructions in the respective section below:
- Kit Parent SKU – Enter/Scan the Kit Parent SKU. If you are disassembling the kit in this mode, the serial won’t be removed.
- Assembled Serial Number – Enter/Scan the Assembled Serial Number of the kit that you intend to disassemble. Use this mode if the parent product requires serial scanning and the Serial Number was generated in Skustack.
- Basic Serial Number – Use this mode, if the parent product requires serial scanning and the Serial Number was generated in Sellercloud (not Skustack).
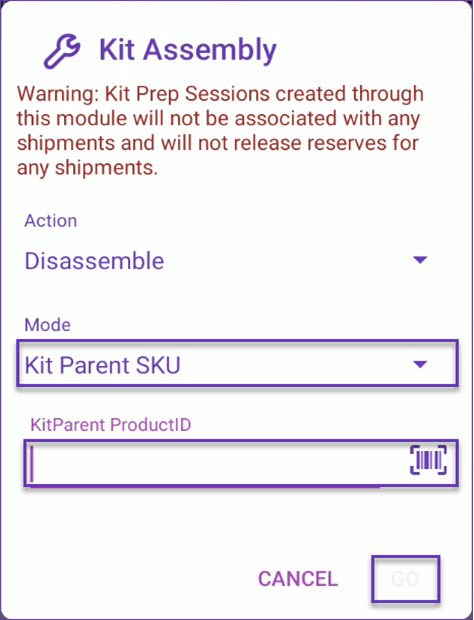
Kit parent SKU mode
- Enter the kit parent SKU.
- Use the arrows to enter the number of required kits and tap Go.
- Another prompt opens where you should specify the Original Bin (the bin the kit parent will be deducted from), Destination Bin (the bin to which the components will be added), and the Quantity to disassemble.
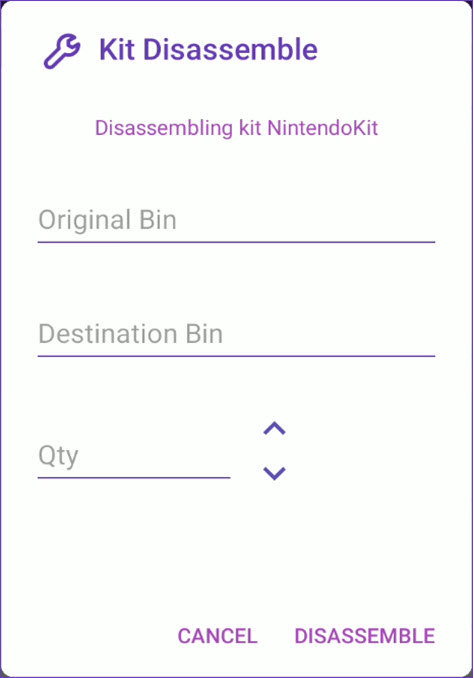
- If you are using the Lot Numbers workflow, you will have to select a lot number from the list of existing lot numbers on the parent:
- If that particular lot number had been assembled in Kitting module, then Skustack will automatically recognize the component’s expirable definition and which lot numbers to add back to which components.
- If that lot number had not been assembled in the Kitting module (example: positive adjustment), then the user will be prompted to select a lot number for each expirable component (and will be able to create a new lot number for the component if it does not yet exist).
- Tap Disassemble.
- The Kit will disassemble into the selected Destination Bin.
Assembled Serial Number mode
- Enter/Scan the Kit Parent Serial Number (the serial number generated during the kit assembly in Skustack).
- Select the Original Bin (the bin the kit parent will be deducted from) and
- Destination Bin (the bin to which the components will be added).
- Tap Go.
- The Kit will disassemble into the chosen Destination Bin. If any components require serial scanning, Skustack will find the serials that were scanned originally during assembly and add those serials back to the component in the bin it was disassembled into. It will then remove the parent from the original bin.
- If you are using the Lot Numbers workflow, Skustack will automatically know which parent lot number to use and which lot numbers should be added back to each component.
Basic Serial Number mode
- Enter the Basic Serial Number (the existing serial number or the serial added manually to the kit in Sellercloud).
- Select the Original Bin (the bin the kit parent will be deducted from) and Destination Bin (the bin to which the components will be added).
- If you are using the Lot Numbers workflow, you will have to select a lot number from the list of existing lot numbers on the parent:
- If that particular lot number had been assembled in the Kitting module, then Skustack would automatically know the component’s expirable definition and which lot numbers to add back to which components.
- If that lot number had not been assembled in the Kitting module (example: positive adjustment), then the user will be prompted to select a lot number for each expirable component (and will be able to create a new lot number for the component if it does not yet exist).
- Tap Go.
- The Kit will disassemble into the selected Destination Bin. Serial numbers will be added for any of the components that require a serial scan.
Related Settings
| SETTING | DESCRIPTION |
| Validate serial globally | Client setting. Enables serial number validation in Skustack. Learn more about serial number validation and relevant client settings here. |
| Require Component Serial Scan If Necessary | Skustack’s Warehouse Management setting. When enabled, will force the user to scan serials for components that are set to require serial scan. |
| Scan To Assemble | Skustack’s Warehouse Management setting. |
| Auto Print Kit Labels | Skustack’s Warehouse Management setting. When enabled, kit labels will be printed automatically upon assembly. |
| Print kit parent SKU on PickList Order Confirmation Label instead of component SKU | Skustack’s Warehouse Management setting. When enabled, order confirmation labels will contain the Parent SKU details, instead of component’s. |
| Auto Close After Fully Assembled | Skustack’s Warehouse Management setting. When enabled, the Kit Prep Session will be automatically updated to Completed once all kits are assembled. |
| Auto populate progress quantity when bin is selected | Skustack’s Warehouse Management setting. When a bin is selected, the Pick Qty field will automatically be set to the total quantity available in that bin, up to the quantity required. |
| Only suggest bins with existing qty | Skustack’s Warehouse Management setting. When enabled, Skustack will not suggest bins with zero product quantity. |
| Hide products with zero bin quantity | Skustack’s Warehouse Management setting. Any product that has a quantity of 0 in a bin will be hidden from the list. |