
Overview
Skustack’s Product Bins allow you to easily access all bins associated with a particular product. A bin becomes associated when the product is initially added to it. By default, it retains the association even if the product’s inventory in the bin is zero. In this article, you’ll learn how to efficiently view and regulate product bin quantities both through your Skustack device and your Admin portal.
Product Bins Module
The Product Bins module is located within Skustack’s Bin tab and allows you to view and manage product bin quantities.
Search Product Bins
To find all bins associated with a particular SKU:
- Navigate to the Product Bins module and tap the Search icon.
- Scan or enter the required SKU.
- A list of associated product bins will be displayed. Primary bins are easily distinguishable by their bold and italic font. To conceal bins with zero bin quantity, enable the Hide products with zero bin quantity Warehouse Management setting.
- Tap on the Movements icon to access the product’s bin movements.
- Swipe left on a bin to reveal shortcuts to other actions:
- To access the product’s bin movements, tap on the Movements icon.
Manage Product Bins
When the Allow Quantity Updates Warehouse Management setting is enabled, you can control the product’s bin quantities through your Skustack device. If necessary, you can also enforce an adjustment limit in the Set Quantity Updates Limit field, an Adjustment Reason, and configure other Related Settings.
To adjust quantities for a product within a bin:
- Search for the desired bin.
- Swipe the header down and tap the + icon to add quantities to a new bin.
- To adjust the quantities in one of the existing bins, tap the item and the adjustment dialog will open.
- You can use one of the following methods to either increase or decrease the quantity in the selected bin:
- Scanning – Scan the products’ SKUs as many times as you wish to change the quantity. Use either the green or red Arrow to indicate whether products are added or removed from the bin. (To change between the two modes, simply tap the Arrow)
- Manually – Either type the desired number to adjust or use the arrows above and below the number field to either increase or decrease the quantity.
- If the Warehouse Management setting Adjustment reason is enabled, you must provide a specific Reason for the quantity change.
- Tap Add.
Related Settings
| Setting | Description |
| Adjustment reason | Skustack’s Warehouse Management setting. When enabled, a reason must be provided, before an inventory adjustment can be done. |
| Edit adjustment reason | Skustack’s Warehouse Management setting. Enable to allow edits of existing adjustment reasons. |
| Display Product Name when doing bin adjustments/transfers | Skustack’s Warehouse Management setting. The product name will be displayed in the adjustment/transfer dialog. |
| Enable Large Adjustment Warning | Skustack’s Warehouse Management setting. If enabled, a warning message will appear whenever the adjustment quantity exceeds the amount appointed in field Set Large Adjustment Warning Qty. |
| Set Large Adjustment Warning Qty | Skustack’s Warehouse Management setting. In this field, you can set the Large Adjustment Warning threshold. Whenever an adjustment quantity reaches this threshold, a warning notification will prompt the user to reconfirm the movement. |
| Allow quantity updates | Skustack’s Warehouse Management setting. If enabled, it allows product bin adjustments up to the amount specified in Set Quantity Updates Limit field. |
| Set Quantity Updates Limit | Skustack’s Warehouse Management setting. When the Allow quantity updates setting is enabled, here you can specify a quantity adjustment cap. |
| Open adjustment window by default | Skustack’s Warehouse Management setting. When a bin is scanned in the Product bins or Manage bins, the system will open the adjustment window first. If disabled, the bin transfer window will open first. |
| Hide products with zero bin quantity | Skustack’s Warehouse Management setting. Bins with zero quantity will be hidden from the product’s bin list. |
Product Warehouse Bins
Within the Skustack Admin portal, you can seamlessly see product-associated bins, assess their quantities, and make adjustments if necessary.
Search Product Bins
To find product-associated bins:
- Navigate to the Skustack Admin portal at https://xx.skustack.com (replace “xx” with your server ID or team name).
- Enter your login credentials.
- On the left, select Products > Manage Products and open the required SKU.
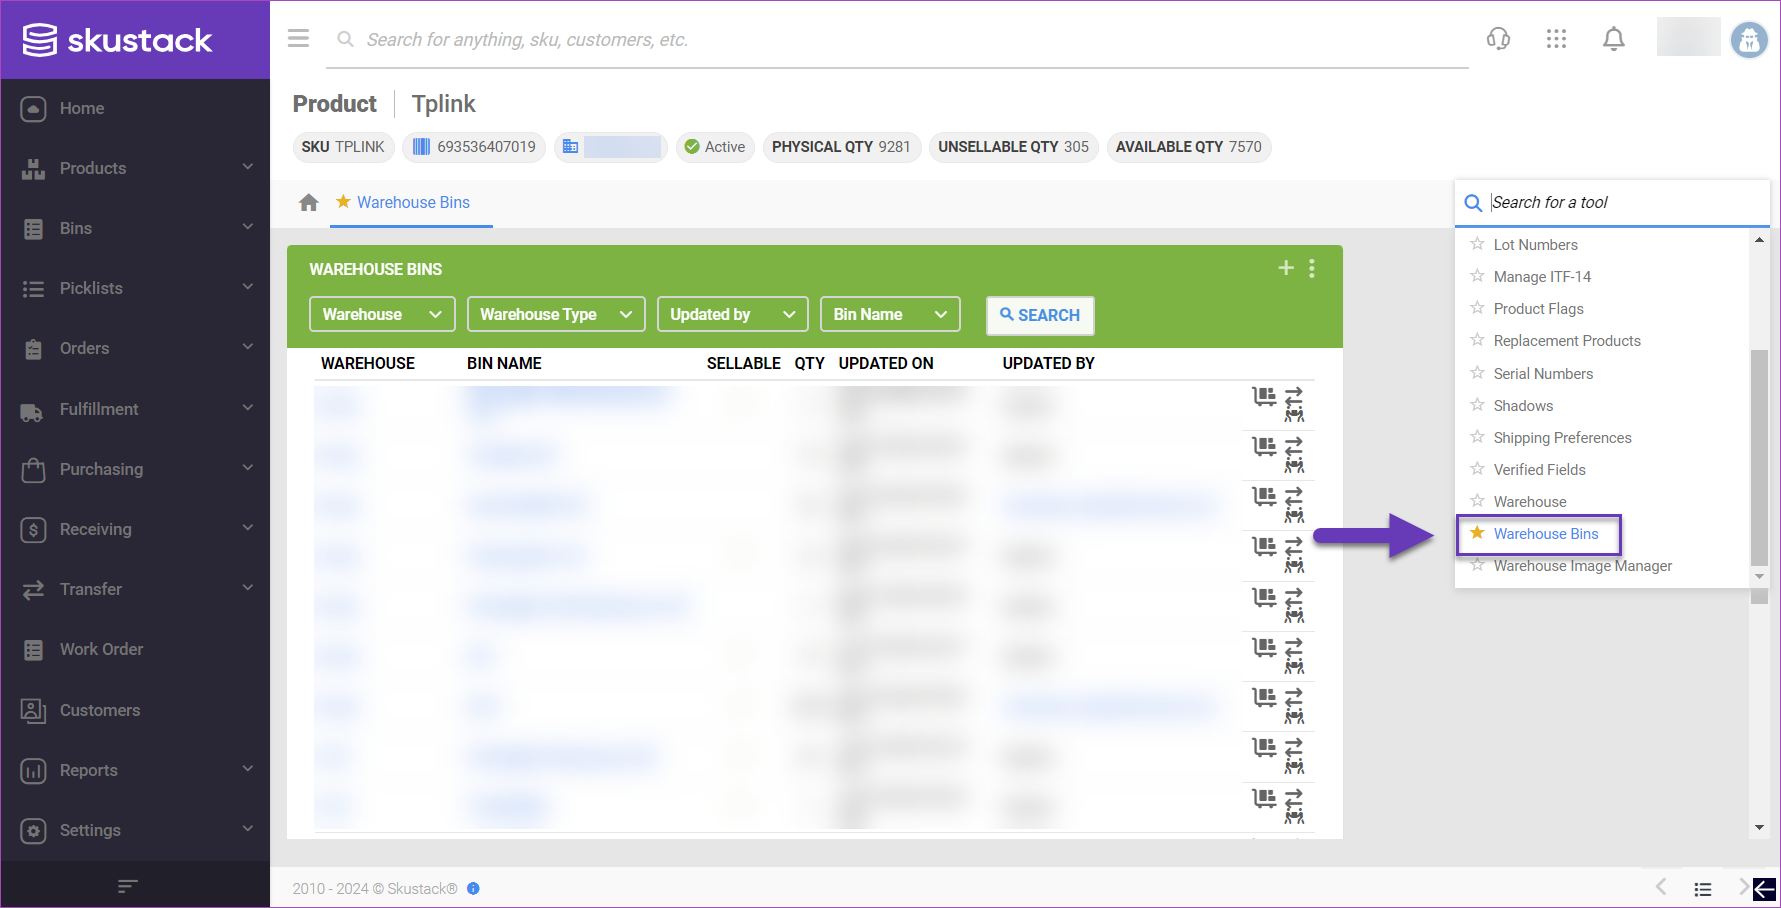
- Open the product’s Toolbox and select Warehouse Bins.
Alternatively, you can filter multiple product bins at once:
- Navigate to Bins > Product Warehouse Bins.
- Select the required ProductID and configure your Default filters to make sure that the results display exactly what you need.
- Click Search. Each filter you apply gets highlighted. If a filter is gray or not displayed at all, it’s not active.
- To manage the columns in the grid, click the three dots icon on the top right and select Customize Columns. You can:
- Reorder columns by dragging them up or down in the list.
- Hide columns by clicking the Trash icons.
- Add columns by clicking Add column.
- To arrange the data in a different order, use the Sort by menu.
- To save your filtering and sorting options, click Save view, enter a Name, and click Save.
- Select your desired bins from the grid and access the Actions menu to Export To Excel, or click on a product to be directed to the product’s warehouse bins page.

Manage Product Bins
- Open your desired product.
- Click Toolbox, and select Warehouse Bins.
- Narrow down the bins list by utilizing the Warehouse, Warehouse Type, Updated by, and Bin Name filters at the top of the panel.
- Click on one of the options in the right-hand corner next to each bin to either Adjust Inventory, Transfer Inventory, or View Movements for this product in that bin.

- Click the + icon to add quantities to a new bin, or the three dots icon to Export Warehouse Bins and View All Movements for this product in all bins.