
Overview
The Skustack Admin portal offers a robust order management system, providing you with the ability to create and manage orders for your customers, either individually or in bulk. Conveniently add payments and tracking information, change order statuses, and perform various order-related tasks.
You can edit and update individual orders from the Order Details page.
Manage Orders
Search for desired orders, apply custom filters, customize columns (show/hide columns or add more, such as Picked, Ship Date, Delivery Date, etc.), and perform various actions for individual or multiple orders.
Search Orders
- Navigate to the Skustack Admin portal at https://xx.skustack.com (replace “xx” with your server ID or team name).
- Enter your login credentials.
- On the left, select Orders > Manage Orders.
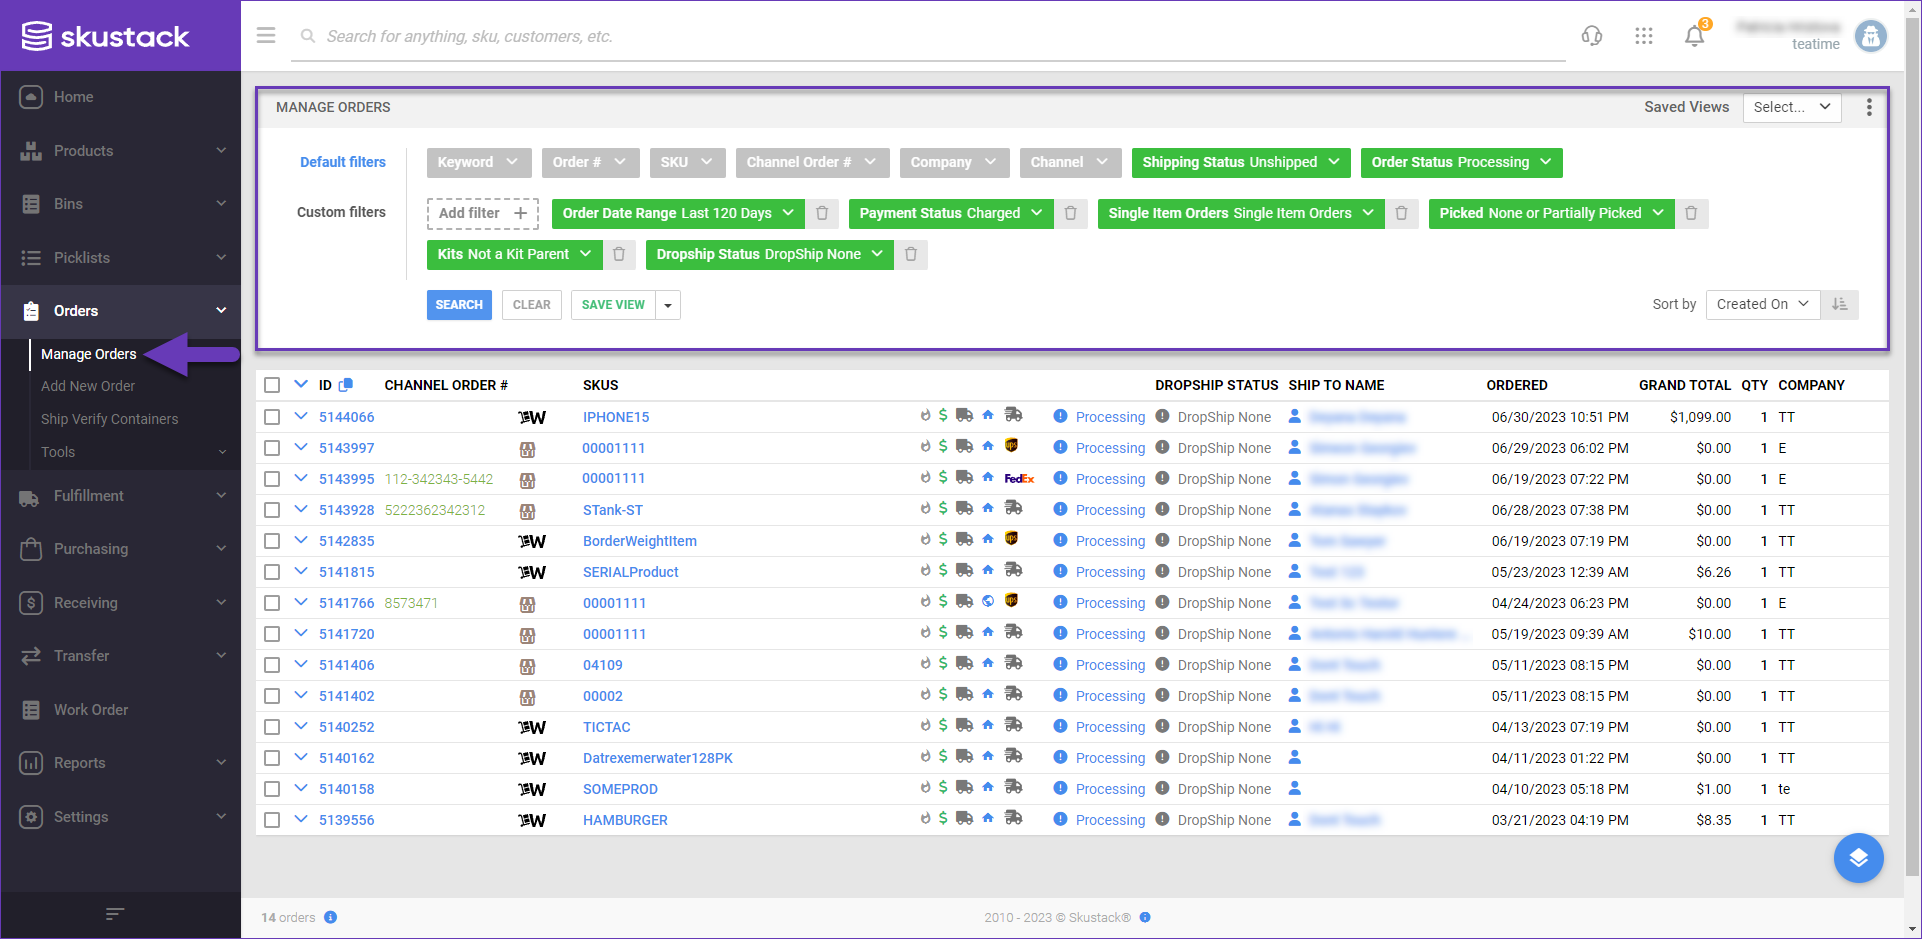
- Configure your Default filters to make sure that the results display exactly what you need.
- Click Search. Each filter you apply gets highlighted. If a filter is gray or not displayed at all, it’s not active.
- To manage the columns in the grid, click the three dots icon on the top right and select Customize Columns. You can:
- Reorder columns by dragging them up or down in the list;
- Hide columns by clicking the Trash icons;
- Add columns by clicking Add column.
- To arrange the data in a different order, use the Sort by menu.
- To save your filtering and sorting options, click Save view, enter a Name, and click Save.
- Select an order from the grid and access the Actions menu at the lower right-hand corner to either:
- Export Orders
- Generate Pick List
- Print Invoice(s) to PDF
- Print Product Labels
- Problem Order
- Refresh Kit Components
- Ship Orders
- Unship
- Update Order Status
or click on an order ID to be directed to the Order Details page.
Order Details
The Order Details page gives you an in-depth understanding of your order’s data and allows you to manage and make changes to individual orders. To edit or update order information:
- Navigate to Orders > Manage Orders.
- Select your desired order from the grid.
For more information about each panel, refer to the tables below.
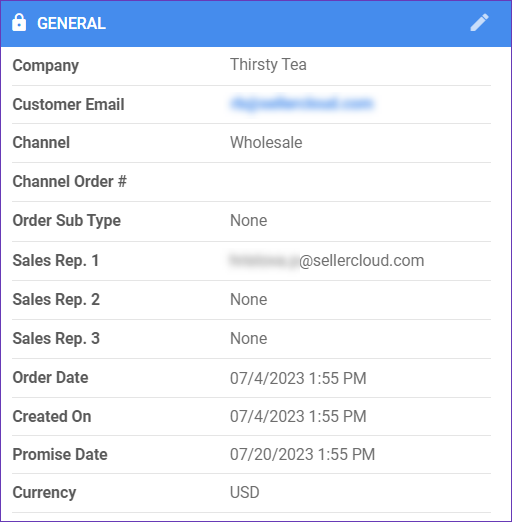
General Panel
| Field | Description |
| Company | This is the company under which the order was created. |
| Customer Email | The email of the Customer that is associated with the order. |
| Channel | This field shows in which marketplace the order was placed. |
| Channel Order # | Also known as order source ID received from a channel or marketplace. |
| Order Sub Type | The order sub-type. |
| Sales Rep. 1/2/3 | These fields show the Sales Representative’s email address. |
| Order Date | The date when the order was placed on the marketplace. |
| Created On | The date when the order was created in the Skustack Admin portal. |
| Promise Date | Order shipping deadline. |
| Currency | This is based on the company’s default currency and location. |
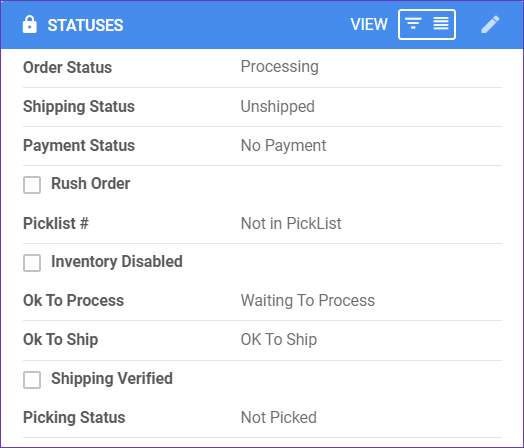
Statuses Panel
| Field | Description |
| Order Status | Here you can view the order status, depending on whether is it completed, on Hold, Cancelled, etc. |
| Shipping Status | This field shows the order’s shipping status. |
| Payment Status | The payment status provides information if the order has been fully paid, partially refunded, or if there is no payment yet. |
| Rush Order | The Rush Order field indicates if the customer has paid extra to upgrade the shipping service. |
| Picklist # | The Picklist # field indicates if the order is currently in any picklist. |
| Inventory Disabled | This field indicates if the inventory count for the order is enabled or disabled. |
| Ok To Process | Client setting Enable OKtoProcess Workflow must be enabled for this workflow. |
| Ok To Ship | Client setting Enable OKtoShip Workflow must be enabled for this workflow. Learn more here. |
| Shipping Verified | This field indicates if the packages were Ship Verified. |
| Picking Status | This field shows the order’s picking status. |
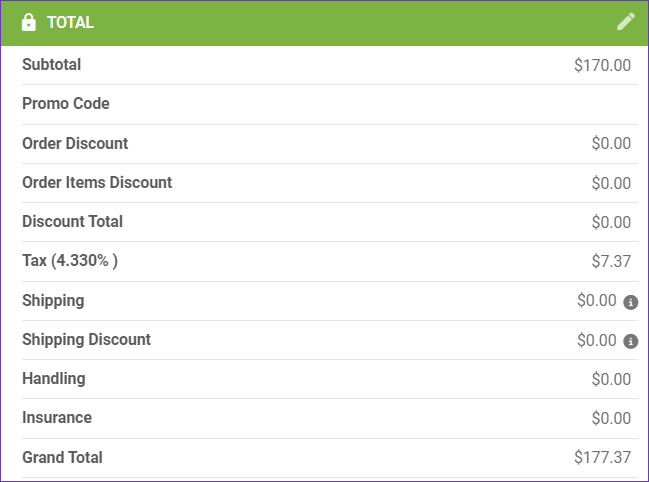
Total Panel
| Field | Description |
| Subtotal | Refers to the total cost of all the items in the order before any additional charges like taxes, shipping fees, or discounts are applied. |
| Promo Code | This field shows if a promotional code has been applied upon payment. |
| Order Items Discount | Indicates if there are items with applied discount within the order. |
| Discount Total | The total value of the discount. |
| Tax | This field indicates the Overriding Tax or the Custom Tax Rate, if applicable. |
| Shipping | This field shows the shipping amount. It can be updated from the toolbox. |
| Shipping Discount | This field shows if there was a discount applied to the shipping cost. The shipping discount can be updated in the shipping tab from the toolbox. |
| Handling | Handling fees. |
| Insurance | Insurance Cost. |
| Grand Total | This field indicates the order’s total amount. |
Change Log
The Change Log shows all changes made to the order, including the date, time, and the user who made the change. It helps you to track and manage all order changes and updates.
To view the Change Log, navigate to Orders > Manage Orders > Open an order > Toolbox > Change Log.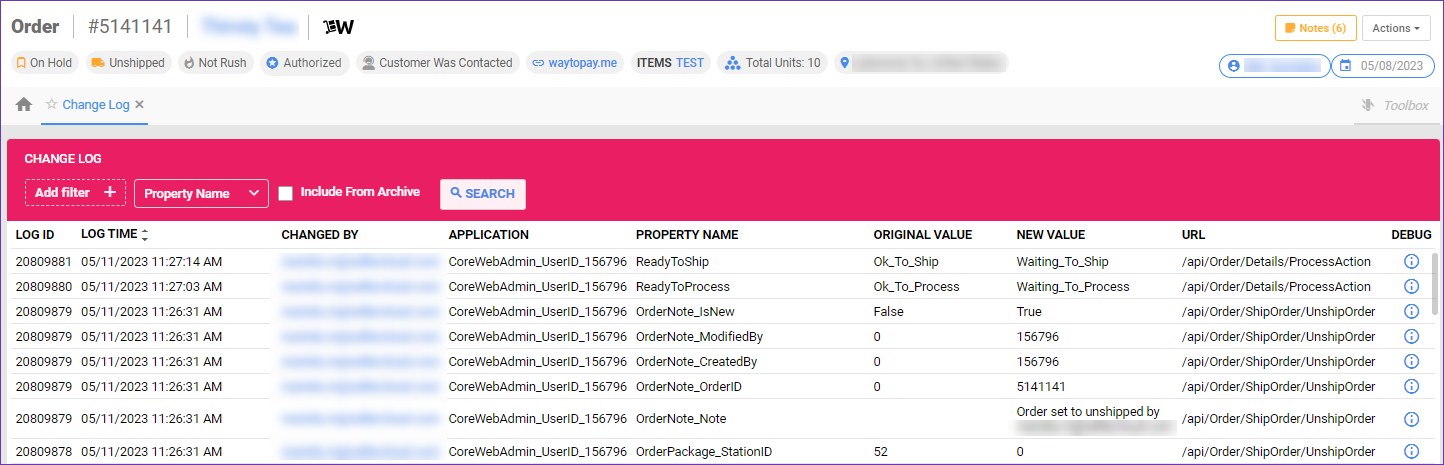
You can see the original order details, order products, order status, and payments. Any notes left will also be displayed, and the email address of the user that initiated the changes.
The Change Log displays both the original and the new value after a change has been made.
Toolbox
- Action Documents – Here, you can see all requested Order Documents that contain details about the order’s lifecycle.
- Change Log – Here, you can see all changes and updates applied to the order, including who initiated the change and when.
- Documents – You can upload any relevant order documents and attachments, such as labels.
- Lot Numbers – Here, you can see the items’ Lot Numbers, if applicable.
- Picklist – You can see if the order belongs to any picklist.
- Serial Numbers – Here, you can add or upload Serial Numbers, if applicable.
- Shipping – You can edit shipping addresses, shipping details, and manage packages.
Actions
Some of the order Actions are available to perform in bulk, on the Manage Orders Page. However, you will find only a limited number of actions there. Some actions, such as Importing Tracking Information, can be done via a file import on a separate page in the Orders Tab.
The following are the actions found on the Order Details page for individual orders:
- Manage Serial Numbers – Leads you to the Serial Numbers tab, where you can add or upload order Serial Numbers.
- Print Product Labels – This action will print labels for the products in that specific order. The label includes product information, such as SKU, UPC, and more.
- Re-Calculate Inventory – This will recalculate the inventory of the order’s products.
- Re-Calculate Picked Qty – This action will recalculate the picked quantity of the order’s products.
- Receive Payment – This action will redirect you to a window where you can apply payment for the order and change the Payment Status.
- Refresh Kit Components – This action can be performed only on unshipped orders, and it will refresh kit component details in cases of any kit changes.
- Set Cancelled Internally – This will cancel the order in the Skustack Admin portal.
- Set On Hold – This will change the order status to on Hold, and you will be prompted to give a reason for this change.
- Ship Order – This action allows you to update tracking information or generate shipping labels.
- Shipping Packages – This will lead you to the Shipping panel, where you can update relevant shipping information.
- Update Shipped Verified Status – Here, you can change the current status to either Not Verified or Shipped Verified.
- Verify Shipping Address – This action allows you to verify the address on the order, receive a suggested address from the carrier, and adjust it as needed.
To successfully verify shipping addresses from the Skustack Admin, you must have valid carrier credentials configured on the Shipping API page for your company. Contact your onboarding representative or Sellercloud Support for assistance.
- View Products in Manage Inventory – This action will lead you to the inventory tab, so you can see the order items’ current inventory.
The available Actions in the Action menu may vary based on the order statuses and may also be impacted by relevant Order-related Client Settings. If you are unsure what some of them mean, reach out to Sellercloud Support or your onboarding representative for assistance.