
Overview
Pickup management refers to the process of organizing, coordinating, and overseeing the pickup of ordered items or goods from your warehouse location. It involves managing the tasks related to pickups and ensuring that all packages are handed over to their designated carrier. Using a container is one of the most common methods to track pickups in logistics and supply chain operations. Containers can be created and managed effortlessly through both the Skustack Admin portal and the Skustack app.
Create Containers
You can create a Container in a few simple steps:
- Navigate to the Orders tab > Manage Pickup Containers.
- Tap the + icon.
- Enter the Container’s Name and select a Shipping Carrier from the dropdown.
- Tap Create and you will be directed to the new container. By default, the container is created for all carrier services. If required, you can restrict the container to specific Shipping Services through the Skustack Admin portal.
- To add a package to the container, tap the + icon to open the Container Ship Verify dialog and scan the tracking number.
The container shipping carrier and shipping service must match those required for the package.
Print Container QR codes
Each Container has a QR code label, which serves as its digital identifier. The QR codes are scanned to verify the sorting of order packages within the Ship Verify Containers module.
To print a Container QR code:
- Navigate to the Orders tab > Manage Pickup Containers and open the required container.
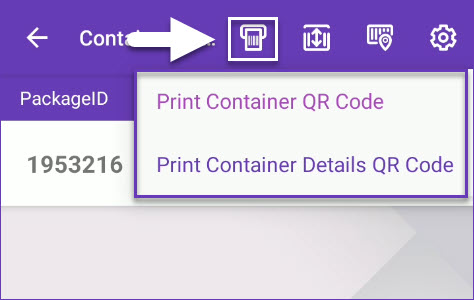
- Tap the printing icon next to the Container Name and select the QR code print type:
- Print Container QR code – Note that a 3×1.5 label size configuration is required for this option.
- Print Container Details QR code – Note that a 4×1.5 label size configuration is required for this option.
- A print request will be sent to your printer and a Container QR code label will be generated.
Search Containers
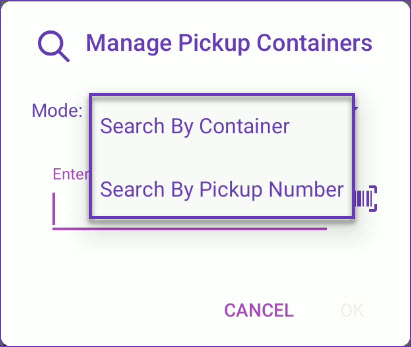
The Manage Pickup Containers module enables you to search for existing Containers in one of the following modes:
- By Container – This option allows you to open a container by scanning its QR code.
- By Pickup Number – To simplify the process of identifying and selecting the appropriate containers to pick for a particular shipper, a Pickup Number can be created for multiple containers through the Skustack Admin portal. Use this mode to find all Containers related to a specific Pickup Number.
Mark as Picked Up and Close
When the required items are handed over to the carrier, you can mark the container as Picked and Closed. This can be done either individually for each container, or in bulk via a Pickup Number.
Individually
- Open the required container and tap the Mark As Picked Up icon.
- Enter the Trailer Reference to document the shipper’s reference ID.
- If required, add a Driver Note.
- Once done, tap Submit. The Container can be easily closed by tapping the respective icon.
Via Pickup Number
Assigning a single Pickup Number to multiple Containers designated for the same shipper can significantly streamline and enhance the pickup process. You can easily mark such Containers as Picked and Closed via their Pickup Number:
- Open the required Pickup Number and a list of related Containers will load.
- Scan the Containers’ QR codes.
- When all Containers are scanned, tap the Mark As Picked Up icon and enter a Trailer Reference.
- (Optional) Add a Driver Note.
- Tap Submit. The Containers in question will be immediately Picked and Closed.
Ship Verify Containers
With Skustack’s Ship Verify module, you can scan a package’s tracking number to verify that it is shipped with the correct carrier by scanning the respective container’s QR code. Further information on the process can be found here.
Create Containers
You can create a Container in a few simple steps:
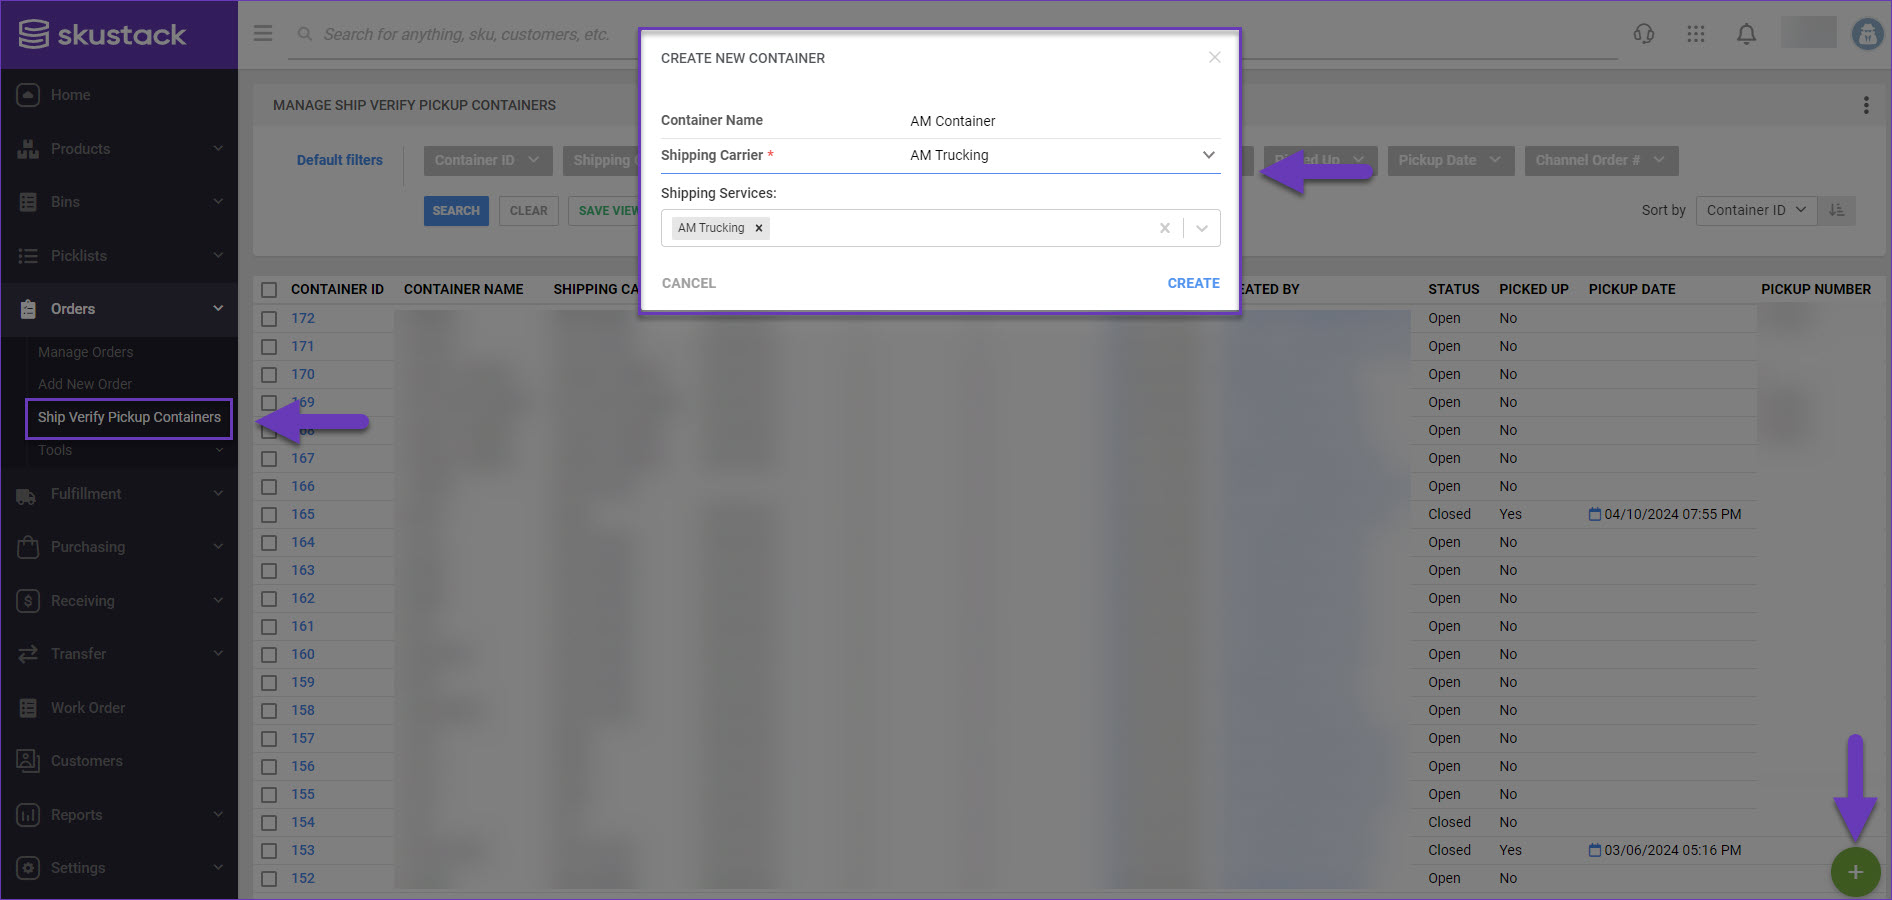
- Navigate to Orders > Ship Verify Pickup Containers.
- Click on the green + icon to add a new container.
- Enter the Container Name and select the Shipping Carrier.
- (Optional) Choose the desired Shipping Services from the dropdown. This ensures that the container is used exclusively for orders that require those particular services and that they meet the same shipping criteria, such as delivery speed, etc.
The container shipping carrier and shipping service must match those required for the package.
- Click Create and the container will be added to the list.
Print Container QR codes
Each Container has a QR code label, which serves as its digital identifier. The QR codes are scanned to verify the sorting of order packages within the Ship Verify Containers module. The Skustack Admin portal lets you print QR codes either individually or in bulk.
Individually
To print a QR code individually:
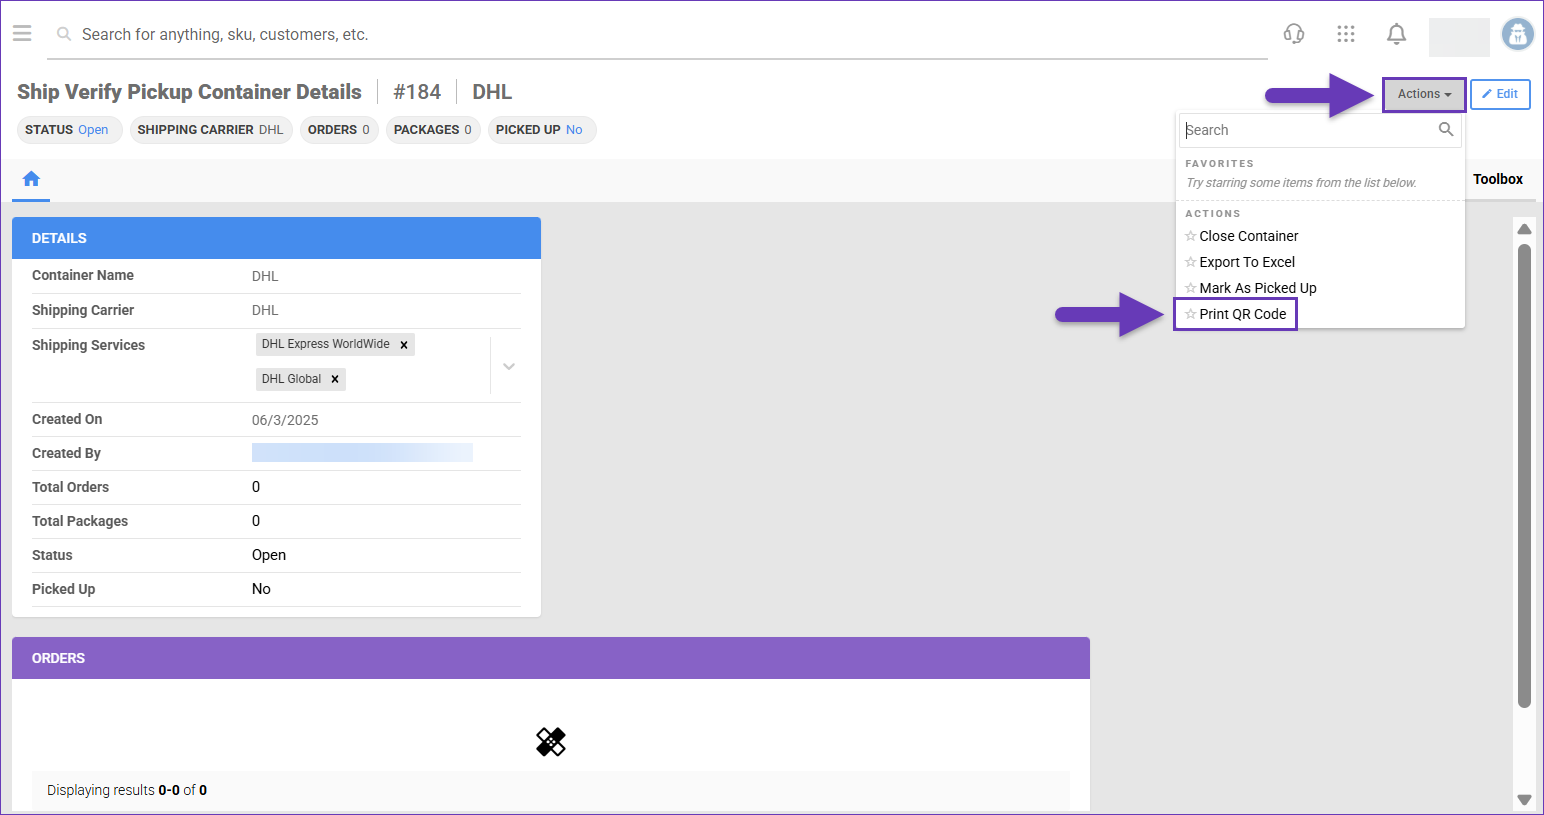
- Navigate to Orders > Ship Verify Pickup Containers and open a container.
- Access the Actions menu and click Print QR codes and PDF file with the Container’s label will be saved in your computer’s Downloads folder.
In Bulk
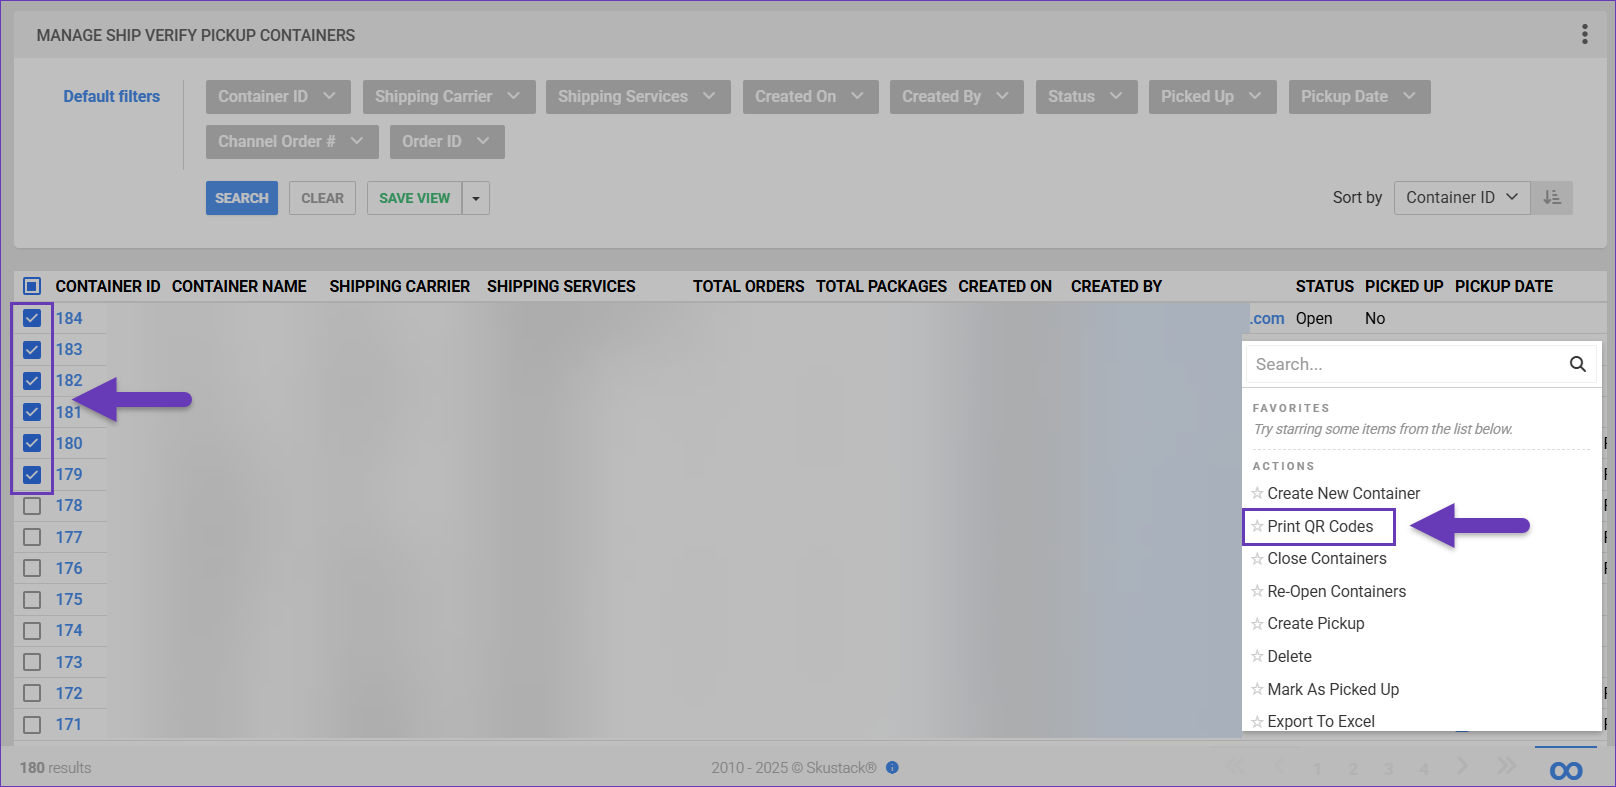
To print QR codes in bulk:
- Navigate to Orders > Ship Verify Pickup Containers and select the desired Containers from the grid.
- Access the Actions menu and click Print QR codes.
Search Containers
To search for existing containers:
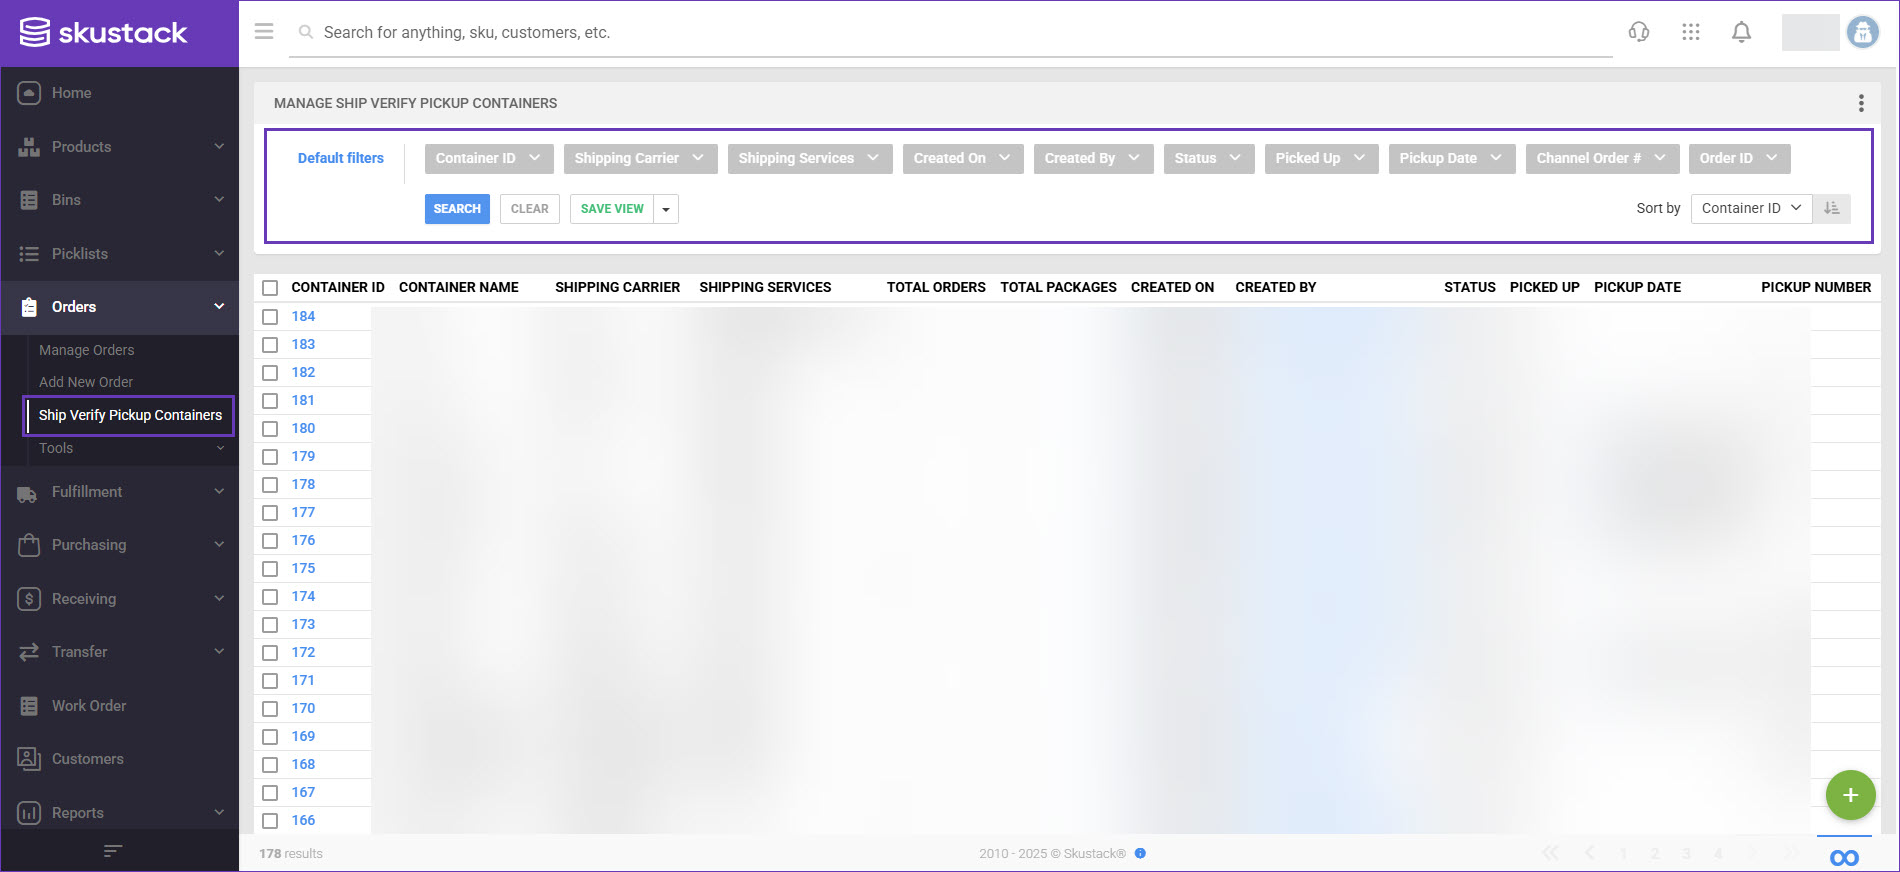
- Navigate to the Skustack Admin portal at https://xx.skustack.com (replace “xx” with your server ID or team name).
- Enter your login credentials.
- On the left, select Orders > Ship Verify Pickup Containers.
- Configure your Default filters to make sure that the results display exactly what you need. The available filters are:
- Container ID
- Shipping Carrier
- Shipping Services
- Created On
- Created By
- Status
- Picked Up
- Picked Date
- Channel Order #
- Order ID
- Click Search. Each filter you apply gets highlighted. If a filter is gray or not displayed at all, it’s not active.
- To manage the columns in the grid, click the three dots icon on the top right and select Customize Columns. You can:
- Reorder columns by dragging them up or down in the list;
- Hide columns by clicking the Trash icons;
- Add columns by clicking Add column.
- To arrange the data in a different order, use the Sort by menu.
- To save your filtering and sorting options, click Save View, enter a Name, and click Save.
Create Pickup
You can group multiple Containers in a single Pickup reference to streamline and optimize the pickup process. This can be achieved by creating a single Pickup Number that covers multiple containers. The method simplifies the workflow of identifying and selecting the appropriate containers to pick for a particular shipper.
To create a new Pickup:
- Navigate to Orders > Ship Verify Pickup Containers and select the required Containers from the grid.
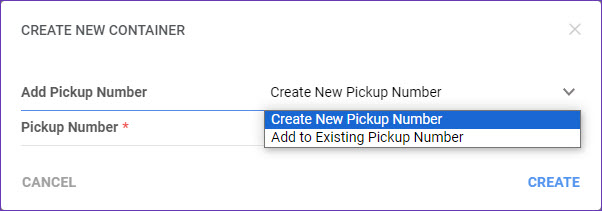
- Access the Actions menu and click Create Pickup.

- From the Add Pickup Number dropdown, select to either Create New Pickup Number or to Add to Existing Pickup Number.
- Enter a Pickup Number, or select one from the list of existing numbers.
- Click Create and the containers’ Pickup Number will appear on the Ship Verify Pickup Containers page.
Mark as Picked Up and Close
Once the items are handed over to the carrier, you can mark a container as Picked up. This action will automatically close the container.
Mark As Picked Up
Containers can be marked as Picked Up individually or in bulk, depending on the processed pickup.
Individually
To pick and close an individual Container:
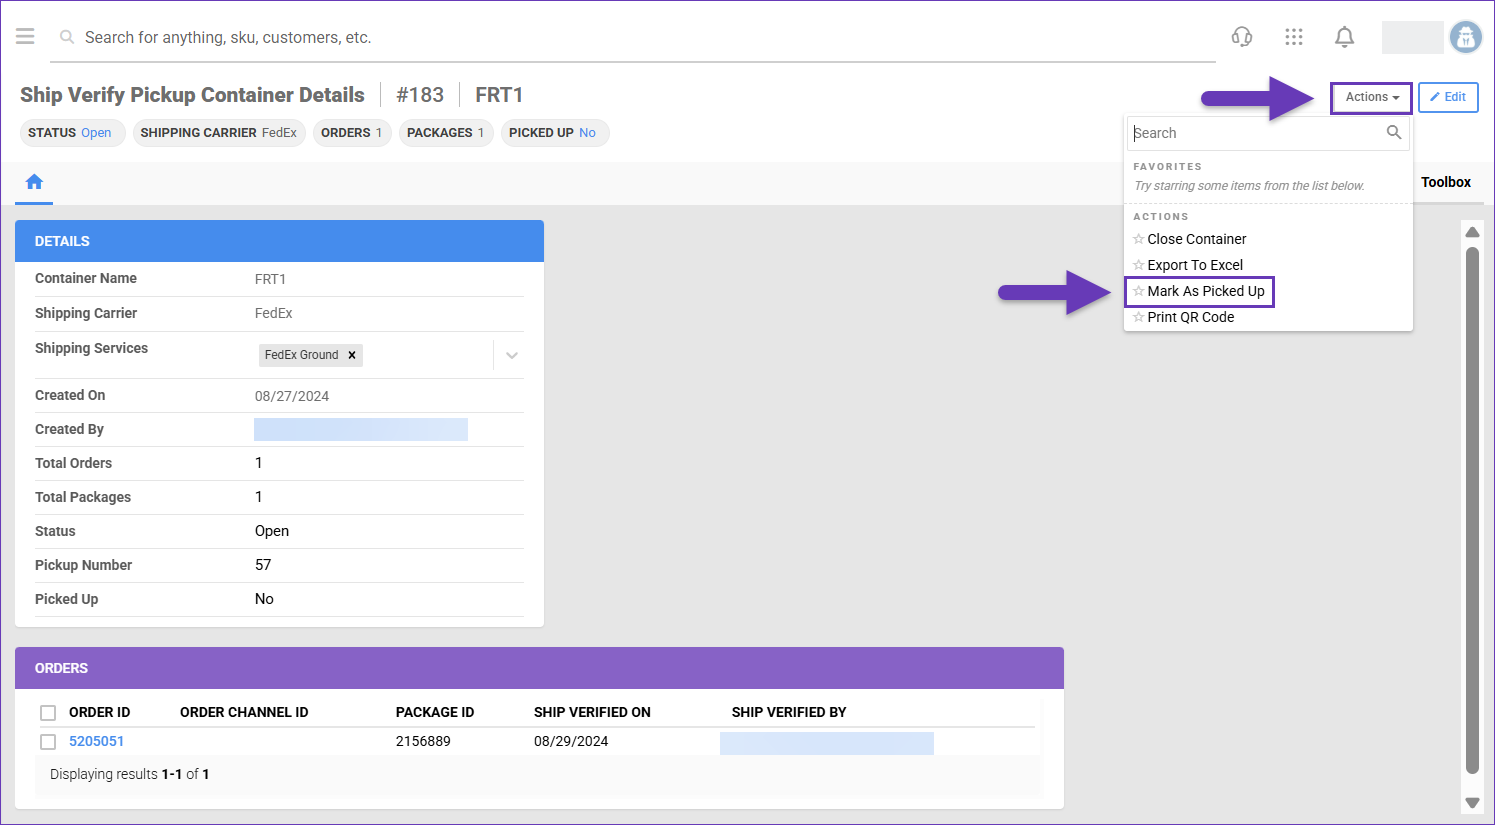
- Navigate to Orders > Ship Verify Pickup Containers.
- Open the required Container to see its details and all orders associated with it.
- Access the Actions menu and select Mark As Picked Up.
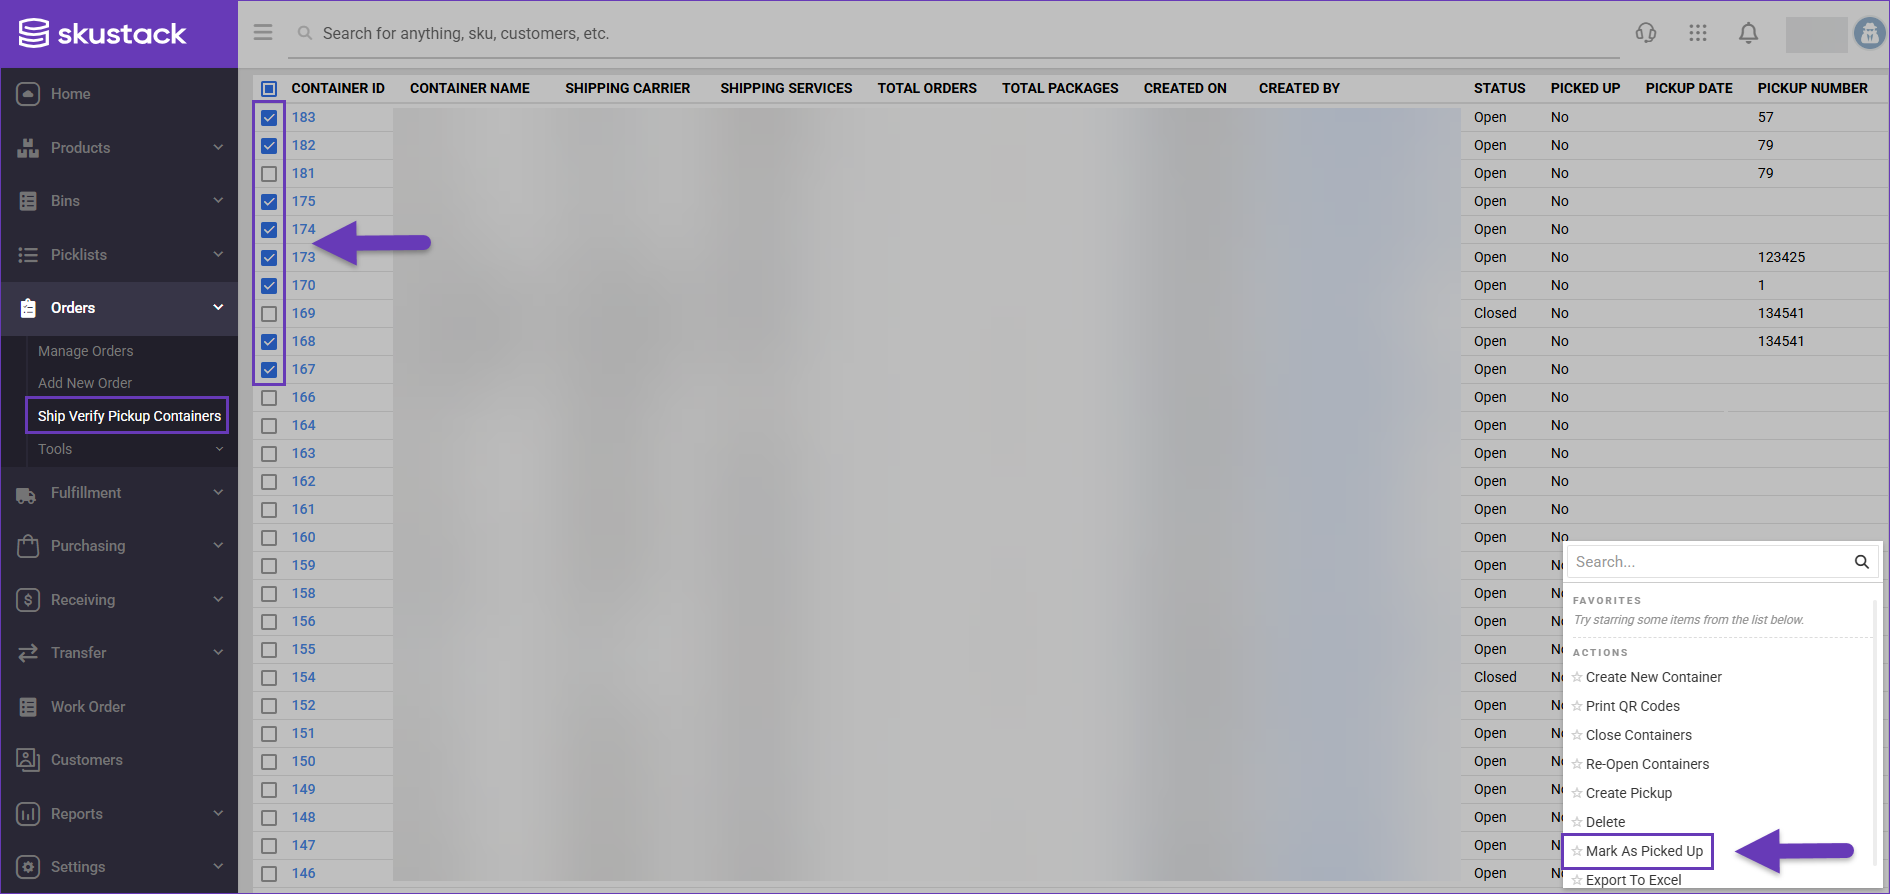
In Bulk
To mark multiple Containers as Picked Up with a single action:
- Navigate to Orders > Ship Verify Pickup Containers and select your desired Containers from the grid.
- Access the Actions menu and click Mark As Picked Up.
Close Containers
You can also close containers you no longer intend to use through the respective action. The functionality is available individually and in bulk.
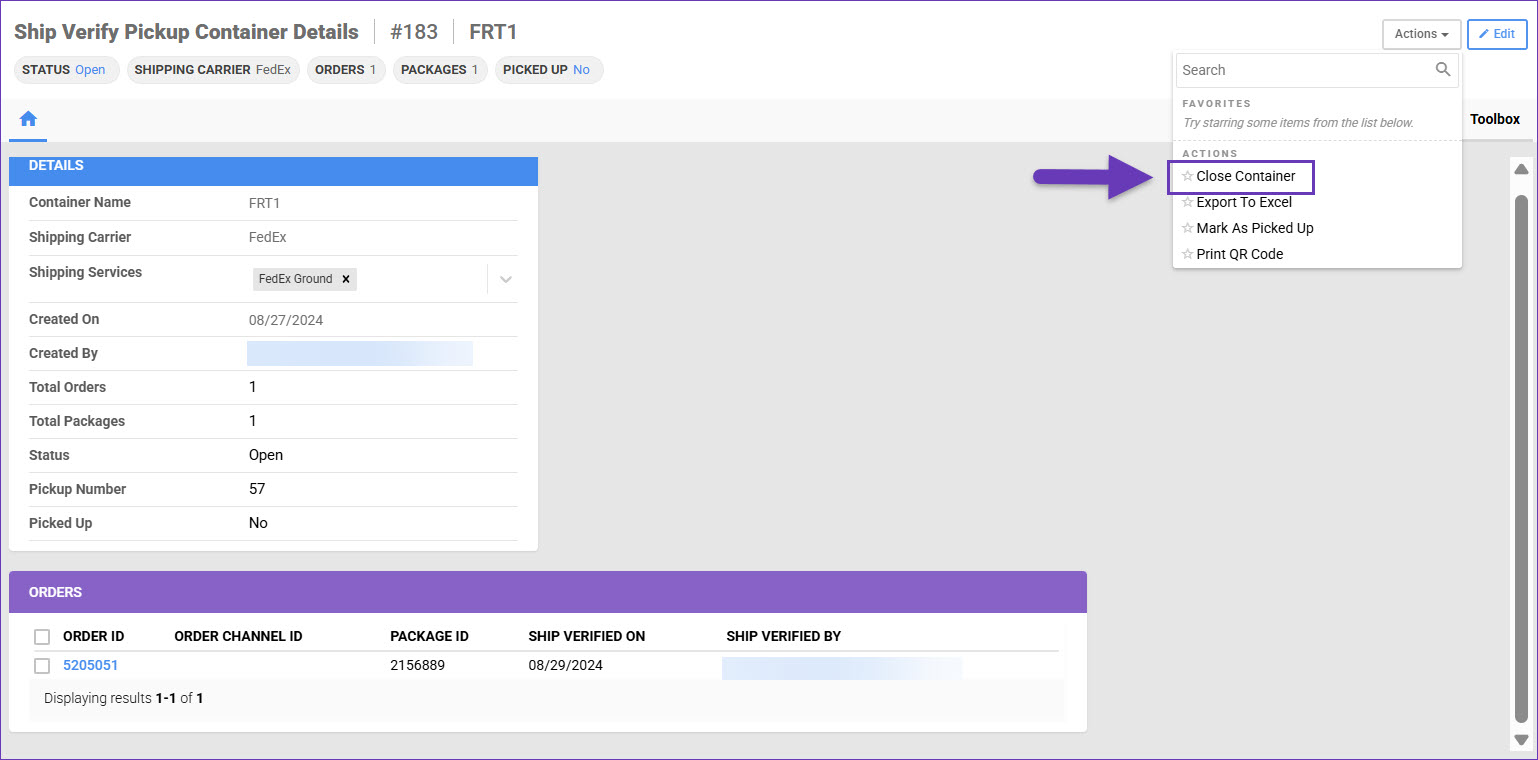
Individually
To close an individual Container:
- Navigate to Orders > Ship Verify Pickup Containers and select the required container.
- Access the Actions menu and click Close Container. The container’s status will be updated accordingly.
In Bulk
To close multiple Containers simultaneously:
- Navigate to Orders > Ship Verify Pickup Containers and select your desired Containers from the grid.
- Access the Actions menu and click Close Containers.

Export Container Details
You can export detailed information of your Ship Verify Pickup Containers to a spreadsheet for reporting and analysis purposes. The generated file will contain the following columns:
- ID
- ContainerName
- ShippingCarrier
- ShippingServices
- CreatedOn
- CreatedBy
- OrderID
- OrderChannelID
- TotalPackages
- TotalOrders
- ShipVerifiedOn
- ShipVerifiedBy
- ContainerStatus
- PickUpStatus
Depending on your operational needs, the information can be exported individually and in bulk.
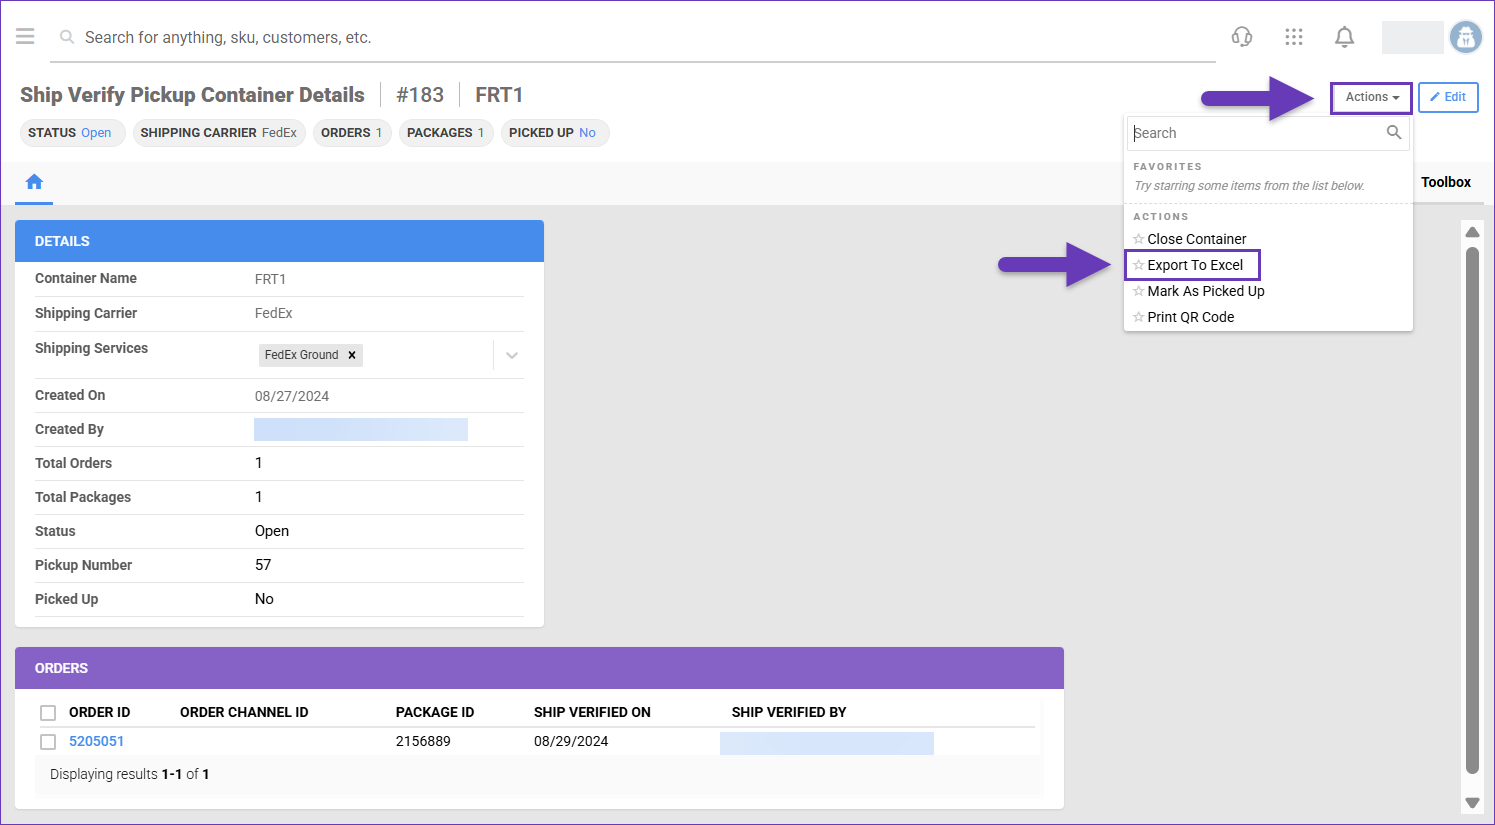
Individually
To download information about a specific Container:
- Navigate to Orders > Ship Verify Pickup Containers and select the required container.
- Access the Actions menu and click Export to Excel. The report will be saved in your computer’s Downloads folder.
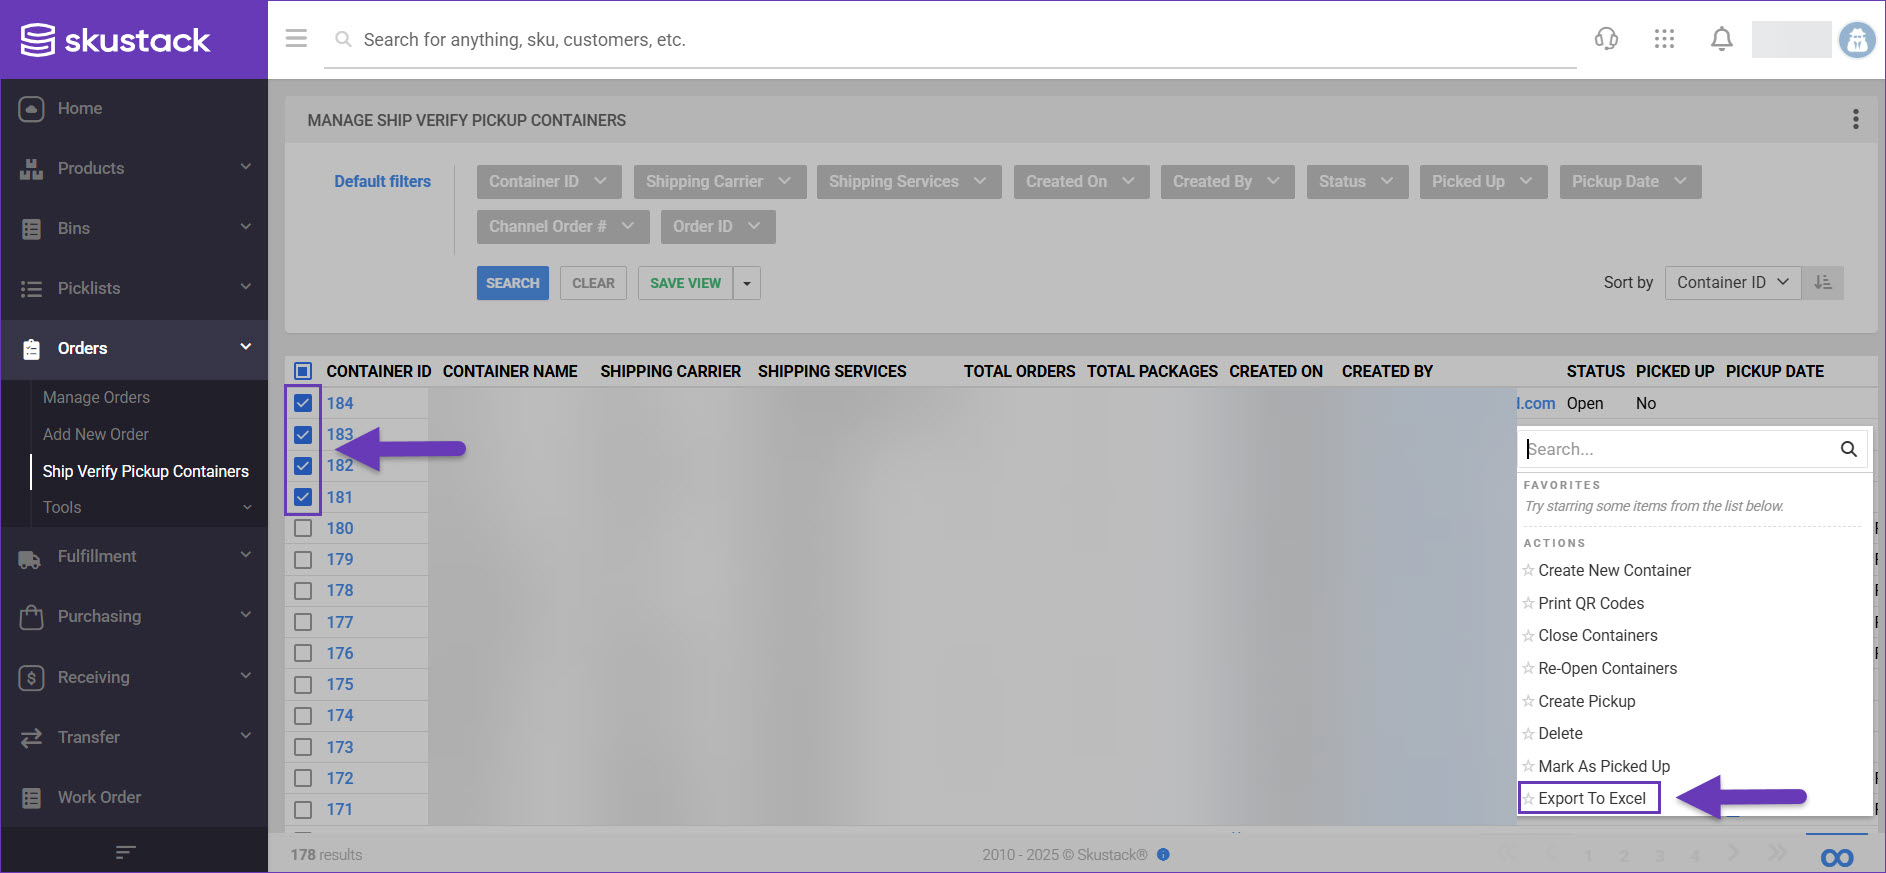
In Bulk
To generate an export for multiple Containers:
- Navigate to Orders > Ship Verify Pickup Containers and select your desired Containers from the grid.
- Access the Actions menu and click Export to Excel. The report will be saved in your computer’s Downloads folder.
Delete Containers
If you don’t need a Ship Verify Container, you have the option to delete it. Before you can do so, you must ensure it does not contain any orders. If there are orders that should be removed from the container, you can delete them from its contents.
Delete Container Contents
In case an order has been verified in the wrong container, you can delete it from the Container’s Details page:
- Navigate to Orders > Ship Verify Pickup Containers and select the needed container.
- Click the Edit button in the top right corner.
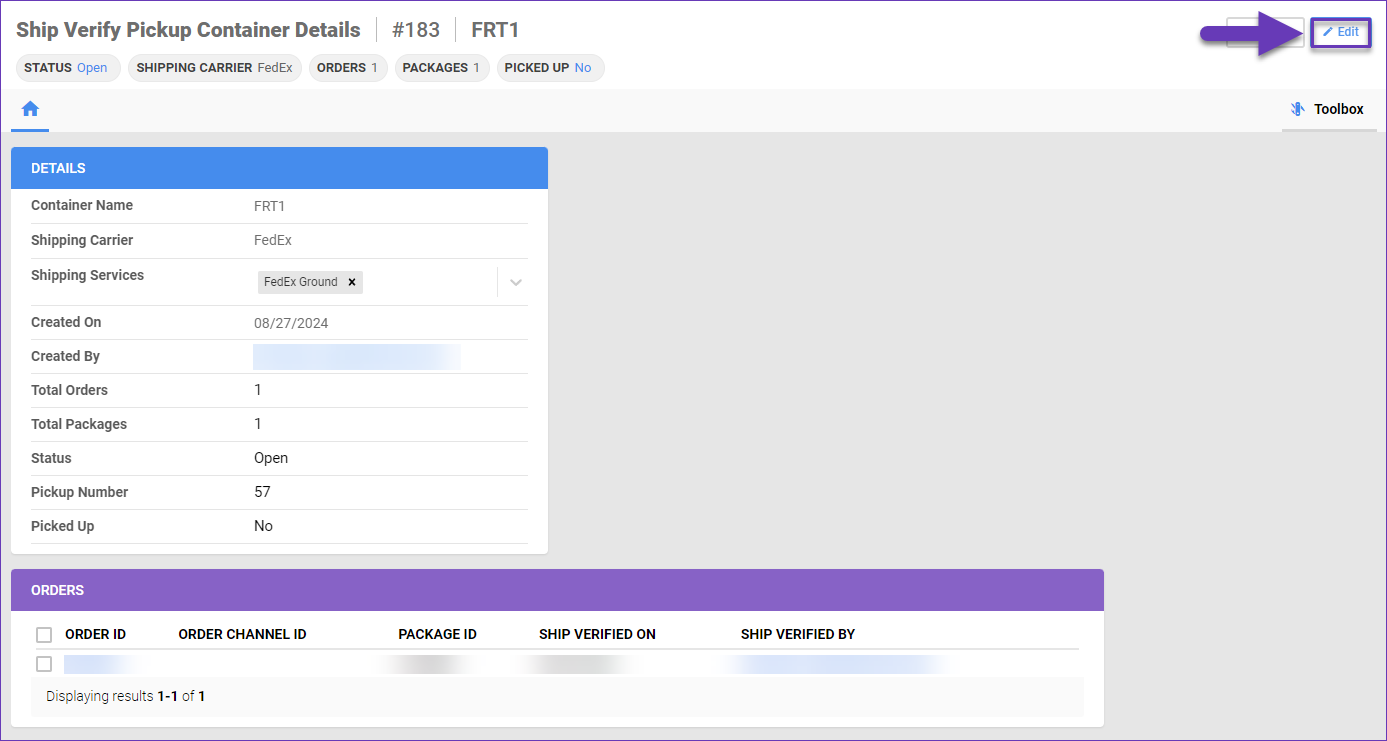
- To remove an order, click its Delete icon. You can also delete multiple orders simultaneously.

Delete Containers
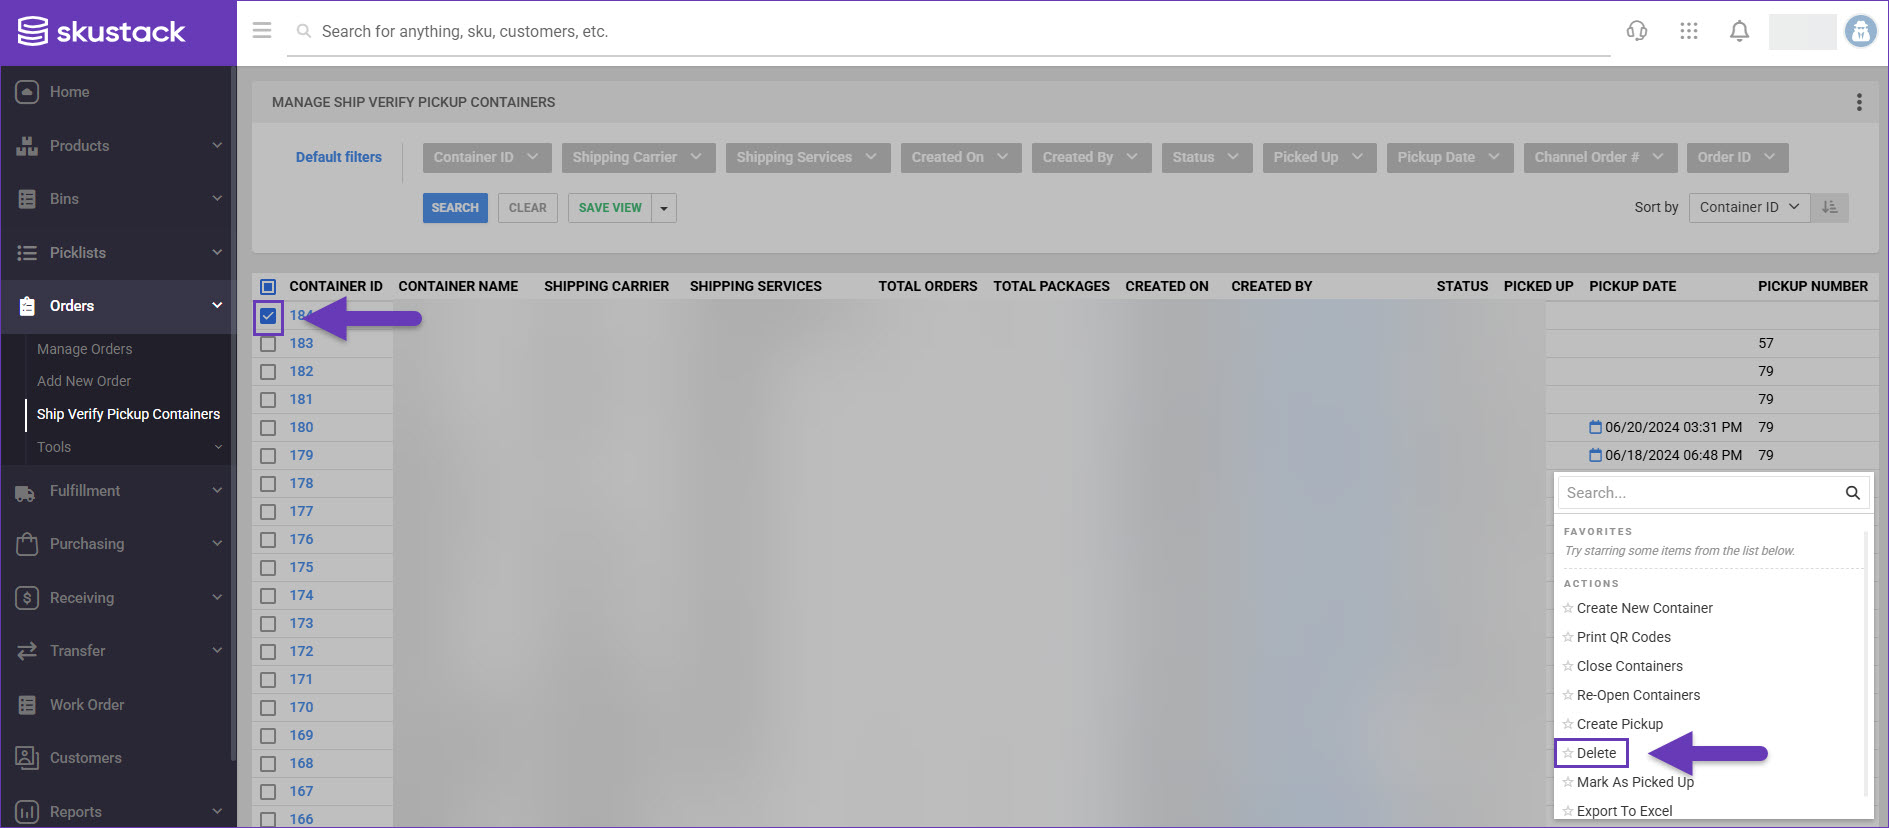
When an empty Container is not required, you can permanently delete it:
- Navigate to Orders > Ship Verify Pickup Containers and select the needed container from the grid.
- Click the Actions button and choose Delete.
Ship Verify Containers
With Skustack’s Ship Verify module, you can scan a package’s tracking number to verify that it is shipped with the correct carrier by scanning the respective container’s QR code. Further information on the process can be found here.