Overview
The Skustack Admin portal provides an easy-to-use interface to manage and track employee information, access, and attendance. It is a secure way to store employee data, such as contact information, account details, login history, and more.
Some of the key features include Employee Permissions and Roles, Device Settings, Change Logs, and more. To learn more about devices and how to manage them, refer to this article.
Manage Employees
In this section, you will learn how to easily manage your employee permissions, create and assign pre-defined security templates, as well as review login history.
Search Employees
To search for employee accounts:
- Navigate to the Skustack Admin portal at https://xx.skustack.com (replace “xx” with your server ID or team name).
- Enter your login credentials.
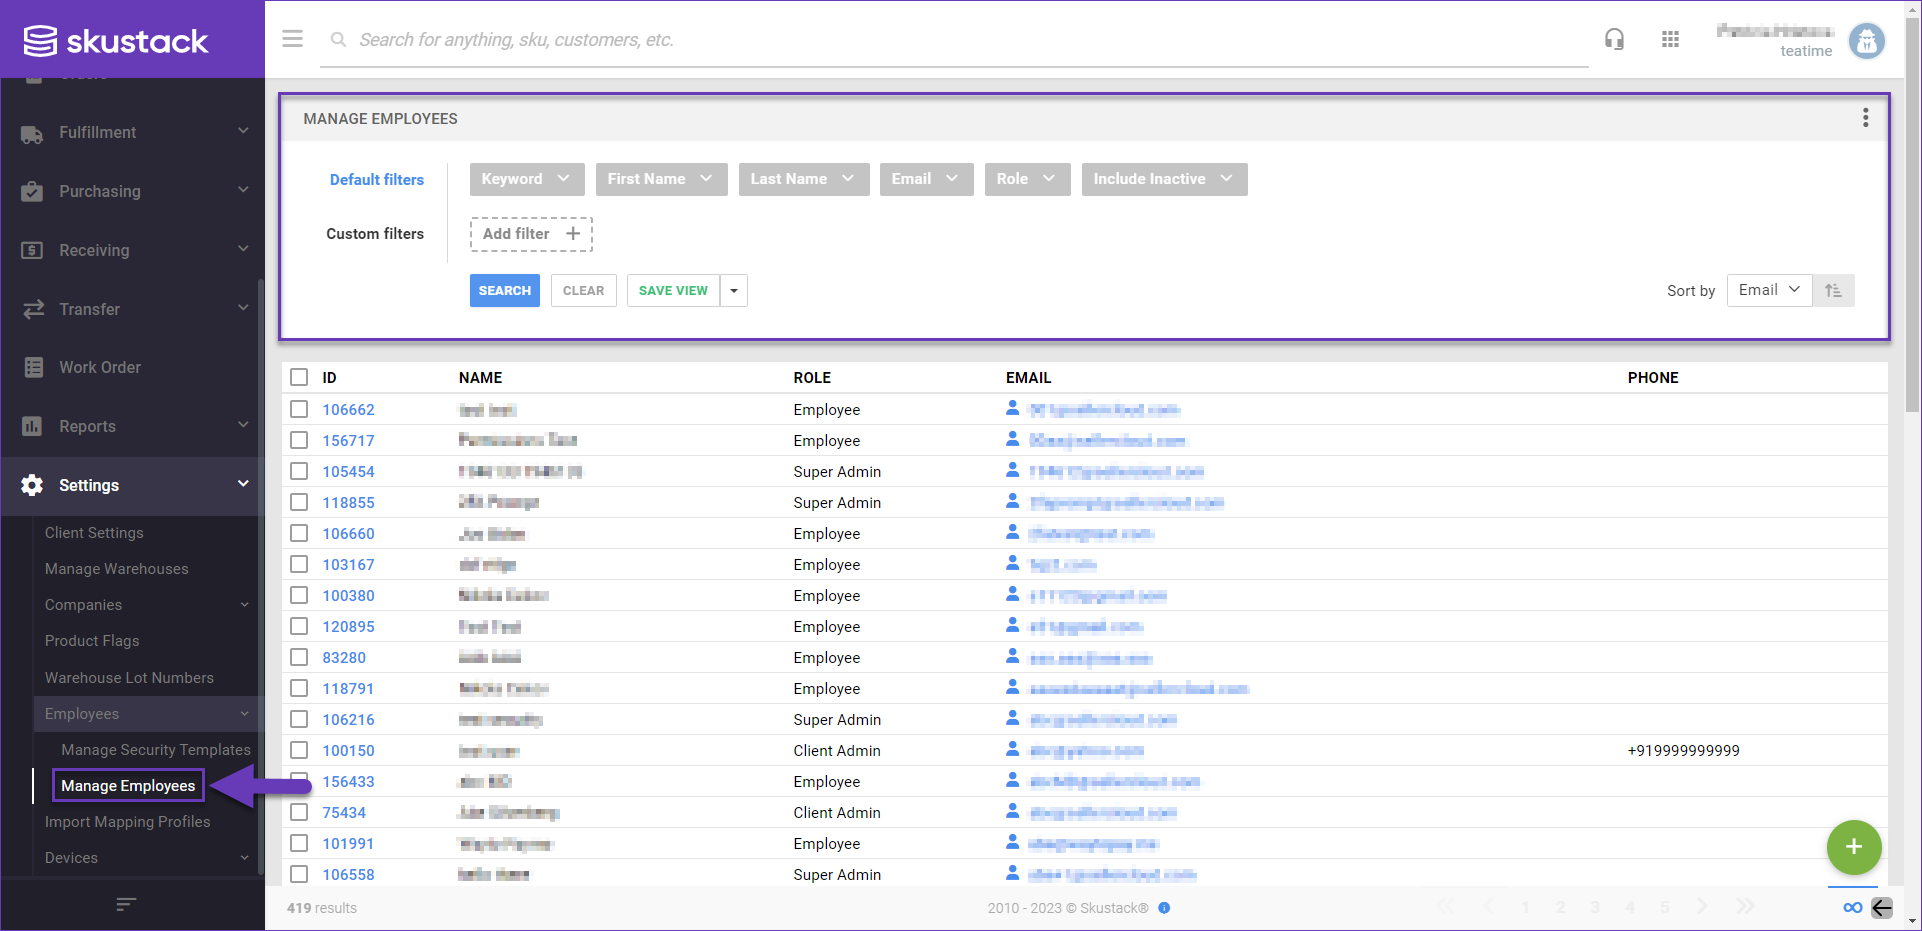
- On the left, select Settings > Employees > Manage Employees.
- Configure your Default filters to make sure that the results display exactly what you need.
- Click Search. Each filter you apply gets highlighted. If a filter is gray or not displayed at all, it’s not active.
- To manage the columns in the grid, click the three dots icon on the top right and select Customize Columns. You can:
- Reorder columns by dragging them up or down in the list;
- Hide columns by clicking the Trash icons;
- Add columns by clicking Add column.
- To arrange the data in a different order, use the Sort by menu.
- To save your filtering and sorting options, click Save view, enter a Name, and click Save.
- Click the + icon at the lower right-hand corner to add a new employee, or select an employee from the grid and access the Actions menu to either Update Per-Company Permissions or Delete an employee account.
Create an Employee
To add a new employee:
- Navigate to the Manage Employees page.
- Click on the green + icon in the lower right-hand corner.
- Populate the fields.
- First Name
- Last Name
- Email — The email the user will use to log into Skustack. The email address must be valid!
- Password — Sets a first-time password that the user can change once they log in.
- Company — Sets the default company for the employee.
- Security Template — If applicable, select a template from the drop-down menu.
- Send Welcome Email — Sends welcome email to the user.
- Click Add.
- An employee is created. You can now view and manage the employee’s information from the Employee Details page.
Grant Access
Access to Skustack is only available to Users with sufficient permissions.
If your role is a Client Admin, you can grant or revoke access to yourself and other users either individually or in bulk.
Individually
To grant access to Skustack for a specific employee:
- Navigate to the Manage Employees page.
- Click the Edit icon in the Details panel.
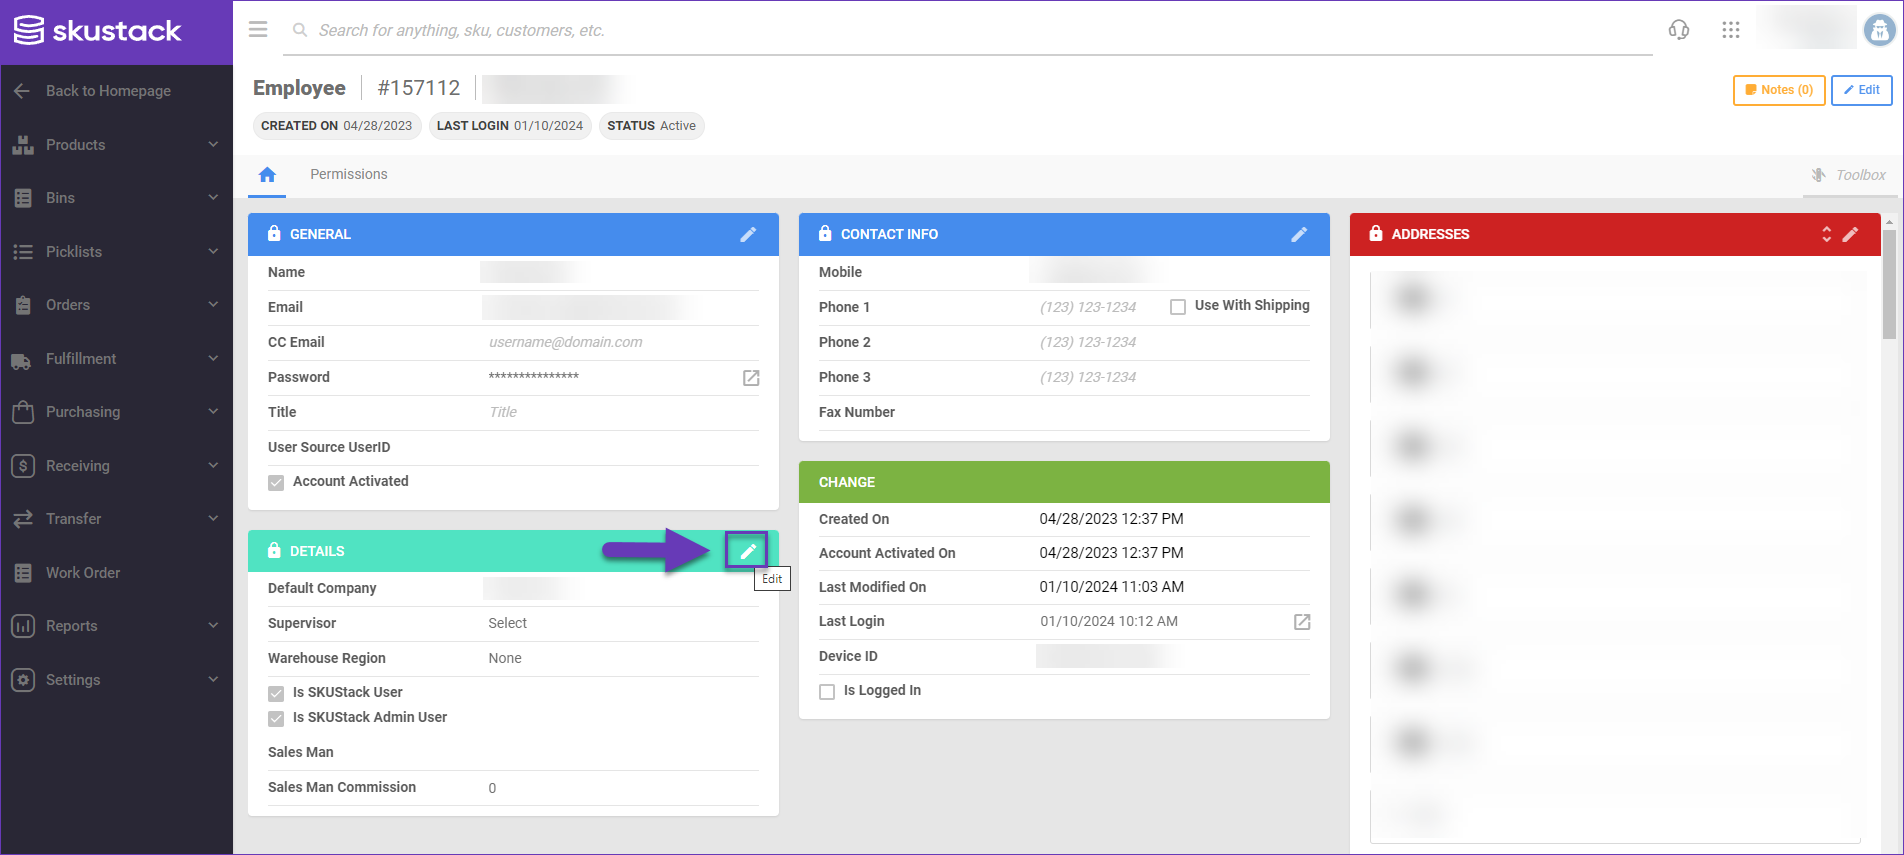
- Select the Is SKUStack User checkbox. If you wish to grant Admin access rights, you should also check the Is SKUStack Admin User box.
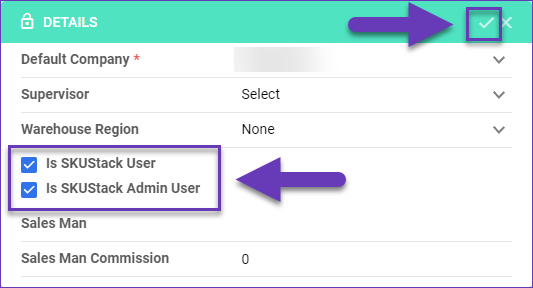
- Save your changes.
In Bulk
To grant access to multiple users simultaneously:
- Navigate to Settings > Employees > Manage Employees.
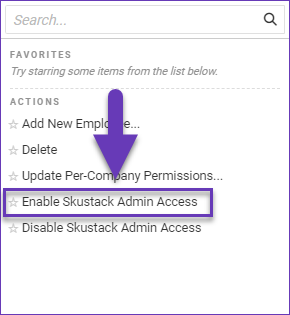
- Select the desired users and click on the Actions menu in the lower right-hand corner.
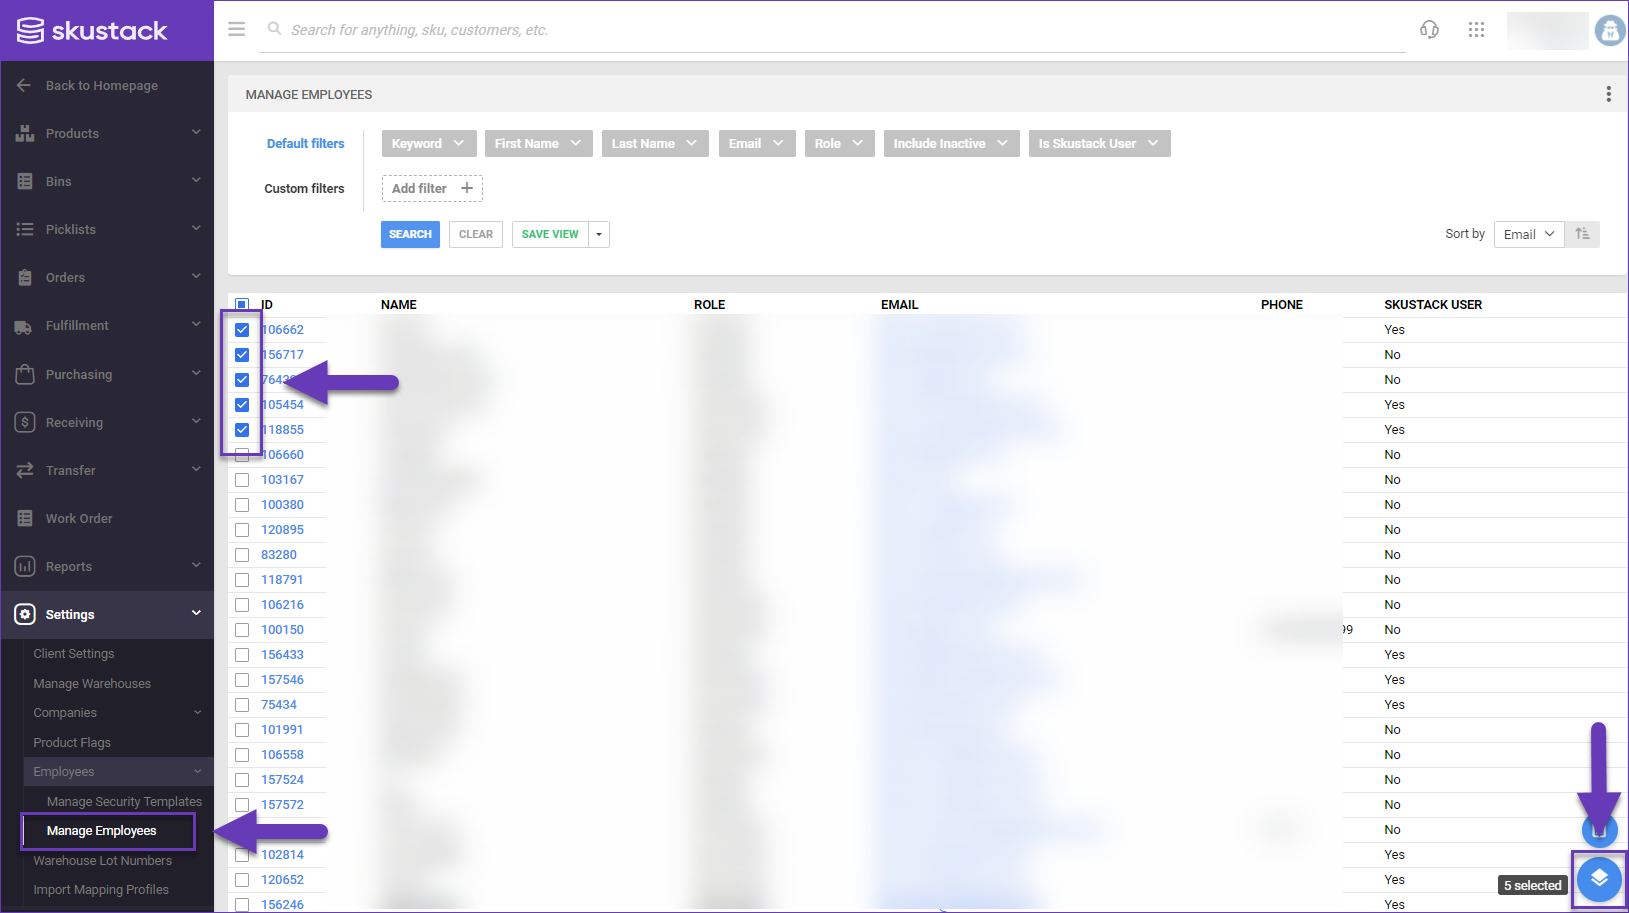
- Click Enable Skustack Admin Access. To remove access rights, choose Disable Skustack Admin Access.
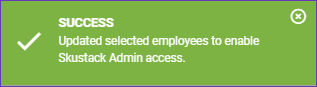
- A success message will validate the access update.
Employee Details
The Employee Details page displays information about each employee, such as their name, username, email address, job title, and access level. It also shows the date the employee was added to the system, their last login date, and their current status. In addition, the toolbox provides you with several functionalities, including the ability to manage and customize the employee’s device settings.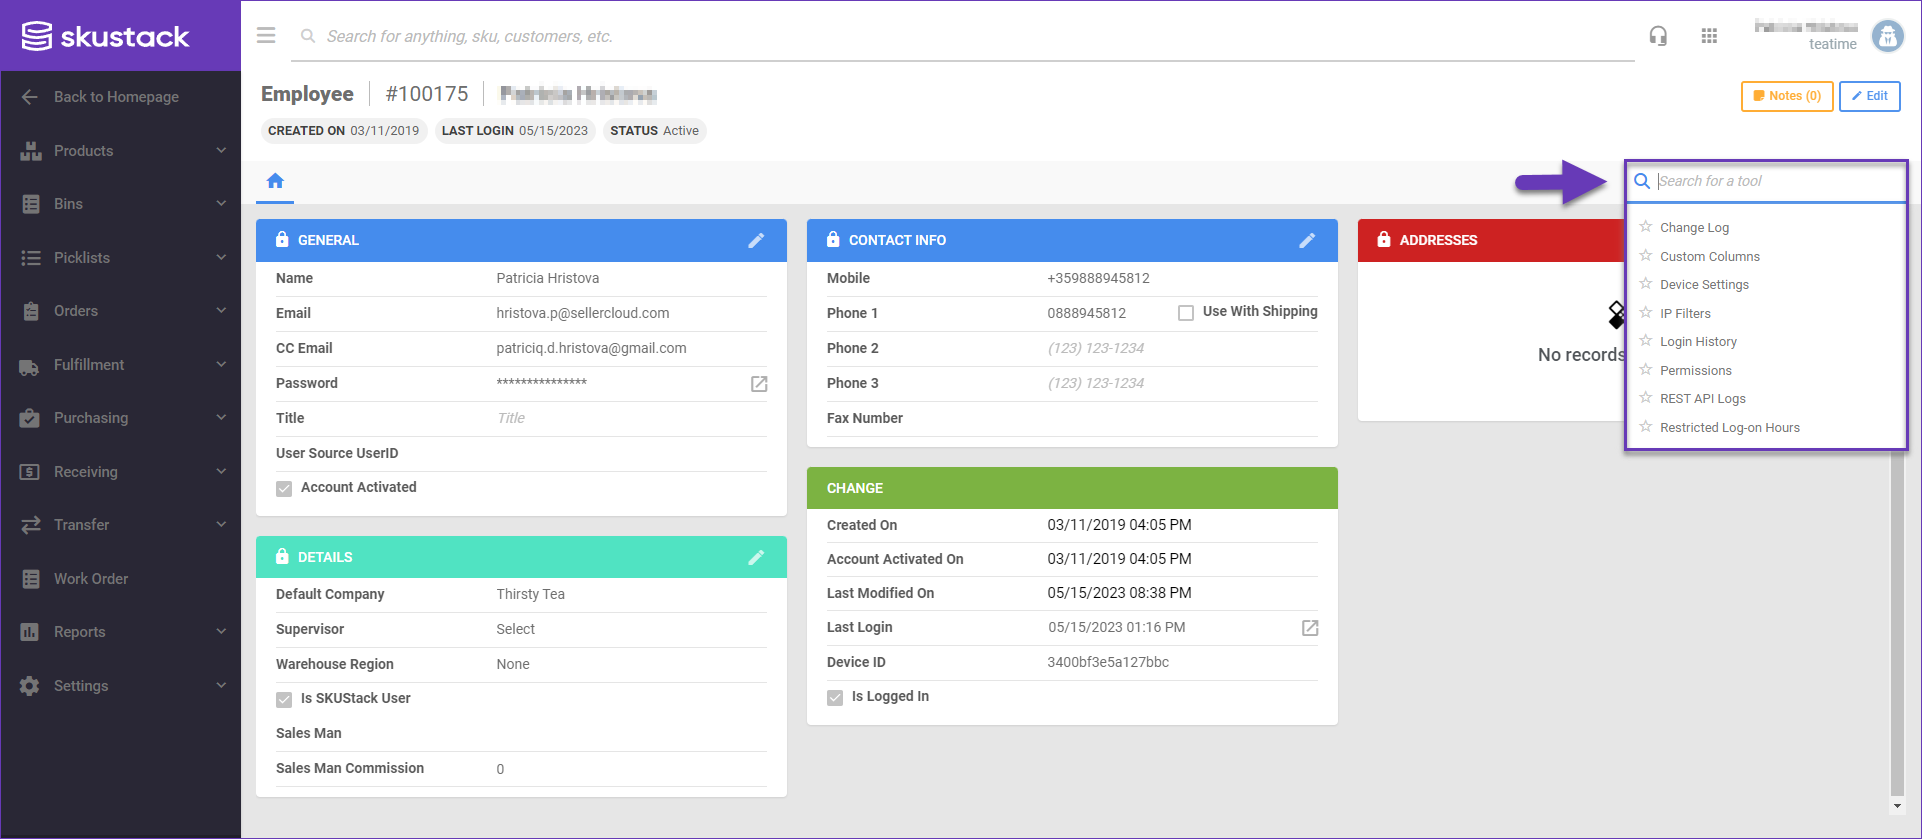
General Panel
| Field | Description |
| Name | Employee’s Name. |
| Employee’s Email Address. | |
| CC Email | Employee’s CC Email. |
| Password | Employee’s Password. |
| Title | Employee’s Job Title. |
| User SourceID | Employee’s ID Number. |
| Account Activated | Indicates if the employee’s profile is active. |
Details Panel
| Field | Description |
| Default Company | Employee’s default assigned company. |
| Supervisor | Employee’s direct manager, if applicable. |
| Warehouse Region | Employee’s assigned warehouse region, if applicable. |
| Is SKUStack User | Indicates if the employee has Skustack access. |
| Sales Man | This is the email address of the Sales Representative, if applicable. |
| Sales Man Commission | Sales Representative’s commission percentage. |
Contact Info and Addresses
Here you can see Employee’s contact info, such as Name, Email Address, Password, Title, and Address. You can also edit the information in the different panels by clicking on the edit button in the upper right-hand corner of each panel.
Change Panel
| Field | Description |
| Created On | Date and Time when the Employee account was created. |
| Account Activated On | Date and Time when the Employee’s account was activated. |
| Last Modified On | Date and Time when the last changes were applied to the Employee’s account. |
| Last Login | Date and time of the Еmployee’s last login. |
| Device ID | Employee’s Device ID number. |
| Is Logged In | Indicates if the Employee is currently logged in. |
Toolbox
The Toolbox on the Employee’s Details page provides additional functionalities.
| Field | Description |
| Change Log | The Change Log shows all changes made to the Employee’s profile. Also, who initiated the edits and when. |
| Custom Columns | Employee Custom Columns. |
| Device Settings | A variety of settings that can be customized on each device. Learn more here. |
| IP Filters | Displays IP-based filters. You can restrict access to specific IP locations for better security. You can also add IP Addresses by clicking on the + icon.
The Client Setting Enable IP Address Filter For Employee must be enabled. |
| Login History | Here you can see Employee’s log-in sessions. |
| Permissions | Here you can configure Employee’s Permissions relating to which sections of the Skustack Admin they have access to and what actions they are allowed to perform. |
| REST API Logs | Shows All Rest API requests and responses. |
| Restricted Log-on Hours | You can set specific times of the day when the employee is allowed to log in and use Skustack.
Client Setting Enable Employees Login Hours Restriction must be enabled. |
Employee Roles
There are two types of user roles: Client Admin and Employee. Note that each user can only have one role.
| ROLE TYPE | ACCESS LEVEL | DESCRIPTION |
| Client Admin | User access is extended to everything within their client profile. | This role provides access to everything. Therefore, the permissions for this role can never be edited and are locked by design.
This role manages the permissions for users who have the Employee role. |
| Employee | User access is limited to the permissions that the Client Admin has granted to them. | Permissions are designed for this role.
The Client Admin can create security templates that can be used to apply the same permissions to multiple employees. |
Employee Permissions
Permissions are set on an Employee level by Client Admins. To access Permissions:
- Go to Settings > Employees > Manage Employees.
- Select an Employee > Toolbox > Permissions.
- Click Edit to adjust the permissions as needed.
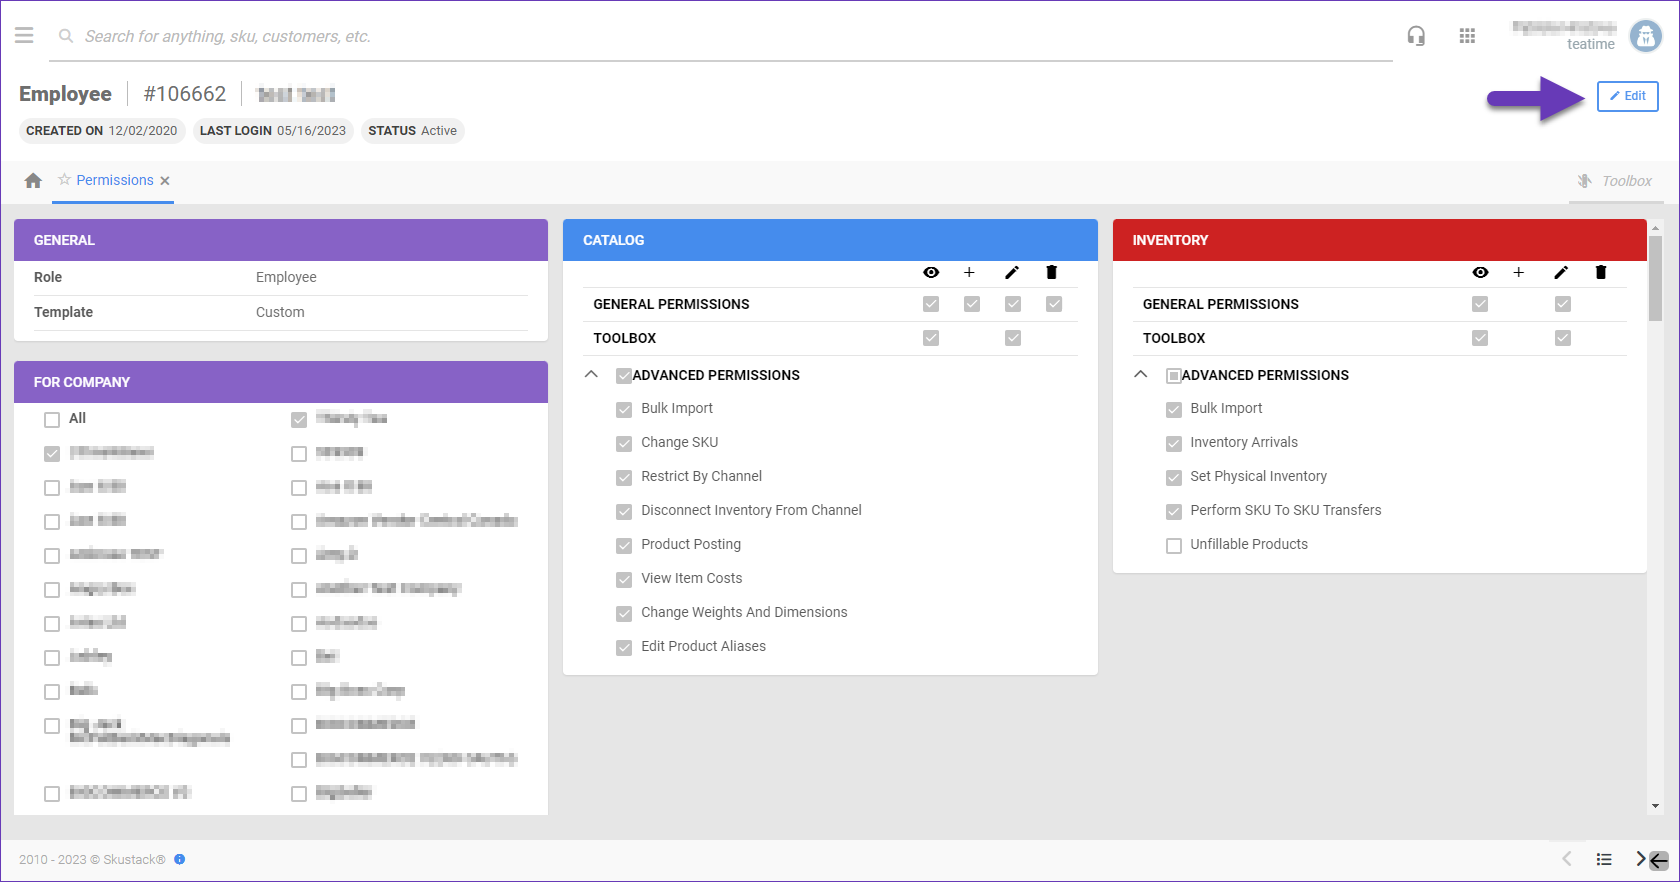
On each page tab, you will find the following icons: View, Create, Edit, and Delete. Hovering over any of these icons will reveal their corresponding names. These icons serve as indicators for the available permissions, which can be set by checking the checkboxes located beneath them.
Types of Permissions
There are three components to a user’s permissions:
- Role type – The level of access (Client Admin or Employee).
- Permission type – This specifies the tasks – View, Edit, Create, Delete, or Advanced – that a user is permitted to perform on a given entity:
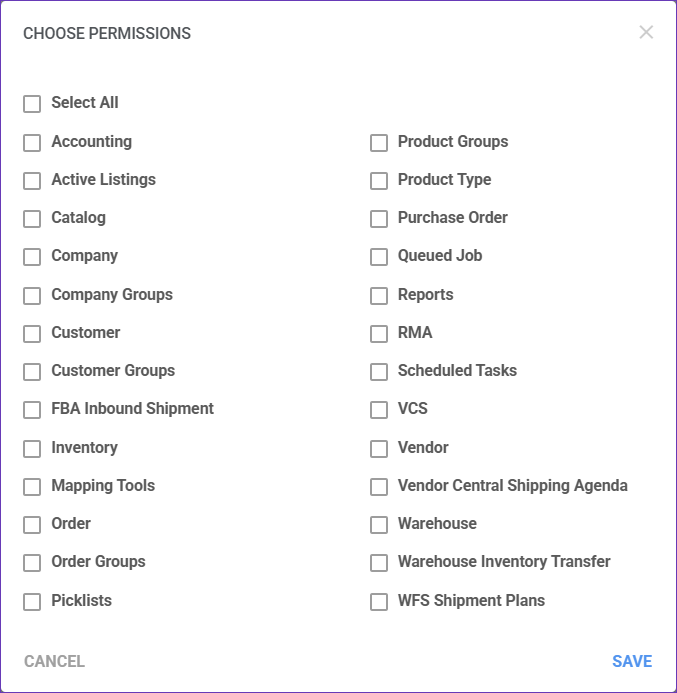
- Entity – A data structure, and its related functionality. Examples of entities include:
- Set Physical Inventory
- Perform SKU To SKU Transfers
- Change Weights And Dimensions
- Inventory Arrivals
Each entity has up to five potential permission types:
| PERMISSION TYPE | ACTION(S) |
| View | Users can see entity-related data. This is the lowest level of permission. |
| Edit | Users can make changes to an existing entity member (fields, statuses, etc.). |
| Create | Users can create a member of the entity. For example, if a user has Create rights for Catalog, they can create a product. |
| Delete | Users can delete a member of an entity. |
| Advanced Permissions | These are specific, entity-related tools or actions that a Client Admin may want to restrict from certain employees.
Not all entities have Advanced Permissions. |
Add New Permissions to an Employee
A Client Admin can set permissions for each entity and choose the companies to which the permissions apply. To grant permissions to an employee for areas they currently do not have access to, proceed as follows:
- Go to Employees > Manage Employees > Click the employee’s ID > Toolbox > Permissions > Edit.
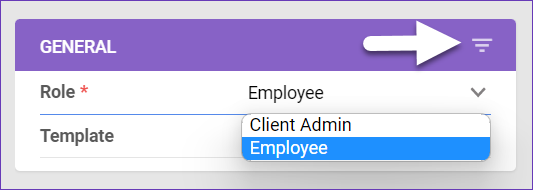
- You can click on the employee’s Role dropdown > Select Client Admin to grant permissions to the entire system > Save.
- From the top-right icon of the General panel, you can select the entities that the Employee can access.
- On the For Company panel, you can select which companies the selected Employee can access. Note that the Client Admin can only define one set of entity permissions per user, which they can then apply to different companies for that user.
Manage Security Templates
Users with a Client Admin role can create Security Templates that define a complete set of permissions. These templates can then be easily applied to any employee from the Employee Details page.
There are two ways to create a security template: create an entirely new one, or save an employee’s permissions as a new template.
Create New Templates
- Go to Employees > Manage Security Templates, and click on the Add icon at the lower right-hand corner to create a template.
- Optional: Click on the Copy From dropdown to choose an existing template’s permissions.
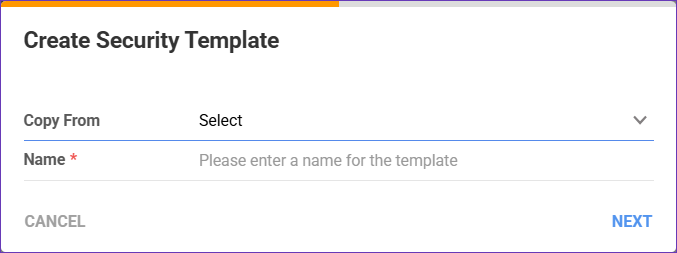
- Click Next and open the new template to apply the required permissions.
- Click Create.
Save Security Templates
You can save security templates based on specific permissions granted to an employee:
- Navigate to the Employee Details page.
- From the Toolbox, select Permissions.
- Click Edit to make any necessary adjustments.
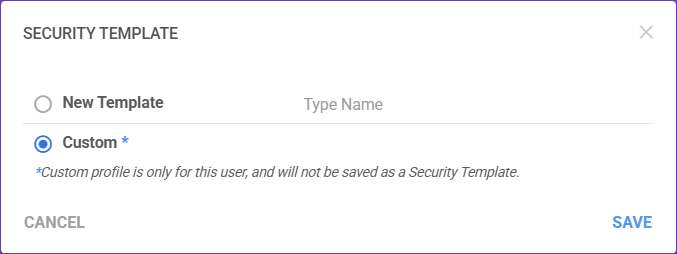
- Click Save and select:
- Custom profile – The settings are saved as a unique profile specific to this user.
- New Template – To save the profile as a Security Settings Template, which can be assigned to multiple users.
Assign Security Templates
You can assign existing Security Templates to your employees either individually, or in bulk.
Individually
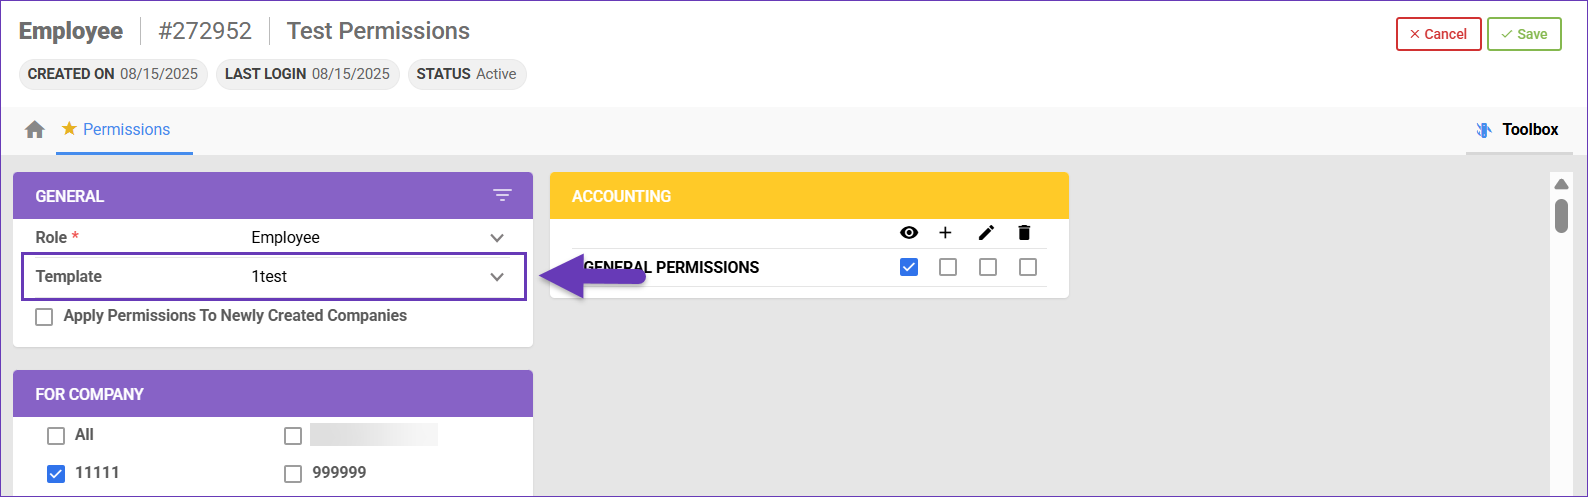
To assign a Security Template to an individual user:
- Navigate to the required Employee Details page.
- From the Toolbox, select Permissions.
- Click Edit.
- In the General panel, select an existing Template from the dropdown.
- Click Save.
In Bulk
You have two methods to assign a Security Template to multiple employees – either from the template itself, or from the Manage Employees page.
From the Security Template
To assign an existing template to multiple employees:
- Navigate to Settings > Employees > Manage Security Templates and open the required Security Template details page.
- Click Edit.
- Click the three-dot menu on the General panel header and select Apply Template to Employees.
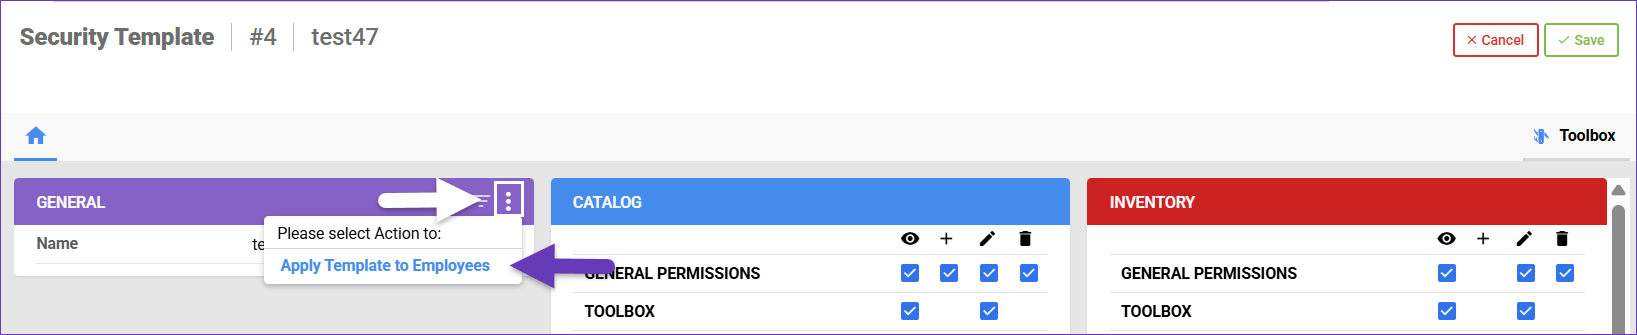
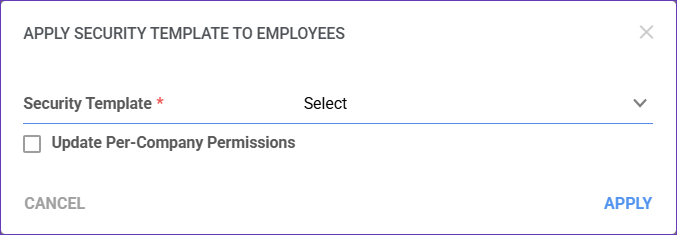
- Select the required employees. Optionally, check Update Per-Company Permissions to specify which companies the employee should have access to.
- Click Apply.
From the Manage Employees Page
You also have the option to select multiple employees, then choose the appropriate security template to assign:
- Navigate to Settings > Employees > Manage Employees.
- Select the users you want to update.
- Click the Action menu in the bottom right corner and select Apply Security Template.
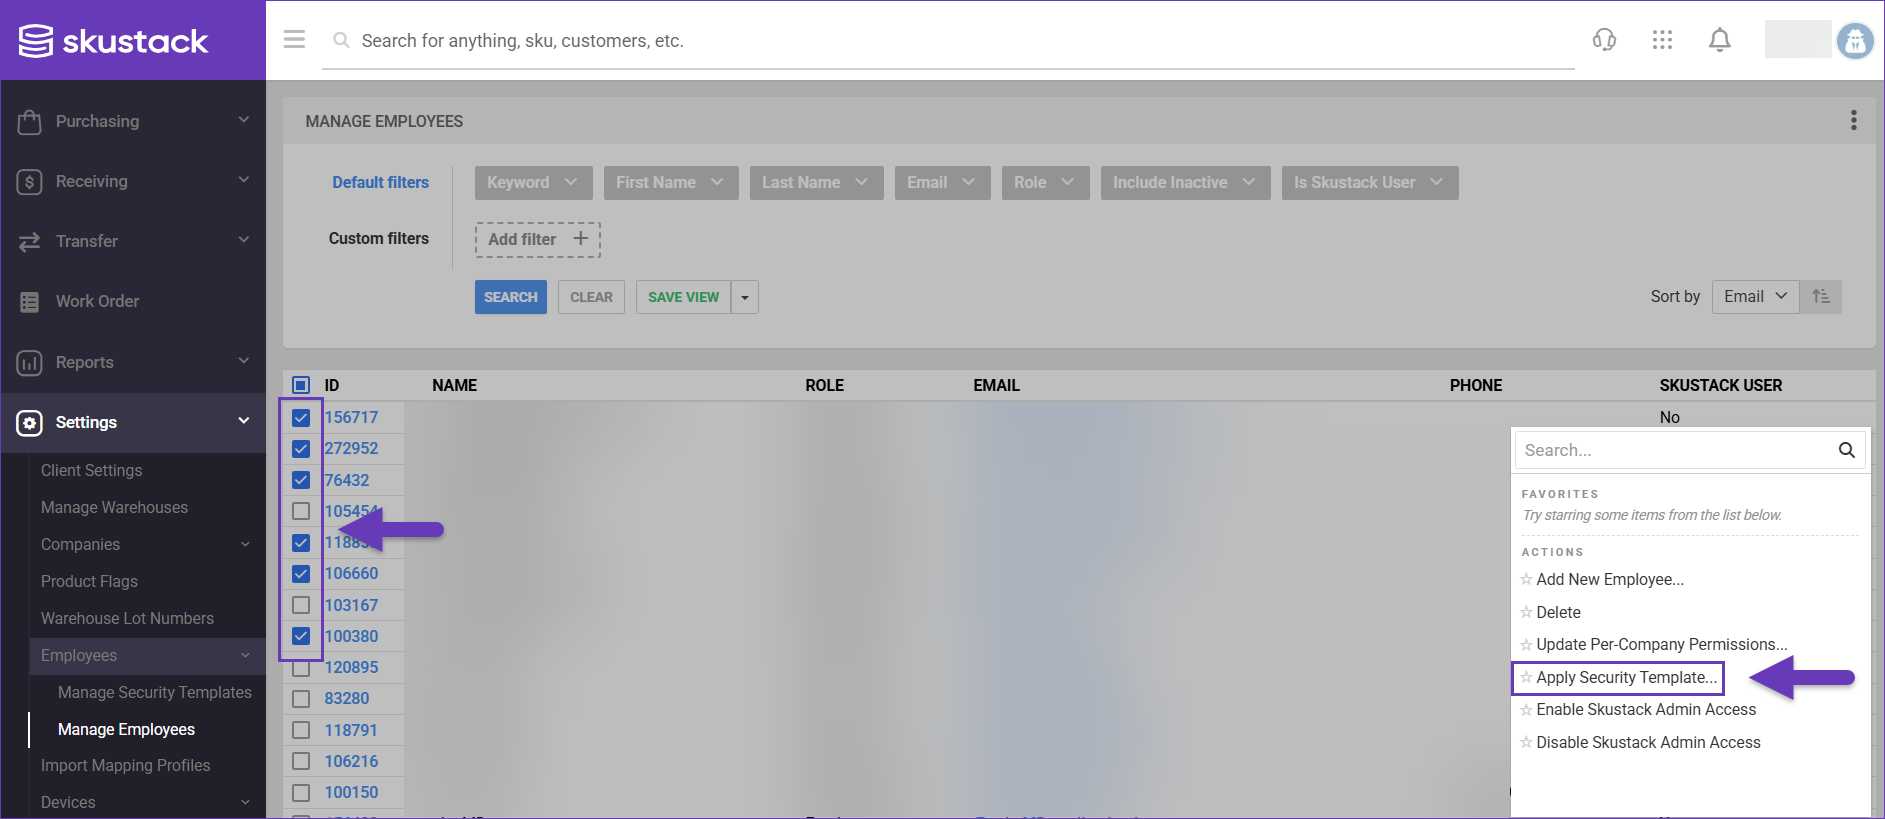
- Select a Template from the dropdown. Optionally, check Update Per-Company Permissions to specify which companies the employee should have access to.
- Click Apply.